2012

Scrappy Trees Tutorial

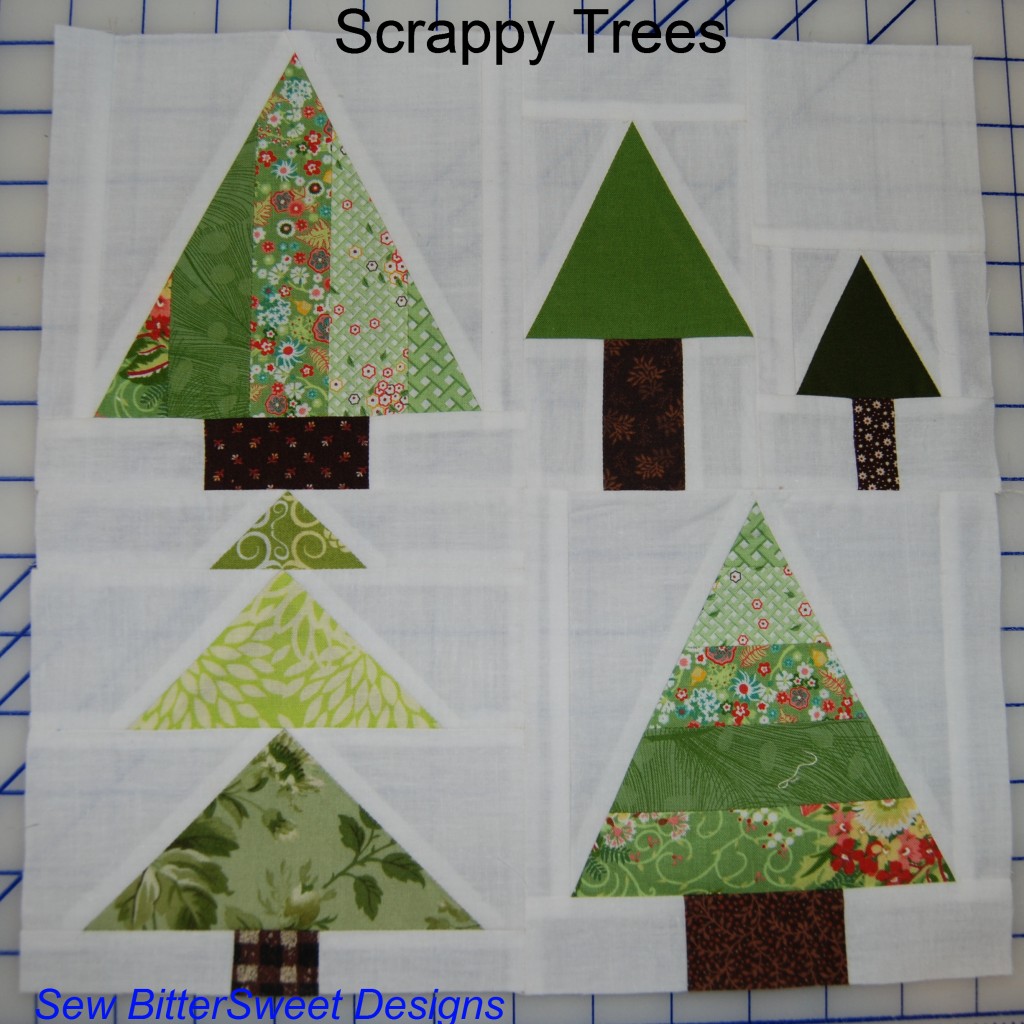
I was so excited when Kim from Kim’s Crafty Apple asked me if I would be interested in doing a tutorial for her Home Sweet Home QAL. I immediately jumped in with both feet and said YES! A couple weeks later PANIC set in – as it always does when I have a deadline and absolutely NO idea what I am going to make.  At first I tossed around the idea of a Tree House of some sort – after all Anne is obsessed with Berenstain Bears and as you probably know, they live in a killer tree house.  As I played and tooled around, I ended up designing a few blocks in EQ7 of scrappy little trees.

If this is your first time to my blog, WELCOME! Please take a few minutes to look around, I have a tutorials page with over 30 free tutorials for quilts, blocks & techniques and I am hosting a very generous giveaway right now from Fat Quarter Shop.

The nice thing is that each individual tree makes a 6.5” (6” finished) block – so if you would like to make 6” blocks from the individual trees you can.

Three of the trees were made using the Tri-Recs ruler – provided to me by Fat Quarter Shop (stop by tomorrow for another tutorial and for a review on it). I have provided PDF downloads of templates for those of you who do not own the Tri-Recs ruler and would like to make this block.

For the Double Tree Block – please go here to download the templates.

For the Pine Tree Blocks – please go here to download the templates.

Each of these blocks was made entirely out of scraps – including the Kona White background – I used 1 strip measuring 3.5” wide for the entire project. All seams are ¼” – you can press open or to the side (whatever is comfortable for you).

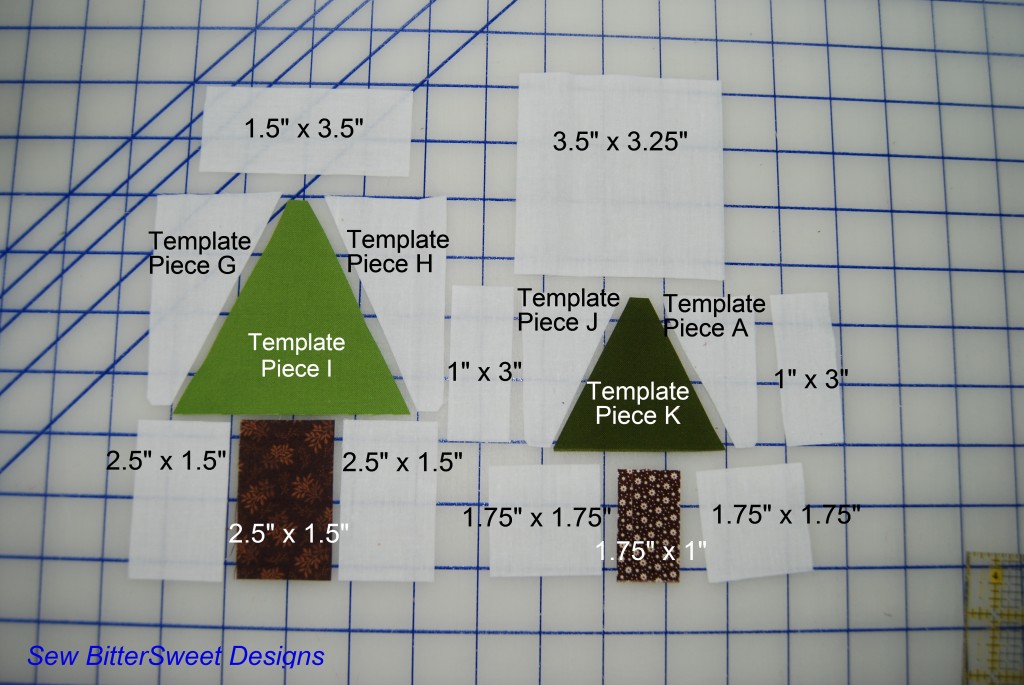
For the Double Pine Tree Block – cut scraps according to image:

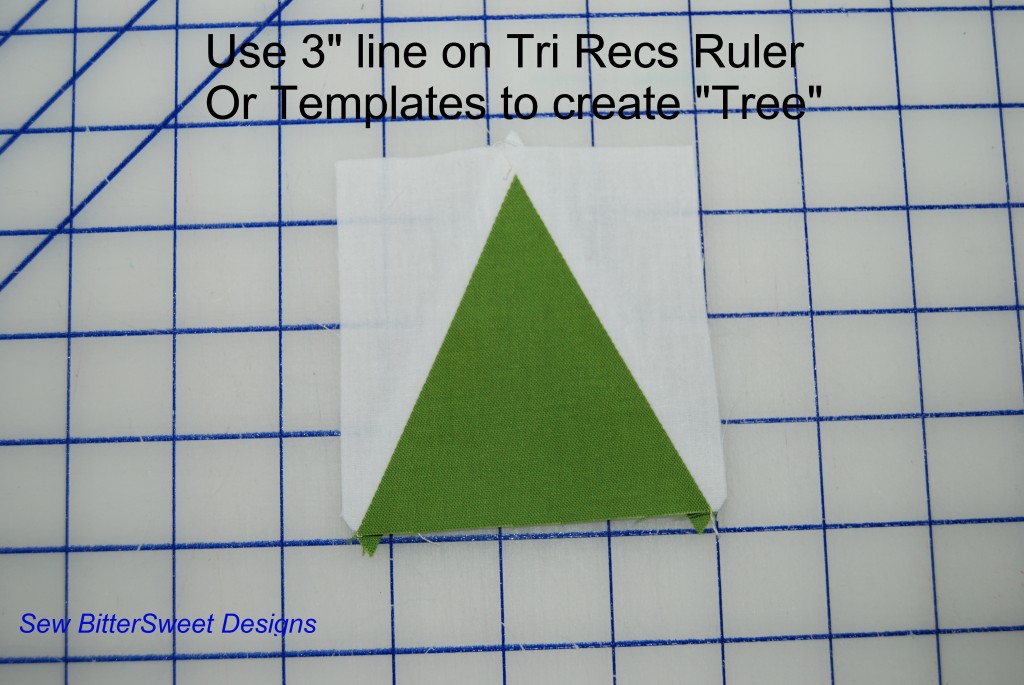
First you will want to create your “tree sections”

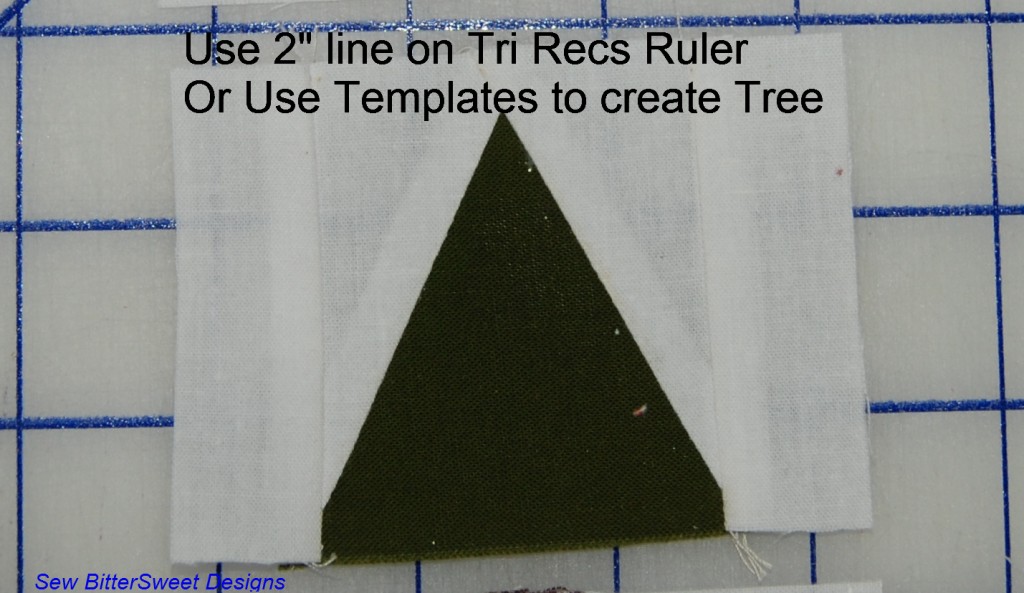
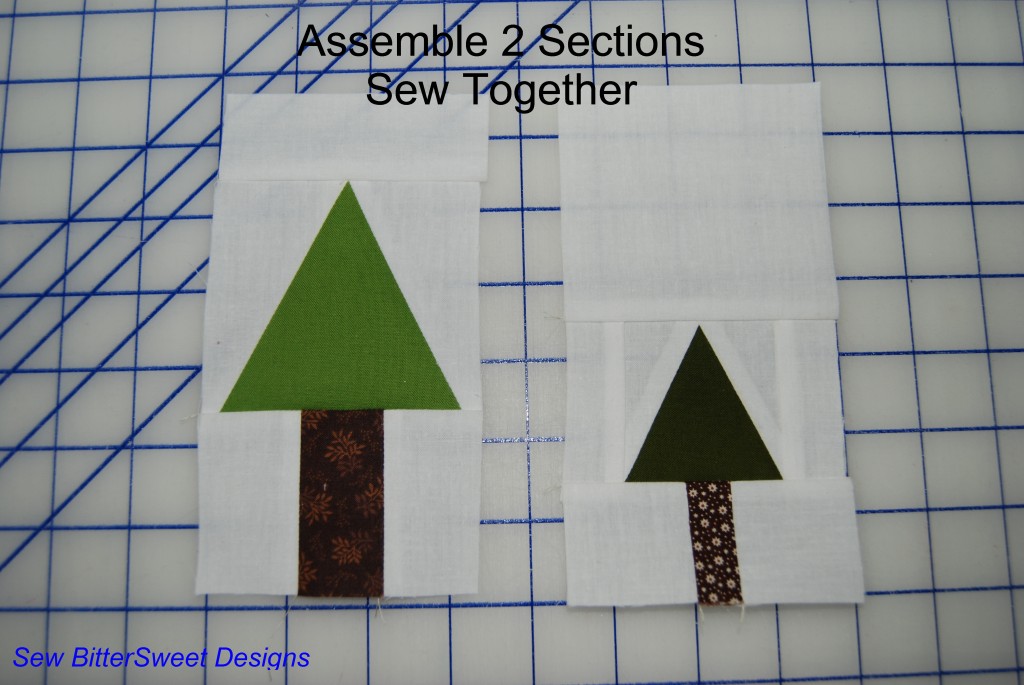
Next you will want to assemble the individual tree sections (effectively splitting the block in half):

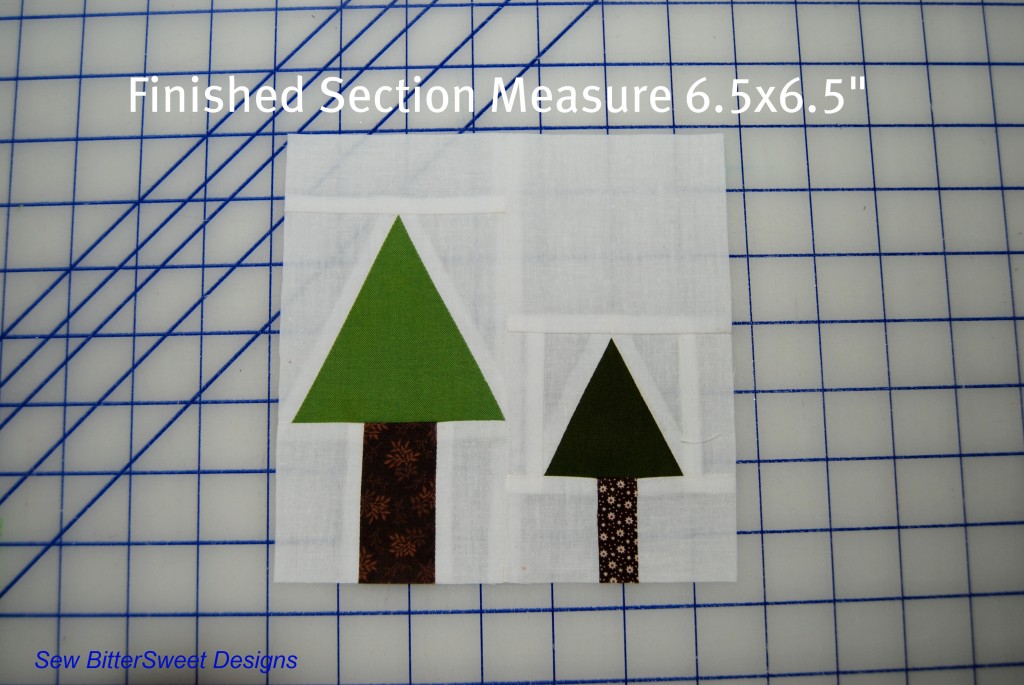
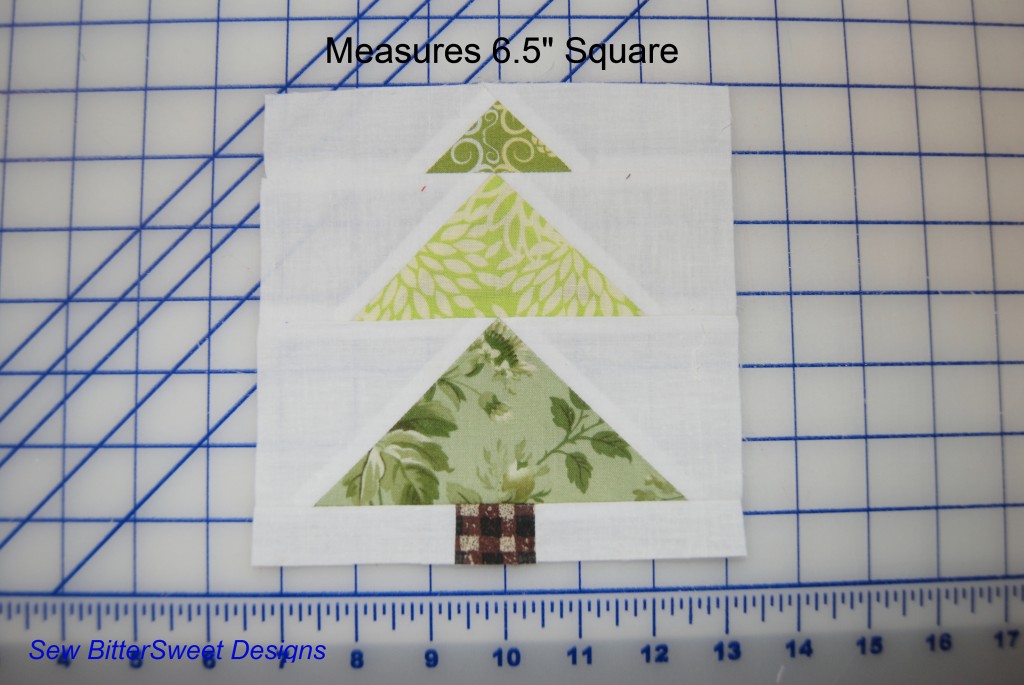
Finished block measures 6.5” Square

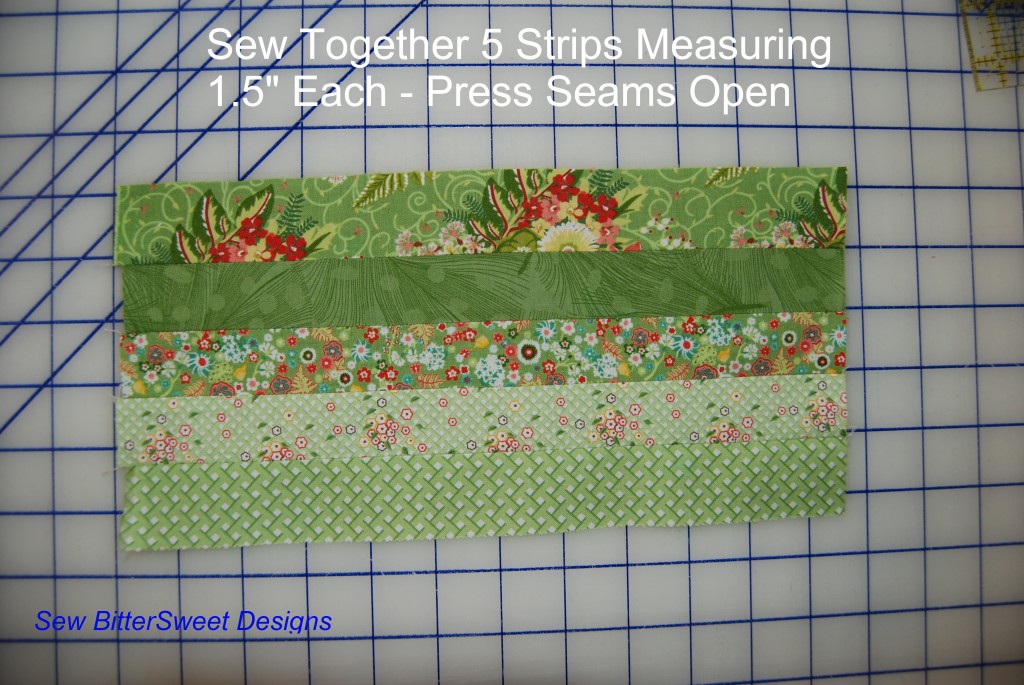
For the two Striped Pine Tree Blocks you will want to start by sewing together 5 strips of fabric measuring 1.5” x 12”

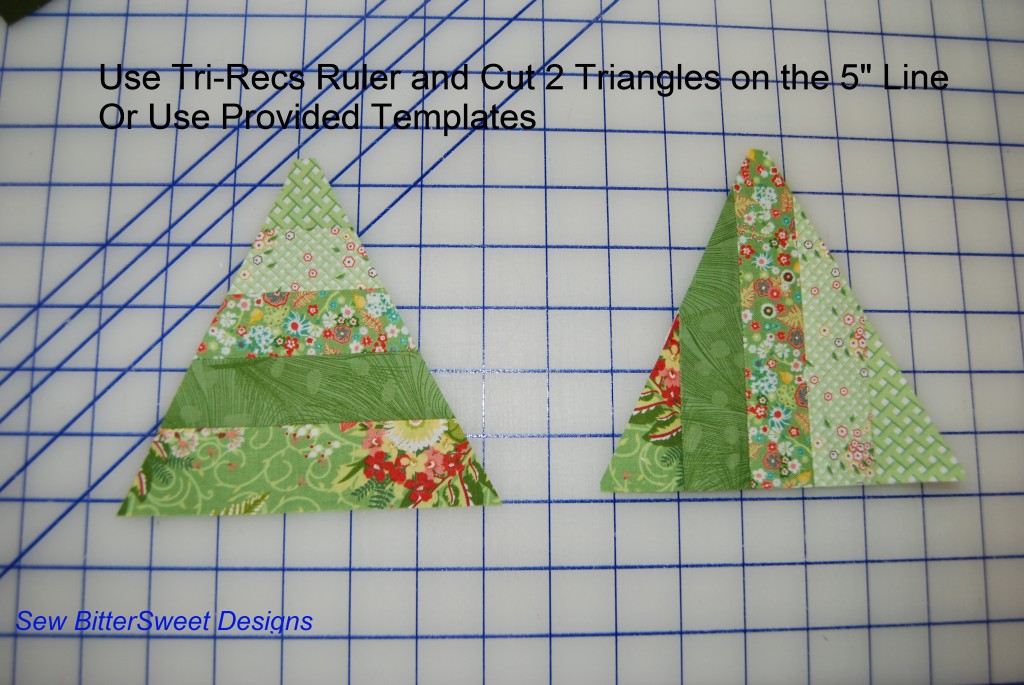
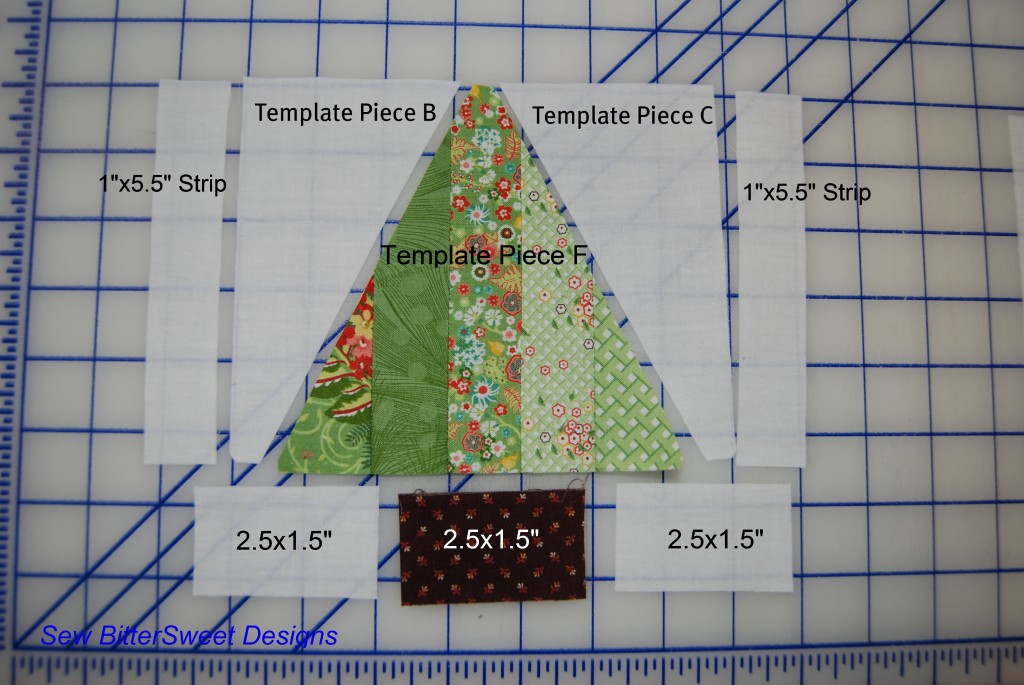
Then using the Tri-Recs ruler or the provided templates – you will want to cut out your tree sections. One will be horizontal stripes, the other will be vertical (simply turn the fabric before cutting):

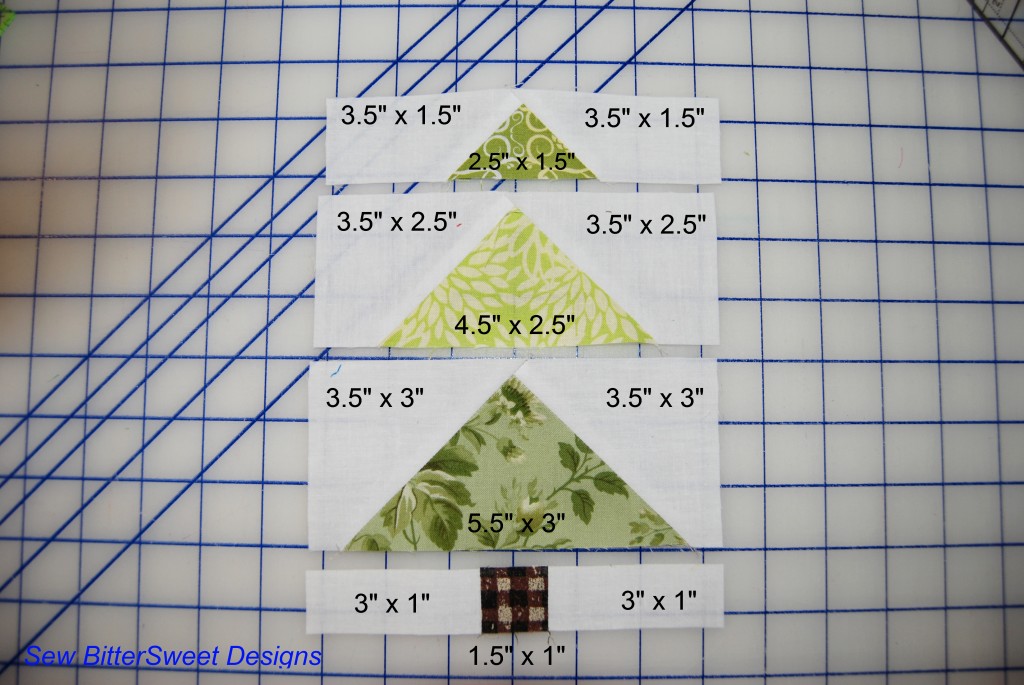
Following the cutting measurements on the next 2 images for the background and tree trunks:
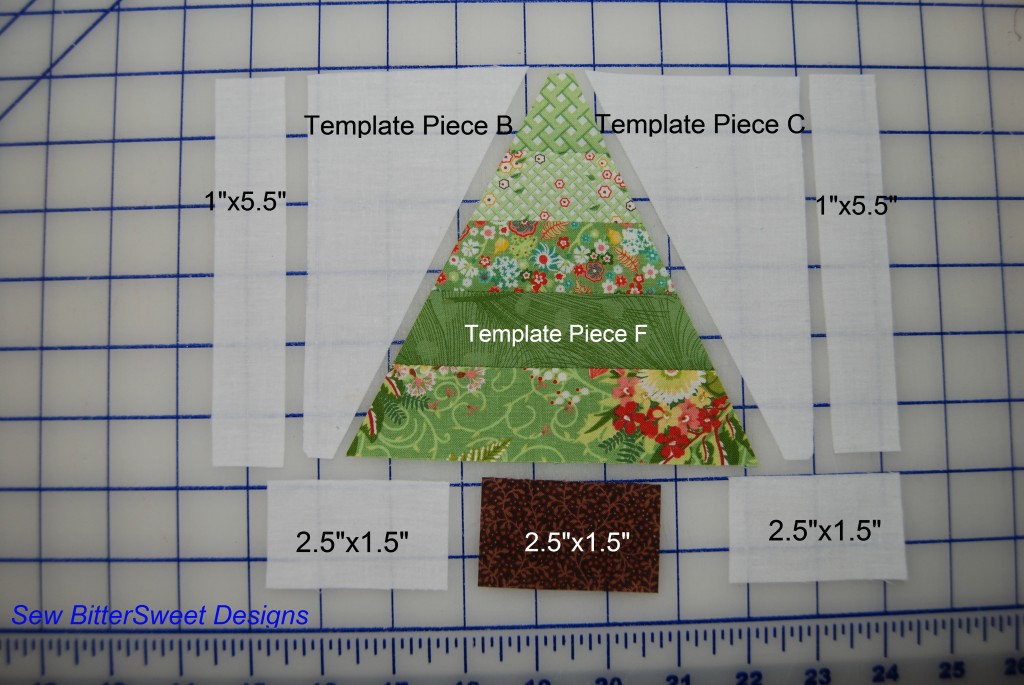
Sew your sections together and voila! Two scrappy pine trees

Sorry about this next block – it was easier to show you the cutting measurements on a partially assembled block:

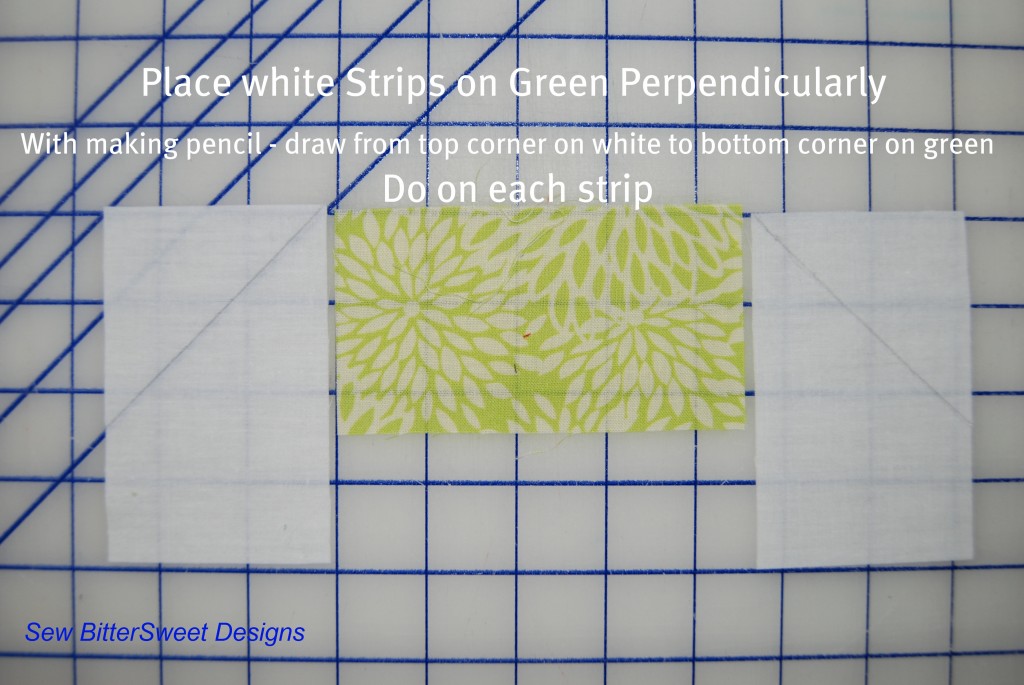
(The technique is the same for each section of the tree, I am demonstrating on the center section – the first section is small and it was hard to get good pictures)

With one white strip at a time, place it perpendicularly on your green strip and use your ruler to draw a line from the upper corner of your white fabric to the bottom corner of your green fabric. Do the same on both sides of the green fabric. Your lines should slant down on your white strips in opposite directions (picture flying geese, except these are rectangles not squares).

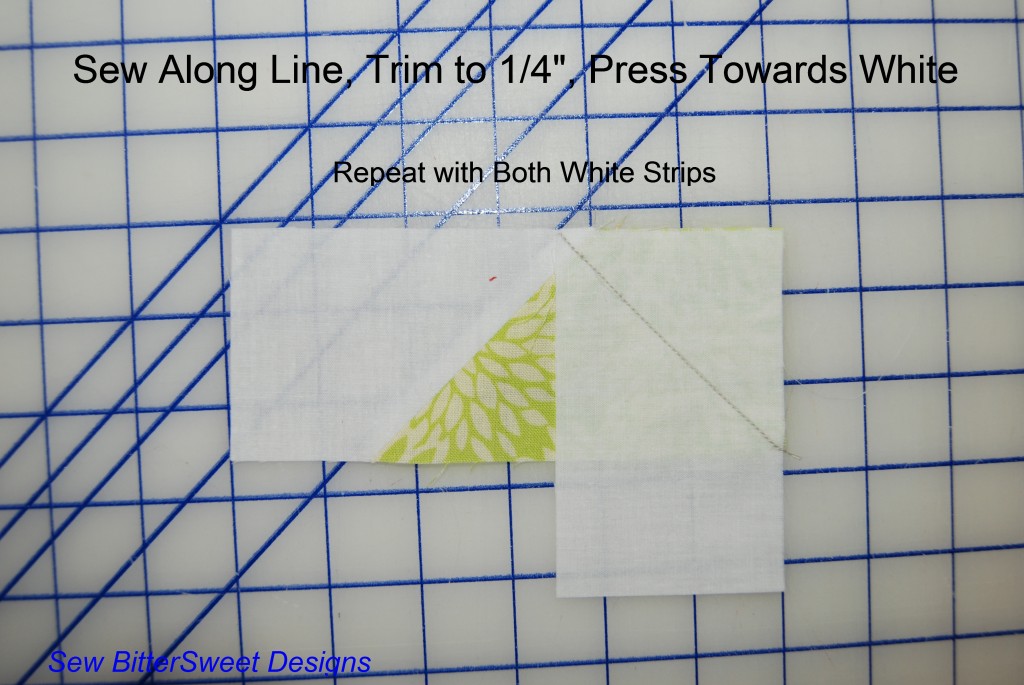
Next place your white strip on the green strip and sew along the line you drew. Trim to ¼” and press open, repeat with the other white strip. Once trimmed the entire strip should measure 6.5” long.


Sew on your bottom section with the tree trunk and you are done! Block should measure 6.5” square

Layout your 4 blocks in a way that makes you happy and sew them together!

Please let me know if you have any questions at all or if you need more pictures! And thank you Kim for hosting such a fun QAL and allowing me to be a part of it!

I’m linking up to Quilting By the River

Sponsor Highlight & Giveaway – Fat Quarter Shop

One of the things I have really come to love about blogging is the conversation.  One of the things that  I love about Fat Quarter Shop is that they are a HUGE part of the conversation. One of the most generous supporters of this wonderful community, Fat Quarter Shop, is not only a great place to shop but it is also a wonderful place to learn and be inspired.

Fat Quarter Shop is on of my favorite places to go and fantasize – my budget only goes so far…so a lot of fantasizing goes on! I mean seriously they have 29 pages on their coming soon section with fabrics that can tickle just about ANYONE’s fancy. Hello reproduction prints, children’s prints, modern, Christmas, and the list goes on!

Here are a few of my favorites that are coming out in the near future:

I grew up reading Peanuts in the Sunday comics – this is so adorable! I see an Advent Calendar in my future!

Doesn’t this just look adorable? I am seeing a baby blanket – now will one of my friends please get pregnant – so I have an excuse to buy this when it comes out!

How much do you love this print – perfect for a boy or girl – so much fun!

Fat Quarter Shop recently sent me a new little notion to try out – the Tri-Recs Tools – tomorrow I will be showing you a fun block using it and doing a full review on Wednesday, so be sure to stop back to see both these posts!

As a testament to their continued generosity Fat Quarter Shop has a little giveaway for you today and there will be FOUR, count them 1 – 2 – 3 – 4, winners! How would you like to win a little Hello Luscious?

That’s right, Fat Quarter Shop is giving away 4 Charm Pack to 4 different winners. Do you want to win? There will be 3 chances!

1. Follow Fat Quarter Shop on Twitter or Pinterest (not on Pinterest yet, email me – melissa (at) sewbittersweetdesigns (dot) com,  and I will send you an invite!) – leave a comment telling me how you are following them! (Don’t twitter or Pinterest? Go sign up for the Fat Quarter Shop Newsletter and let me know you did!)

2. Go like my Facebook Page – Google Friend Connect is going away and this is a great way to keep in touch! Leave me a comment telling me you are a current or new Facebook friend.

3. Follow me on Twitter – leave me a comment with your twitter name.

This giveaway runs through March 2nd at 9:00 pm pacific time. I will announce the winner March 3rd before I head off to Sew Expo! I am using the And The Winner Is Widget. Good luck!

Twirling Around – Doing Something Good

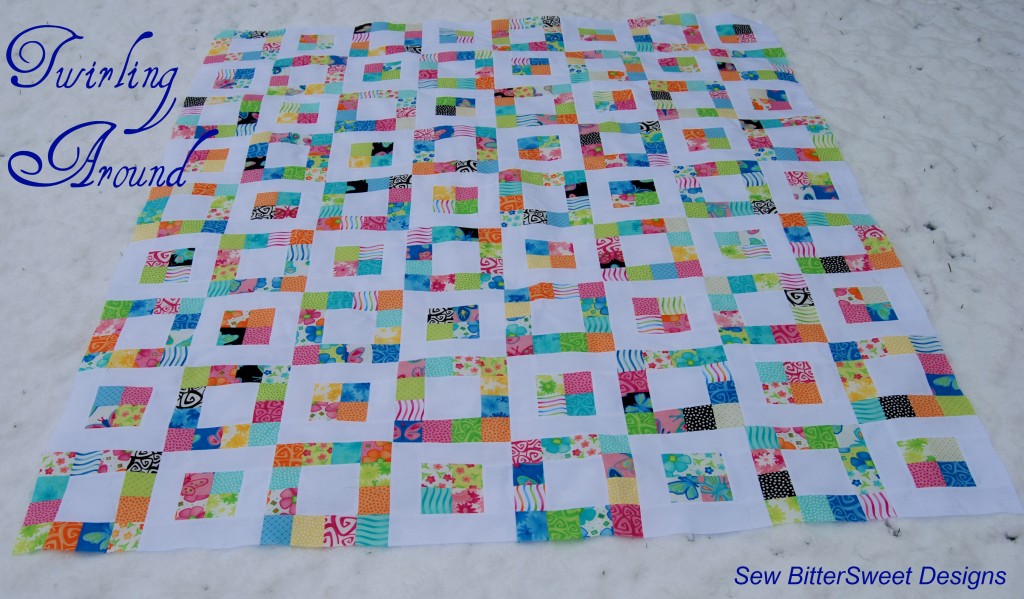
I normally do not post twice in one day, but today is special.  You may remember my Twirling Around Quilt that I posted pictures of back in January.

Well, yesterday, Julie from The Intrepid Thread made a wonderful announcement on her blog – you can now buy my very first pattern from Julie.

The pattern is being sold exclusively at The Intrepid Thread for $6.00. The best part is that all proceeds are being donated to Heartline – the charity that Julie helps support – on top of that…Julie is matching each donation dollar for dollar. This means, you spend $6.00 and $12.00 will be donated to Heartline.

And did I mention that Julie is have a great giveaway right now too!

Congratulations Are In Order!

I would just like to say again, you all are so incredibly talented! Thank you for sharing all of your beautiful creations with everybody! I would also like to take an opportunity to thank my wonderful sponsors and all of my fabulous blogging buddies who helped make the Valentine’s Day Showcase a success!

The First Place Winner – taking home a $75.00 gift certificate from Fat Quarter Shop is Susan Smith with her Valentine Mini Quilt Wall Hanging.

valentinecontest2Our Second Place Winner – taking home a $25.00 gift certificate to Contemporary Cloth is Rebecca from Our Busy Little Bunch.

image courtesy of: Our Busy Little Bunch

Our Third Place Winner – taking home a gift set from Sassy Packs is Gwen with her Love Sweet Love. (I couldn’t figure out how to show the picture here – sorry, Flickr was not my friend today!).

And now for a little surprise! I decided that we need a random surprise winner. Normally I resort to Mr. Random Number Generator but Anne had to have some testing done yesterday and I wanted to cheer her up – so I let her pick the winner 🙂  You will be happy to know it worked like a charm!

Congratulations to Cheryl! She submitted some hand sewn cookies – at a quick glance I thought they were edible, but I was wrong – they are stunning and clearly look good enough to eat!

You have won a charm pack of Ruby by Bonnie and Camille from my personal stash 🙂

All of the winners will be notified by email later today.

Have a great weekend everyone and come back Monday for another fun giveaway!!!

Superior Threads – The Bottom Line Review

Superior ThreadsThe Bottom Line

(Full Disclosure: Superior Threads provided me with samples of their threads and needles – the thoughts and opinions presented are my own)

I was first introduced to The Bottom Line by Superior Threads at a quilting shop in Idaho. I was looking for thread to quilt my Fancy Flocks quilt, I had already found the perfect thread for the top and I was looking for a bobbin thread. I wanted something that would blend to the point of being virtually invisible but really strong.  I was shown a couple of quilting examples using The Bottom Line and I was sold. I purchased one spool to quilt Fancy Flocks in and didn’t think about it again.

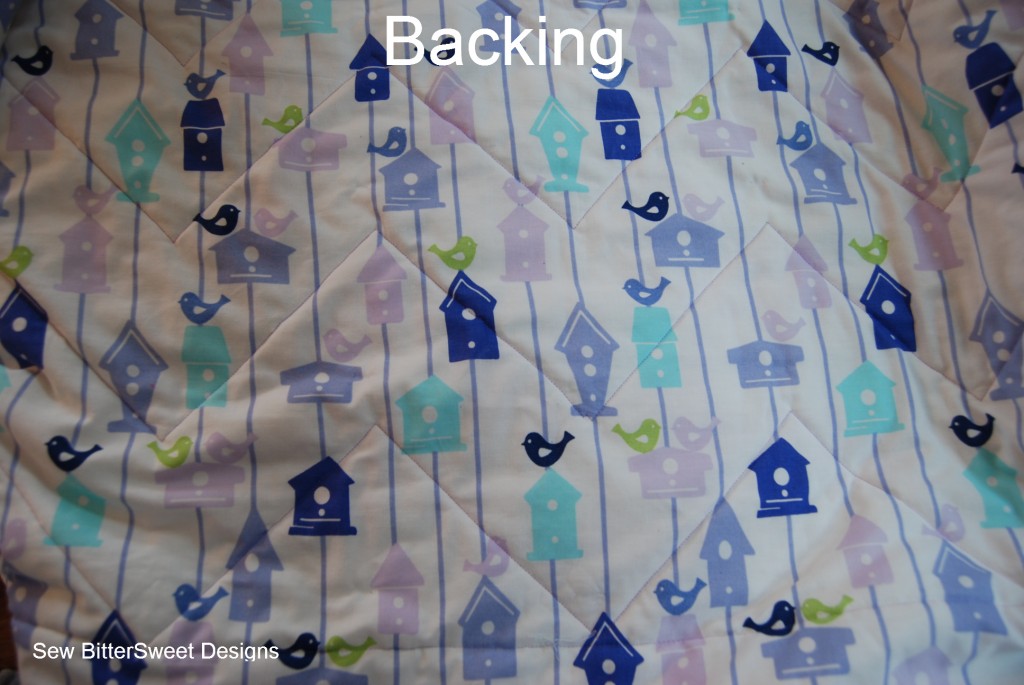
As I’m hoping you can see, or not see as the case may be, the design of the quilting is there – the chevrons, but you can’t really see the thread it just blends in so perfectly. Exactly the look I was hoping to accomplish!

Later when Superior Threads asked me what I would like to review I suggested The Bottom Line because I wanted to see how it would look used throughout an entire quilt. On their website The Bottom Line is advertised as a quilting, embroidery, bobbin, binding, and applique thread. It is a 60-wt Polyester Thread and comes in 55 colors.

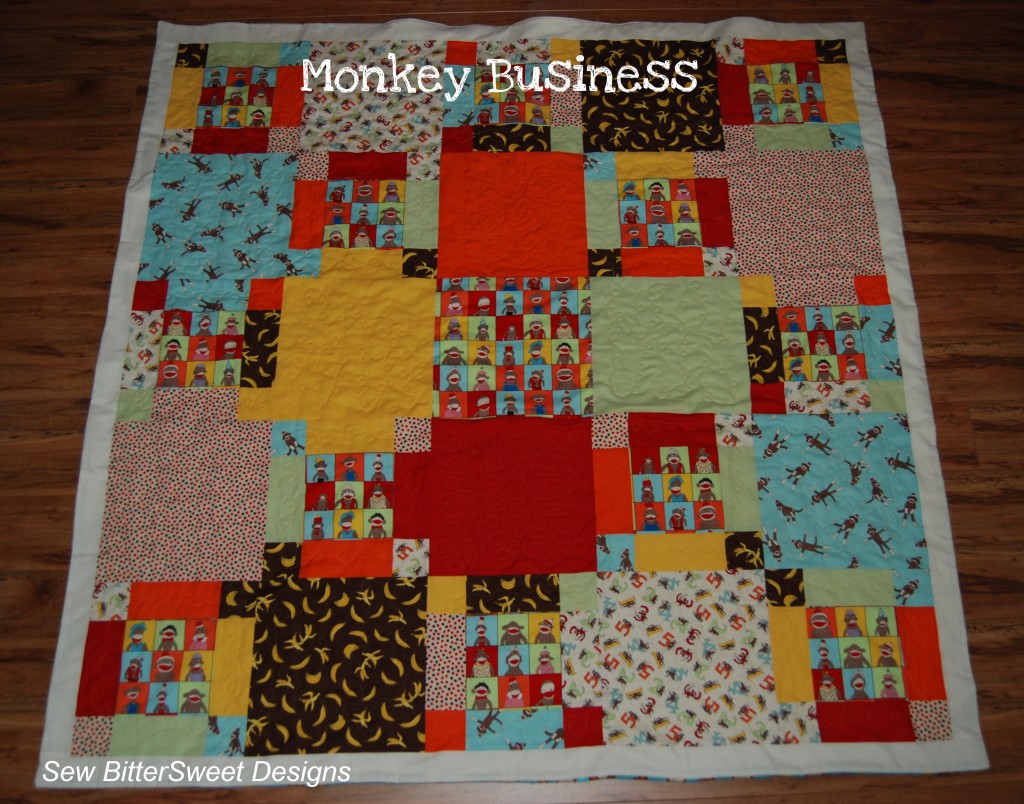
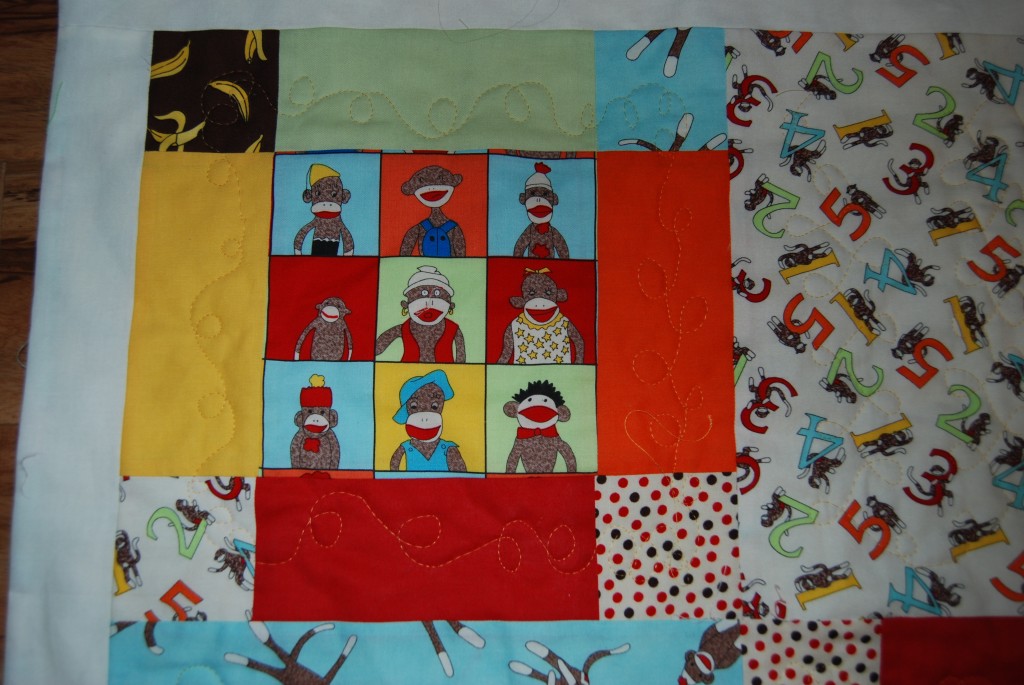
I knew exactly what project I wanted to use The Bottom Line in – Monkey Business – a quilt I designed for my nephew.

As always before starting a new project, I cleaned out my machine, then I referred to the Home Machine Thread Reference Guide – option 3. I wanted to make sure that I was sewing under optimal conditions. For The Bottom Line the guide suggests a 70/10 or 80/12 needle with a tension of 2.0 to 3.0. I put in an 80/12 needle, set my tension to 2.0 and got started.  I decided to do meandering FMQ on this quilt (and I should mention that this was the FIRST TIME I did FMQ on this machine and only my second time ever!).

The first thing I noticed was that I needed to change my needle, I needed a 70/10 – the 80/12 was simply too large for such a fine thread and it kept breaking. The second thing I noticed was that I needed to go all the way to a 3.0 on my tension setting.  After these two steps – smooth sailing.

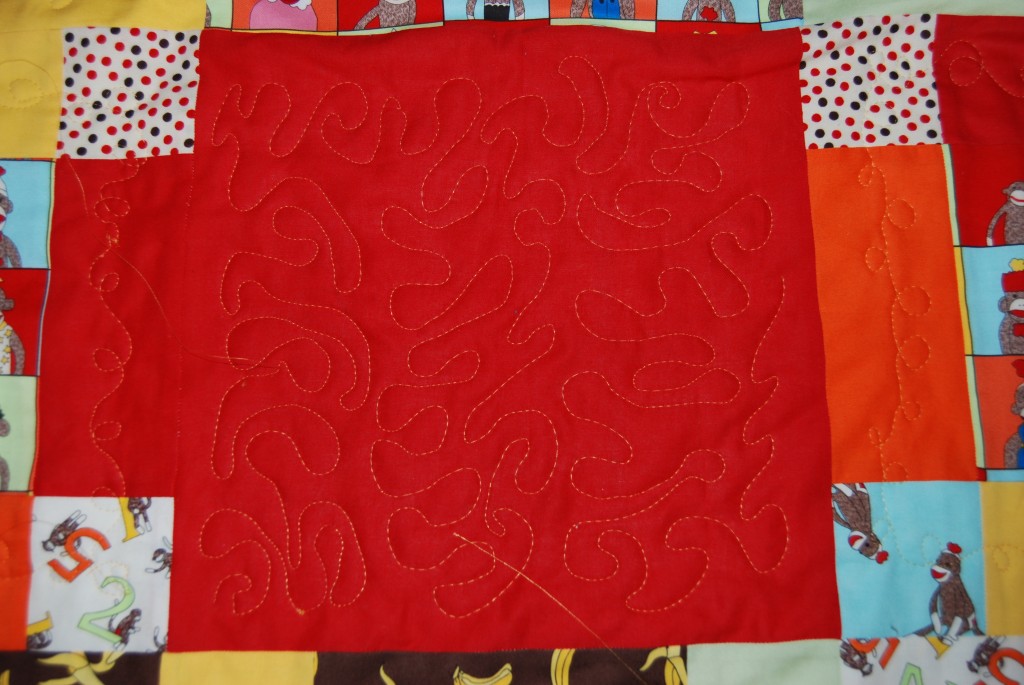
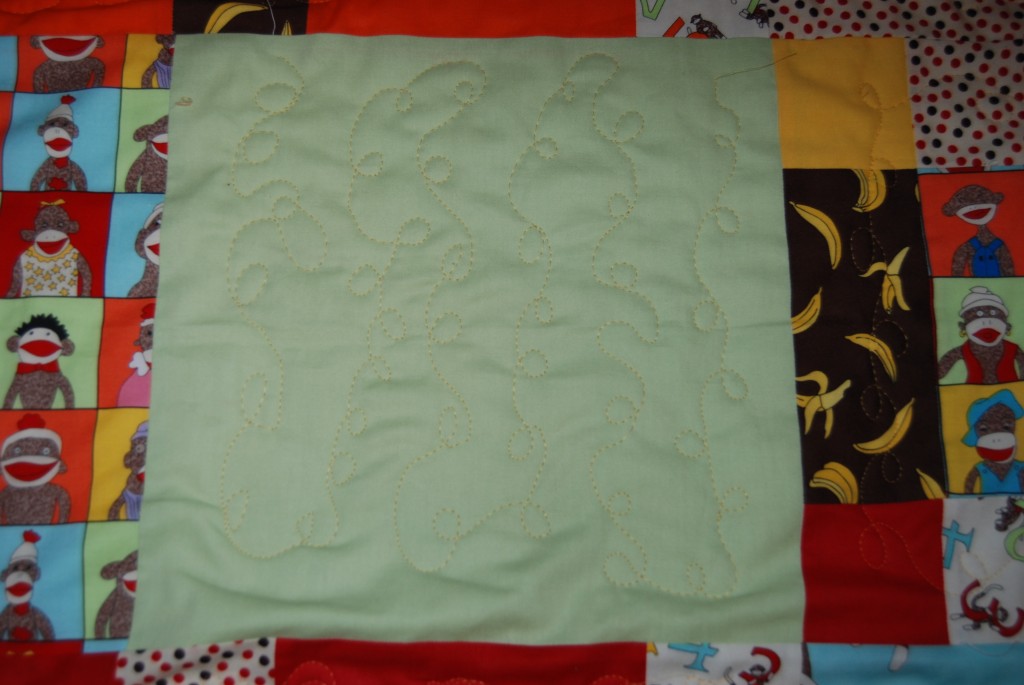
As you can see The Bottom Line thread blends beautifully and almost shimmers against the fabric – I purposefully selected a color that would stand out on most of the fabrics as a design detail.

Things I Liked:

  • As a bobbin thread – The Bottom Line blends beautifully into your project – if you are going for a matching seamless look, this is the thread for you
  • As a bobbin thread – there was not a single break (I was using an 80/12 needle when I quilted Fancy Flocks and a cotton top thread)
  • There was no lint AT ALL – I did not have to clean out my machine when I was finished with either project – this is extremely rare with the threads that I typically use.
  • When using it in the top and the bobbin I love how it stands out and shimmers – the quilting becomes an important design feature of the quilt
  • Readily available at your local quilt ship – as I said the first time I used The Bottom Line was when I purchased it at a local shop in Idaho (I was on vacation). Being able to buy it in stores helps because I can match my colors perfectly!
  • The Bottom Line comes in 55 colors and in 3 different spool sizes – having such a range available is fabulous.
  • Education – not only is the Home Machine Thread Reference Guide available to help you get started with the right needle and tension settings, but there are also videos available to help you learn.

Recommendations:

  • Start with the smaller needle size (70/10) when using it in the top and bobbin. When using it in the bobbin go with the needle size you need for your top thread.
  • The 70/10 needle was hard for me to find in local quilt shops – at least the Superior Brand – I will be purchasing these in March at the Puyallup Sew Expo direct from the Superior Threads Booth.
  • Watch the video on The Bottom Line Thread – educating yourself about something you purchased is the smart thing to do. You wouldn’t buy a new washer and dryer without reading the instruction manual, so why would you do that with thread?
  • If you want to try out the thread but are not really sure if you will like it – try out the “Try Me Specials” that Superior offers – it is a great way to try out a new thread and see if it is something that you will want to use in the future.

I have no improvements to offer Superior Threads – except maybe to remove the recommendation of an 80/12 needle – from my experience that was just too large of a needle size when using it in the top and bobbin.  The Bottom Line is a durable thread which offers an additional quality of being beautiful. It adds great design detailing when quilting and it will not gunk up your machine with lint (one of my favorite features of this particular line).

Have you used The Bottom Line? If so, what types of projects have you used it on?

PS. Today is the last day to vote for the Valentine’s Day Showcase – After Party – so go get your vote one!

Scroll to Top