block tutorials

Stacked HSTs Block Tutorial

Hello! And welcome to #QuiltNon2016 – for those of us who are not able to go to QuiltCon in sunny Southern California, we are getting together and making the best of things! Julie from The Intrepid Thread has pulled together some awesome bloggers and shops for this fun event! I have a quick 6″ finished block tutorial for you. This block would make a great pillow sewn with 4 of them and a nice border. I’m 100% certain that I’m not the first to come up with this block but I since I have no idea what it was originally named I’m going with “Stacked HSTs”.

Stacked HSTs Tutorial - http://staging.sewbittersweetdesigns.coFor this block you need:

12 squares – 2″ x 2″

4 rectangles – 1.5″ x 4.5″
4 rectangles – 1.5″ x 2.5″

Make 12 HSTs:

Stacked HSTs Tutorial - http://staging.sewbittersweetdesigns.coPair up your fabrics and draw a diagonal line across your fabrics:

Stacked HSTs Tutorial - http://staging.sewbittersweetdesigns.coSew 1/4″ from either side of the line.

Stacked HSTs Tutorial - http://staging.sewbittersweetdesigns.coCut them apart on the drawn line, then press open and trim to 1.5″ x 1.5″

Stacked HSTs Tutorial - http://staging.sewbittersweetdesigns.coStacked HSTs Tutorial - http://staging.sewbittersweetdesigns.co
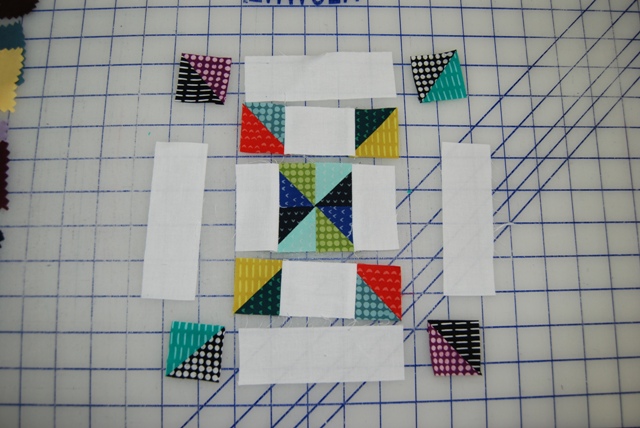
Layout the block as pictured below:

Stacked HSTs Tutorial - http://staging.sewbittersweetdesigns.coPiece the center first:

Stacked HSTs Tutorial - http://staging.sewbittersweetdesigns.coNext piece the first two white rectangles:

Stacked HSTs Tutorial - http://staging.sewbittersweetdesigns.coThen piece the middle HSTs to either side of the two remaining 1.5″ x 2.5″ rectangles:

Stacked HSTs Tutorial - http://staging.sewbittersweetdesigns.coPiece these to the center block, making a 4.5″ x 4.5″ square:

Stacked HSTs Tutorial - http://staging.sewbittersweetdesigns.coPiece the middle section rectangles next:

Stacked HSTs Tutorial - http://staging.sewbittersweetdesigns.coPiece the 4 remaining HSTs to the 2 remaining rectangles as pictured below:

Stacked HSTs Tutorial - http://staging.sewbittersweetdesigns.coPiece the top and bottom sections on and your block is complete!

Stacked HSTs Tutorial - http://staging.sewbittersweetdesigns.coI hope you enjoyed this quickie block tutorial, using some super time pieces, but hey, precision piecing can be very rewarding! If you want to jazz this block up a little try some low volume prints in place of the white and go with high contrast for your HSTs.

Make sure to check out all of block tutorials, if you make all six you will be eligible to win a fabulous fabric prize!  Be sure to visit Julie’s blog for full details!

Happy Quilt-Non 2016!

signature

Easy Paper Pieced Star

In light of several patterns I have coming out in the near future, I thought it would be a good time to put up a very simple paper pieced pattern with a picture tutorial.  These techniques can be used on virtually all foundation paper pieced patterns (they do not work with English paper piecing as that is a different ball of wax entirely).  So without further ado, print off the templates. Make sure your printer is set to print actual size and we will get going. Please note, there are many 5 point stars floating around on the internet, I drew this one in EQ7 because I did not feel it was appropriate to host anyone else’s templates on my site other than my own.

Basic 5 Point Star - https://test.sewbittersweetdesigns.comMaterials:

Paper Piecing Templates
White Scraps for Star
Blue Scraps for background
Fabric Glue
Basic Quilting Supplies

Preparation and Cutting:

Print pattern pieces and cut apart.

Paper Piecing:

Start with any section you like. The sections are labeled A, B, C and D

Before sewing lower your stitch length to 1.5 – this makes tearing the paper at the end easier.

Lay your template on top of your fabric, cut the fabric to be slightly larger than the template. Use a small amount of glue to secure the fabric to the paper. Note the back side of the template is secured to the back side of the fabric.

Basic 5 Point Star - https://test.sewbittersweetdesigns.comNext fold the template back along the first sewing line and trim the fabric 1/4″ from the sewing line.

Basic 5 Point Star - https://test.sewbittersweetdesigns.comNext lay your second piece of fabric, right sides together on your first piece of fabric. Arrow is pointing to the edge where the first piece of fabric and second piece of fabric meet.

Basic 5 Point Star - https://test.sewbittersweetdesigns.comFlip pieces so that the paper is right side up and sew along the line on the pattern. It is important to start sewing 1/4″ before the solid line and end sewing 1/4″ after the end of the solid line. This is your seam allowance.

Basic 5 Point Star - https://test.sewbittersweetdesigns.comPress the towards the mostly recently sewn piece.

Basic 5 Point Star - https://test.sewbittersweetdesigns.comNext fold the paper along the next seam to be sewn and trim to 1/4″ away from the sewing line. The dashed line is the trim line.

Basic 5 Point Star - https://test.sewbittersweetdesigns.comPlace next piece right sides together, lining up the trimmed edge. Sew along solid line as in the previous step.

Basic 5 Point Star - https://test.sewbittersweetdesigns.comAfter all sections are pieced, trim each section. It is important to trim pieces 1/4″ bigger than the solid outer edge, please cut on the dashed line only.

 Basic 5 Point Star - https://test.sewbittersweetdesigns.com

Basic 5 Point Star - https://test.sewbittersweetdesigns.comRemove papers, crease along the stitching and gently tear away.

Piece section C and D together first. Match up the seam allowance and piece with a 1/4″ seam.

Basic 5 Point Star - https://test.sewbittersweetdesigns.comNext attach section B as pictured below. Don’t worry if the pieces appear a little wonky, there will be a final trim.

Basic 5 Point Star - https://test.sewbittersweetdesigns.comFinally attach section A.

Basic 5 Point Star - https://test.sewbittersweetdesigns.comTrim block to 6.5″ and you are done!

Basic 5 Point Star - https://test.sewbittersweetdesigns.com

There are lots of ways to paper piece. This was the first way I learned and it is the easiest of all of them. Remember when paper piecing there will be a certain amount of waste, you just need to come to terms with that and be ok with it. It is just fabric after all!  Other methods of paper piecing include the use of freezer paper, or a simple seam folding technique – which will perhaps become a tutorial at a later date. In the meantime, don’t let paper piecing scare you. Once you master this technique it opens a whole new world of quilting to you!

signature

Crossed Diamond Block Tutorial

Hi Everyone. Wow! Two posts in a row, that is a record for me lately!
I am guest posting on the blog for my guild, South Sound Modern Quilt Guild today with a fun block tutorial.  I am sure there are multiple names for this block but I don’t feel like busting out my Quilt Block Encyclopedia (yes I have one) to look up the names, so I am calling it the Crossed Diamond block.

Crossed Diamond Block Tutorial - https://test.sewbittersweetdesigns.com

Head on over to the SSMQG Blog to check the tutorial out!

signature


Fluttering In Formation – 52 Twisted Blocks Tutorial

I am so excited today to be part of the Persimon Dreams 52 Twisted Quilt Blocks QAL!  Below is my block. I found my inspiration in the Encyclopedia of Pieced Quilt Blocks.  The inspiration block is called the Beggar’s Block but when I saw it I just saw butterflies!

Fluttering In Formation - Block Tutorial - https://test.sewbittersweetdesigns.comSupplies:

1 White Square – 4.5″ x 4.5″
32 White Squares – 1.75″ x 1.75″
8 body Sections – 2″ x 4.5″
16 Wing Sections – 1.75″ x 4.5″
Black Pearl Cotton Thread

NOTE: All 1/4″ seams and the block finishes at 12.5″ x 12.5″

Fluttering in Formation Supplies - https://test.sewbittersweetdesigns.comStart by drawing a line, corner to corner on each white square.  (See Picture)

Step 1 - Fluttering in Formation - https://test.sewbittersweetdesigns.comNext chain piece sew your white squares onto your wing sections, sew along the line you drew. Pay attention to the orientation of the squares:

Step 2 - Fluttering in Formation - https://test.sewbittersweetdesigns.comTrim off the excess fabric to 1/4″ and press towards the white:

Step 3 - Fluttering in Formation - https://test.sewbittersweetdesigns.comSew your wing sections to your body sections – creating 8 butterflies:

Step 4 - Fluttering in Formation - https://test.sewbittersweetdesigns.comLay your block out and sew together:

Step 5 - Fluttering in Formation - https://test.sewbittersweetdesigns.comUse my tutorial over on Kim’s blog and embroider the adorable faces on your butterflies.

You will have a beautiful finish!!

Fluttering In Formation - Block Tutorial - https://test.sewbittersweetdesigns.com

There is a fun interview of me over on www.PersimonDreams.com
* If you make the block make sure you upload it to the Flickr group:   http://www.flickr.com/groups/2445539@N20/
* If you are interested in joining this QAL you can learn more information here:   http://www.persimondreams.com/quilt-alongs/lapaceks-orchard/52-blocks

Thanks for visiting!!!

signature

Scroll to Top