Easter

An Easter Surprise for Anne

Last Monday I told Anne that we were going to go on a long car ride and pick something up the next day. On Tuesday afternoon I got her into the car, brought our tablet along with us for entertainment purposes and headed out for a 50 mile trek in rush hour traffic to pick up her “package”.  We got to the airport with about 15 minutes to spare before the “package’s” plane landed.  Anne saw the luggage carousels and assumed immediately her package was a bag of some sort, imagine her surprise when she saw my mom.

Nevermind…you don’t have to imagine it! I will just show you the look on her face!

Greeting Nana - https://test.sewbittersweetdesigns.comHer surprise was her Nana! Best look of joy ever!  We spent the week running wild! We went to the Seattle Pacific Science Center, we went out for her very first grown up tea, and we drove out to Bremerton to visit family.  On Easter Sunday, she got all dolled up in the dress I made her and we had a wonderful dinner at home with my cousins and mom visiting. It was absolutely lovely!
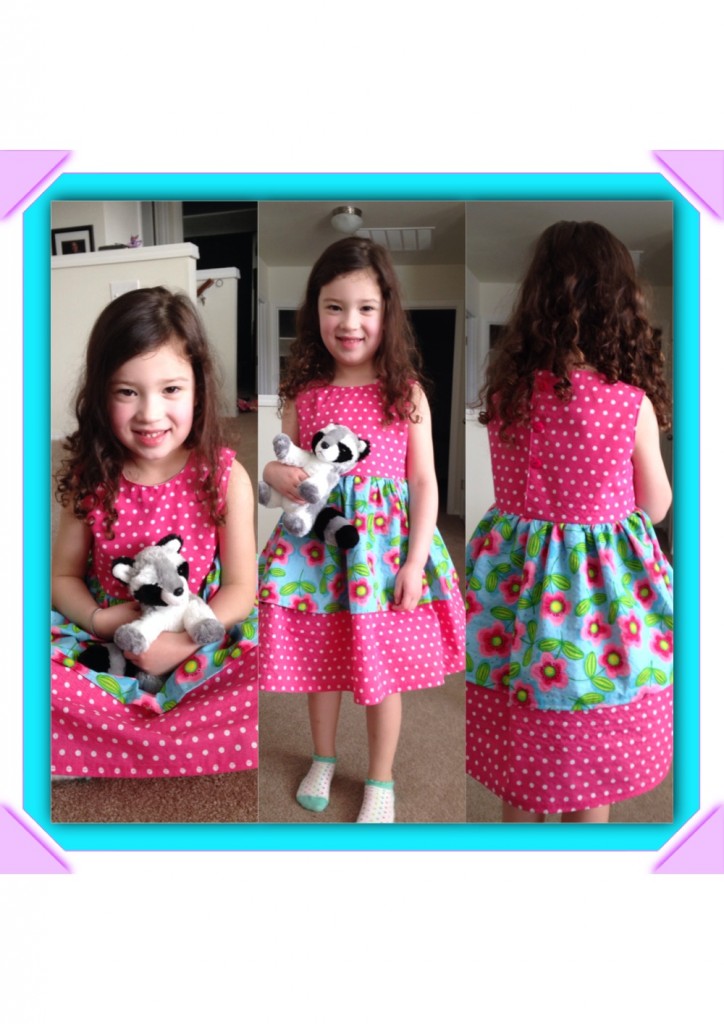
Anne's Easter Dress - https://test.sewbittersweetdesigns.comThe dress turned out so different than I intended. I bought the wrong sized pattern (3 sizes too big) so I had to change the bodice sizing. Then I decided I didn’t like the collar so I removed that from the pattern all together. I also decided I didn’t like the skirt or the way that was assembled and I changed that too. I guess you could say I have finally become comfortable enough with clothes to do my own thing! WOOHOO!

Here is a shot of Anne with the Easter Bunny. She LOVES the Easter bunny and so do I because I get a nice picture of her once a year without her screaming bloody murder like she does with Santa!

2014 Easter Bunny - https://test.sewbittersweetdesigns.comI hope everyone had a wonderful holiday!!!

signature

Week 15 Sewing Goals

I missed last week but I’m back for Week 15!  My goal this week is very simple, make Anne’s Easter Dress. My mom is coming to visit and I want it done before she gets here so I have time to relax and visit with her.

Easter 2014 Pattern -https://test.sewbittersweetdesigns.comI think I’m a touch crazy for making a tank dress but it is what Anne picked out and I’m pretty sure it is within my sewing skill set. I’ve not used a Butterick pattern before, I’m praying the instructions are clear.

While I was taking the above picture, Anne came in and said she made me a cake and would I take her picture, so here she is, in all her baking glory!

Anne's Cake - https://test.sewbittersweetdesigns.comI hope everyone has a great week!!!

signature

Tutorial & Free Pattern – Chinese Take-Out Easter Basket

This year I decided to do something special and a little different for my nieces (8 and 9) and my nephews (5 months and 8).  I made my nephews matching Easter Chinese Take-Out Baskets and my nieces got matching Easter Purses.  The older kids are getting bean bag bunnies (and it is my brother’s problem if they are turned into ammunition against each other) and my youngest nephew will be getting a plush bunny – when I have time to make it!

Here are the older kids Easter “Baskets”:

Purses for the girls
Take-Out for the Boys

The pattern for the take-out box can be found here.

Not much is needed for this pattern.

  • Two pieces of coordinating felt 22×22 inches
  • Pattern pieces – cut out and taped together according to the directions on the pattern
  • Some peltex scraps for the top
  • Some fusible web, for one I used Pellon and the other I used Heat n Bond Lite
  • Coordinating Thread
  • Sewing Machine
  • Scissors
Step 1: Cut out and assemble pattern pieces
Step 2: Cut out fabric pieces

Heat and bond for the large piece, and peltex for the smaller pieces

Step 3: Fuse the large pieces together – follow the directions that come with your fusible – I had an easier time working with the Pellon, but probably because I am more used to that brand.

Step 4: Mark a square for the bottom of you box – I used a sharpie do this on the INSIDE fabric
Step 5: Follow your sharpie line and sew around the square 3 times
Step 6: Sew the sides together – use a 1/4 seam

You now have a lidless box!

Step 7: Sew together your top pieces – I sewed around the edge of all 4 using a 1/4 seam

Step 8: Sew lid pieces on – using 1/4 seam

I wanted my inside fabric to be on the outside for the lid – so while the main body was inside out – I had the right side fabric to the wrong side fabric and sewed
Once you have sewn your lid pieces on, turn your box right side out and voila! A felt Easter Chinese Take-Out Box!  All you need is to stuff it full of bunnies and chocolate (my brother can put the chocolate in) and you are done!  Once the pattern pieces were cut out – it took me less time to assemble this (including take pictures) than it did to write this post.
Enjoy!

Work It Wednesday

This is crunch week for me as I need to get all my Easter stuff finished for my nieces and nephews by Saturday to mail down to CA where they live. I am making good progress. I have finished everything for the girls and as of last night everything for my oldest nephew. I just have my 5 month old nephew to work on now.

Here is my progress thus far…

Bean Bag Bunnies from 2 Little Hooligans – Check
Anne’s Basket and the purses for her cousins
Side View
Girls are a go!
Anyone up for Chinese on Easter?
Go ahead, open it, you know you want to…
Bean Bag Bunnies!

I whipped together The Chinese Take Out Easter “basket”  for my oldest nephew last night. I am hoping that he and his sisters like the bean bag bunnies and actually use them for a bean bag toss and not just as ammunition to throw at each other.

I am also planning to make a minky Bunny stuffy for Anne and for my youngest nephew, I am hoping to start on that tonight. If I only finish my nephew’s on time I will be very happy. Anne won’t really know if I am late with her’s at 17 months she isn’t going to know if she gets it on Easter or not.

What are you working on this week?

Anne’s Garden – Free Pattern – Felt Flowers

We are doing a candy free Easter in our house. For a couple of reasons: 1. a 17 month old does not need tons of sugar, and 2. Anne isn’t allowed to have chocolate yet per doctors orders due to allergy concerns (I’m allergic) so that pretty much rules out all the best Easter candy anyways other than peeps.

As an alternative I am making her some fun Easter presents for her to play with, one of which is her very own garden of flowers.

I let Anne play with her flowers the other day to see how she liked them and they were a big hit!

What you need:

  • Pattern pieces – get them here
  • Felt scraps in two coordinating colors
  • Scraps of fusible web
  • Pressing Cloth
  • Stabilizer (I went super cheap and used a scrap of paper from an old pattern)
  • Colored thread to match fabric scraps – I only matched the piece I appliqued on
  • Thread
  • Needle
  • FiberFil

Step one: Cut out your pieces – two each of the flower and the center piece

Step two: Iron your fusible to the center pieces then fuse your pieces together – make sure you use a lower heat setting because the felt will melt! – Hint – this is where you need your pressing cloth!!!

There isn’t much difference between this picture and the last – that is a good thing 🙂

Step three: Using your pretty colored thread and a zigzag or satin stitch – machine applique the center piece. I used a piece of paper on the back as a stabilizer and ripped it off after wards – these probably will not get washed so I’m not concerned with the left behind paper.

Step four: Skip if you are using the CurveMaster Foot like I did – pin pin pin. Pin the two flower pieces right sides together

Step five: Sew pieces together using a 1/4 seam – I left a whole the size of one petal so that I could turn my flower and stuff it

Step six: Turn, stuff and hand sew shut.

Turned
Stuffed and sewn shut

You are now well on your way to creating your own felt Easter Garden 🙂

I hope your young one enjoys their garden as much as Anne enjoys hers!

I love that face 🙂
Scroll to Top