 Welcome to the 3rd tutorial for the Sew Intertwined QAL! Warning – there is paper piecing and some planning involved – this is not for the feint of heart but I promise to make it as easy for you as humanly possible! I will pass on all of my tips and tricks! If you are not up for paper piecing – Jenna has a traditionally pieced tutorial for the same block over at Sew Happy Geek – head on over and check it out!
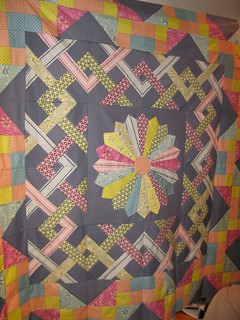
Now for the planning stage! Take your print out from when you were planning your quilt and label the woven blocks as follows – trust me, this will really help you and is a very important step!
 Next, print out your Sew Intertwined Paper Piecing Templates. You will need to print the file a total of 12 times – which is 48 pieces of paper. Please don’t hate me for having you print so much, I promise you will be tickled with how amazingly easy your blocks will line up when you are ready to piece your top! As far as the printing goes you will probably need to play with the print size – I had to go to 104% to get mine to print to the right size when printing from the PDF. The longest solid line should measure 8 and 3/8 inches.
Now I want you to label each of the 48 pages. Use your template (see first image) of your quilt and write in each of your colors and the block number. It is important to remember that the templates are mirror images of the blocks. If you are extremely well organized in the first two steps the rest of it will truly be a breeze. One thing to note (this will make labeling easier, I swear) you are making 3 blocks a total of 4 times, at least you are if you did your layout similar to mine. If you look closely at my diagram you will notice that blocks 1, 4, 7, and 10 are all the same, just turned a 1/4 turn each time. The same is true of [2, 5, 8, 11] and [3, 6, 9, 12].
Ok, now that you all hate me and are ready to walk away, here is my example:
 Now I am going to ask you to print one more of the templates – this time just print one page as the templates are all exactly the same, they just help with the labeling. I want you to cut it apart, use your rotary cutter, you will have to cut a lot of paper with it anyways, may as well start now. Cut each section on the line, for the sections that have the seam allowance leave it there, it will make your life easier.
Now cut your fabrics: I am going to tell you the cutting for my colors, the widths and lengths will be the same for everybody you just need to supplement your colors in.
Background Fabric (white): 1 strip measuring 2 7/8″ by width of fabric – this is for the center square. Sub-cut these into 12 squares measuring 2 7/8″ x 2 7/8″
Background Fabric (white): 7 strips measuring 3 1/8″ by width of fabric. You will also need 12 squares measuring 3″ each – I will show you how to sub-cut these later.
Green Fabric: 2 strips measuring 2.5″
Orange Fabric: 2 strips measuring 2.5″
Pink Fabric: 2 strips measuring 2.5″
Gray Fabric: 3 strips measuring 2.5″
Leaf Fabric: 3 strips measuring 2.5″
Let’s start by sub-cutting the 3″ white squares:
For the rest of the cutting, take the template pieces you cut apart, you will lay them on top of your fabric to cut them out. Remember if working with prints you will want to lay the templates on the fabric with the fabric right side up and the template right side down. For the templates that have seam allowance on them cut those sides 1/8″ larger than the seam allowance, for the sides with no seam allowance cut them 3/8″ larger than the template. This will ensure that you have enough fabric with very little waste. (this is my first tip! It works with every paper piecing project you will ever do!)
Now on to the bigger background section of the paper pieced templates (piece 1). Using the 7 strips measuring 3 1/8″:
For all the rest of the strips you will have 2 different sized pieces depending on whether you are cutting piece 2 or piece 4. Lay your template face down with the fabric face up and cut as described above.
Once you have cut all your pieces, the hard part is over. I suggest moving your templates and all your cut pieces right next to your sewing machine, if you have the room. Lay out the fabric by color and by cut. Have you templates handy and you are ready to start!
 (this is my next tip – it will help prevent any shifting!) With printout facing down glue your first piece to the template. Make sure you are covering all of piece 1 on the template.

 Press Open
The goal is to make sure that your template will be completely covered each time you press open your fabric. Press Open
Sew and Press Open.
Lather, Rinse, Repeat 47 more times! (ok, can you tell I’ve been sick for a week, I’m getting a little punchy!).
When you have them all sewn, you can trim them up. There is no point trimming them as you sew them, it will just take you more time.
This is just like when we were all in school, use your rotary cutter (ok, that part isn’t like school) and your ruler and cut along the dotted lines! I’m going to repeat that last step…CUT ALONG THE DOTTED LINES. If you cut on the solid ones you are going to be rather upset with yourself.
Ok, it is time to get all that pent up aggression out, I’m sure by now you are super frustrated with me. Tear off all the paper from the templates. Be careful not to pull out your stitches!
Do you all hate me yet? Well, get ready for it, here come the Y-Seams. I swear if you follow my directions and review each picture carefully they will not be so bad! From here on out all seams are 1/4″.
Taking one of your 2 7/8″ background squares, place it on top of piece A like the picture below:
(this is the final piece – Piece D)
 Rinse. Lather. Repeat. 11 more times. I swear this is totally worth it, check out how perfectly my points match up!
If you have any questions at ALL leave them here or in the Flickr Group and I will be around to answer them, but have mercy on me if I am not quick this weekend, I take my 2nd dose of my new medication tonight and it is bound to make me feel crappy all weekend. Feel free to print this tutorial as PDF too: Woven Block Tutorial.
This post is sponsored by Contemporary Cloth who provided the beautiful fabrics for my quilt.

 © Copyright M. Dunworth 2012. You are welcome to use this tutorial for your personal use. Please do not use this tutorial, my words or my pictures without my permission. You are welcome to link to this tutorial, but please do not take my work.


