Valentine’s Day Showcase

Valentine’s Day Showcase – The After Party!

The past 10 days we have all be regaled with some AMAZING tutorial from some of my wonderful friends!

In case you missed any of them – here are links to each of them:

February 1st – Sharon from Craizee Corners
February 2nd – Connie from Quilting by the River
February 3rd – Vicki from Sassy Blog
February 6th – Kris from I don’t have a problem, I have a well-rounded fabric stash!
February 7th – Lisa – Cupcakes, Hair Bows and Kiddos
February 8th – Debbe from Pieces to Love
February 9th – Lyanna from Purple Panda Quilts
February 10th – Jenna from SewHappyGeek
February 13th – Brandy from When Life Hand You Fabric…Make a Quilt
February 14th – Michele from Quilting Gallery

Now it is your turn to show us all what you made! There are a few rules:

  1. Your project must be for Valentine’s Day (not St. Patty’s Day or Christmas!) – you DO NOT have to have a tutorial for your project!
  2. You can link to Flickr (make sure you have a description and a link back to here) or to a blog post (please post the party button – it is in my sidebar) – no Flickr/no blog – email me your pic and a description and I will get it loaded for you (melissa (at) sewbittersweetdesigns (dot) com – everyone should get to play!
  3. Voting opens on February 21st and will end on 23rd – I will email everyone when voting is open (then you should tell everyone you know to vote!) The three entries with the most votes will win some FABULOUS Prizes!

First place prize is:

A $75.00 gift certificate from Fat Quarter Shop

Second Place Prize is:

A $25.00 gift certificate from Contemporary Cloth

Third Place Prize is:

Keepsake Frame Cards from Carol Doak and an Add-A-Quarter ruler from Sassy Packs

So go ahead – show us all what you made!!! And Good Luck!


Valentine’s Day Showcase – Michele from Quilting Gallery

Welcome to Day 10 of the Valentine’s Day Showcase! We are wrapping things up with Michele from Quilting Gallery – she has a gorgeous wall hanging tutorial for all of us. I met Michele this summer when I submitted my Cobblestone Roads quilt to one of the weekly quilting contests that Michele hosts over on quilting gallery. Michele has been a wonderful friend the past few months and I’m so happy to feature her here!

What got you hooked on your craft of choice?

Initially, it was quilts in the local quilt store’s window that caught my eye and drew me into their store.  I was fascinated with the fabulous colours and the intricate designs. After a few years, I took a long hiatus from quilting to start my own business, but returned four years ago. Now, it is the fabulous blogs, tutorials, videos and most of all the friendships, that keep me hooked. Oh, and the lovely fabrics and colours that I get to play with every day.

What lights your crafting fire (ie. what keeps you crafting, why do you do it?)?

Ooops, I think I answered that above already.  I keep at it to challenge myself to be better, to learn new things, to experiment, to play and most of all to have FUN. Quilting feeds my soul and keeps me sane.

What is your favorite Valentine’s themed junk food?

Do jelly beans count?

Take it away Michele!


Hi everyone! Thanks so much to Melissa for organizing this super fun Valentine’s showcase party. I’m thrilled to be a part of it.

I’m Michele Foster and I own and manage the web site, Quilting Gallery. My site is dedicated to bringing quilters together from around the world and inspiring quilters’ creativity.

Quilting Gallery

It includes the quilting bloggers directory, quilt shop locator, quilter’s market and the quilt guilds directory. I host swaps, weekly quilt contests, challenges, guest bloggers and quilt-alongs too. I also have a brand new section that started this month called the Learning Center hosted by Pat Sloan. We are tackling Storage and Organization this month. I hope you’ll drop by for a visit.

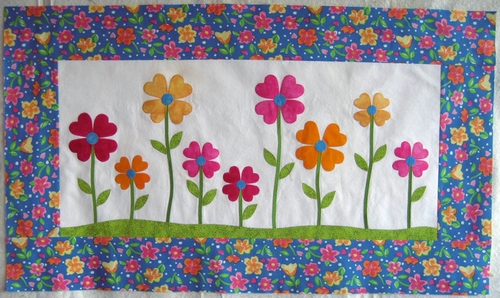
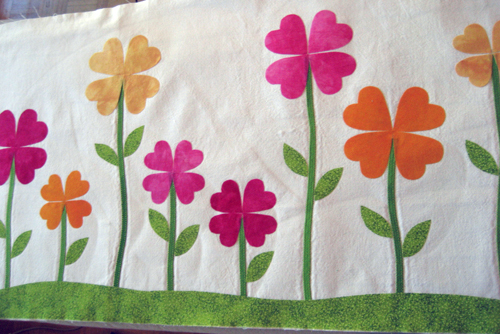
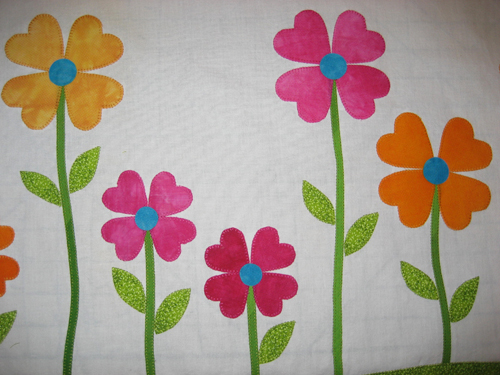
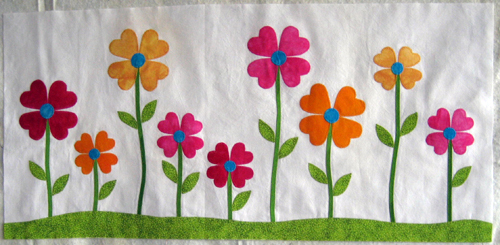
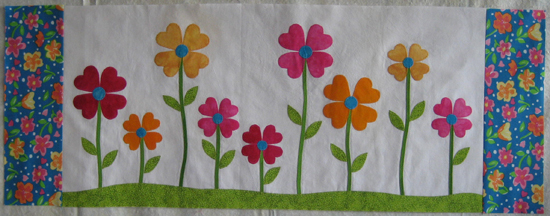
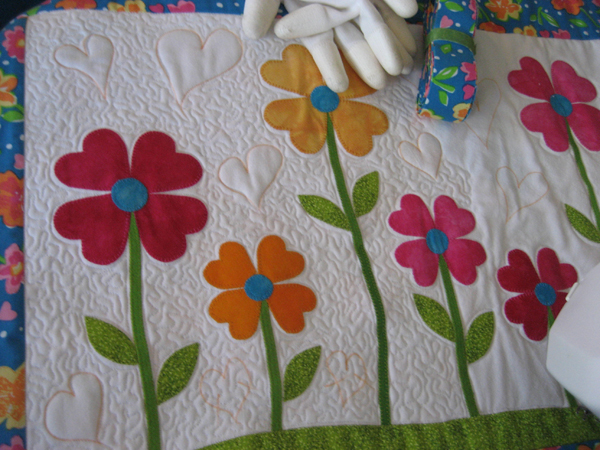
Here’s my Love-ly Garden wall hanging (or table runner) that I’ve created for you. It finishes at 22” x 38”.

love-ly-garden-border

As you can see, it’s not quilted or bound yet. My apologies, but a work crisis came up that I ended up having to deal with this weekend. Thankfully, I had the quilt top completed before.

Let’s get started…

Download a copy of this tutorial and the pattern templates.

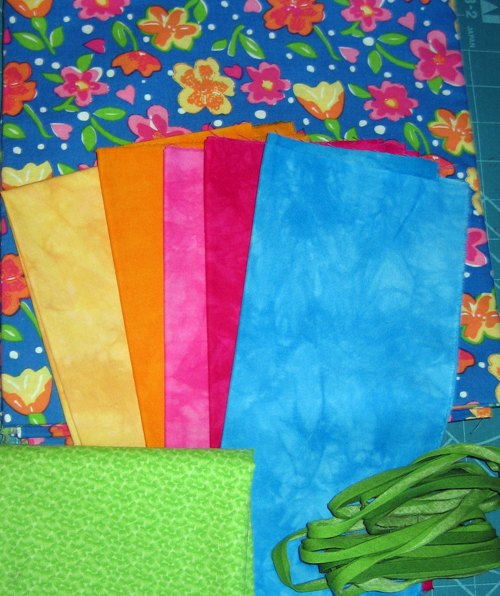
Love-ly Garden is a fusible appliqué quilt project. Choose a fabulous piece of fabric for your borders.. this will be your focus fabric. Pull coordinating colours from your focus fabric for your heart-shaped flower petals, centres, grass and leaves.

Requirements:

  • 14” x 30” solid for the background
  • 2 yards ¼”-wide green bias or ric-rac for stems
  • 2.5” x 30” green fabric for the grass
  • scraps of fabric that coordinate with your border for the flowers (heart petals & centres) and leaves
  • 25” x 40” focus fabric for the border and binding
  • 25” x 40”/42” piece backing fabric
  • 24” x 40” piece of batting
  • ½” yard fusible web
  • pattern templates (attached)
  • fabric glue stick (optional)

Note: Green fabric shown in the photo below was replaced with another piece.

Instructions:

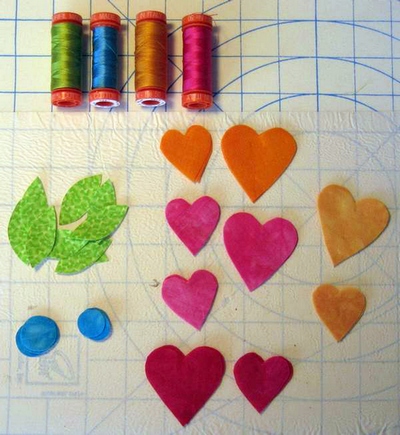
Using the templates in the download, trace the flower hearts, centres and leaves onto your fusible web.  Fuse to the back of your fabric scraps and cut out all of your shapes on the traced lines. I used 4 large and 5 small hearts and 15 leaves for my wall hanging.

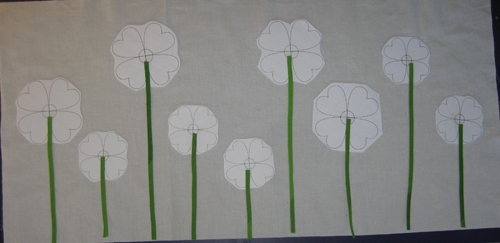
Using the last page in this file, print and roughly cut out the flower shapes. On your background fabric, place the paper flowers in a layout that is pleasing to you. Cut your bias stems (or ric rac) to the lengths needed.

Fuse, or apply with fabric glue, your bias strips to your background fabric. Add some gentle curves or waves when securing your strips for a more whimsical look. Attach the bias pieces to the background using a narrow blanket stitch.

For the grass, use  your rotary cutter to cut a gentle curve from your green fabric the length needed (~31”). You don’t need to have fusible web on this piece, but you can if you want.  I used a glue stick to attach the grass to my background fabric.

Add your flower petals and leaves to your background piece. Fuse in place.

Stitch around all petals and leaves and the along the top edge of the grass with a small blanket stitch. Fuse your flower centers and stitch with a small blanket stitch.

Stand back and admire your pretty garden.

From your border/binding fabric, cut 3 strips 4.5” wide and 4 strips 2.5” wide (or your preferred binding width).

If necessary, square up your background fabric so that it is even. It can become slightly distorted and frayed with all the handling while blanket stitching.

For the side borders, measure and cut two pieces from one of the 4.5” strips the height of your background fabric. Attach your side borders. Press toward the border pieces.

For the top and bottom borders, measure and trim to length the other two 4.5” strips.  Attach your top and bottom borders. Press toward the border pieces.

Layer your quilt top, batting and backing fabric. Baste using your favourite method. For the quilting, first I stitched in the ditch between the background and borders. Next, in free-motion mode, I outlined all of the applique shapes. Then I drew some random heart shapes in the white background. These shapes were stitched as I got to them while doing a close stipple in the background. I’m not sure yet what I’ll do for the border. Any ideas?

That’s a wrap!  I hope you have FUN making this love-ly wall hanging.  It’s been very cold here in Ottawa lately, so it was a pleasure to work on this springtime project and dream of the flowers that will soon return to us.

If you make the Love-ly wall hanging, please share the photo in my Flickr group or on Facebook. I’d love to see it.

Each week I host a themed quilting contest on Quilting Gallery. This week, we’re celebrating Today!, with the theme “Be My Valentine”. For this week, you can enter not just quilts, but anything made with fabric. The Fat Quarter Shop have donated a lovely jelly roll to this week’s winner.  Enter here!

weekly-themed-quilt-contests

Happy quilting!
Michele
Quilting Gallery

——————————————————————————————————-

Thank you so much Michele, and thank you to all of the wonderful ladies who contributed tutorials for the Valentine’s Day Showcase. Tomorrow the linky party will open for everyone to enter their wonderful Valentine’s Day projects. Remember, these do not necessarily have to be from one of the tutorials presented (although that would be fabulous!) and you don’t need to have a tutorial to go with them. I can’t wait to see what everyone else has made!

Happy Valentine’s Day!

NOTE: Don’t forget, I am one of the bloggers who is going to lose Google Friend Connect in March 2012, please take a moment and follow me via Bloglovin’, Facebook, RSS or networked blogs.  You are important to me and I want to be able to stay in contact with you!  Check my side bar for all the best ways to stay in touch after GFC goes bye bye!

Valentine’s Day Showcase – Brandy from When Life Hands You Fabric

Welcome to day 9 of the Valentine’s Day Showcase! Today I am bringing you Brandy from When Life Hand You Fabric…Make a Quilt. I first met Brandy through the Facebook group that she runs Pacific Northwest Quilters – we quickly became friends and she has been such a wonderful person in my life. I hope you will head over to her blog and follow her – you will not be disappointed!

1. What got you hooked on your craft of choice? I was originally “introduced” to quilting by my Aunt Jean.  I never realized that “people” make quilts, that it isn’t just some big manufacturing thing to make “blankets” that are sold in stores.  I was in love with the idea and made a super-hilarious first quilt that we still use today.  In 2000, I was introduced to Carol (who would later introduce me to her brother and would become my sister-in-law – fairly quickly!), and took some classes from her.  At that point, I was truly hooked!!  And in love…

2. What lights your crafting fire (ie. what keeps you crafting, why do you do it?)? I love love LOVE bright colors.  They keep me happy and keep my mood fairly upbeat.  I also love to create something that I will use in daily life.  I love it when someone says “oh, that’s really nice,” and I can say “Thanks so much – I made that!”  It makes me feel really good.

3. What is your favorite Valentine’s themed junk food? Oh my!  I’ve never really thought about this holiday for junk food.  I’d have to say that I LOVE See’s Candy “creams,” and milk chocolate.

Take it away Brandy!
——————————————————————————————————————-
I’ve been wanting to make a “mug rug” ever since I first saw one a few months ago. My friend, Melissa, has offered the perfect opportunity by inviting me to take part in her Valentine’s Day Showcase. It is a 2-week show of fabulous tutorials on her blog, Sew Bitter Sweet Designs. Thank you, Melissa!!!

For this project, I will tell you what I purchased, which is actually much more than I actually used. From the directions, you can tell that you need MUCH LESS fabric than what the supply list calls for. If you have smaller scraps, that would work perfectly!

Supplies:

~ 2 fat quarters, or large scraps, in coordinating reds
~ 2 fat quarters, or large scraps, in coordinating pinks
~ Backing fabric – 9×11 piece (half of a fq works perfectly)
~ Binding fabric – width of fabric (WOF) x 2″ (mine equaled 44″x2″)
~ Batting of your choice – size to match backing
~ Red thread – I used Guterman 100% polyester as it is the perfect color for both matching the reds and contrasting on the pinks
~ GO! Cutter – (not a necessity)
~ Queen of Hearts Go! cutter die (not a necessity)
~ Scraps of Pellon 805 Wonder-Under transfer web – or your fusible of choice
~ Scraps of tear-away stabilizer for appliquéing the hearts onto the background fabric (I believe the type I used is Sulky “Tear Easy,” but I buy it by the yard and there is no label)

Instructions:

~ Back pink fabrics with fusible so that the fusible is cut with your fabric when run through the Go! cutter.

~ Run those 2 layers through your cutter.
OR, cut out 2 larger hearts and 2 smaller hearts from backed fabric if you do not have a die cutter.

~ Cut a 8.75″ x 8″ strip from your 2 red fabrics, then cut the 8″ side in half to make 2 rectangles that are 8.75″ x 4″.

~ Sew the rectangles together, pressing seams open in the back, to look like the following:
NOTE: seams look gorgeous on the back when pressed open (!!), but you can press to your liking.


~ Peel off paper backing from your 2 smaller heart pieces (You will need a total of 2 large and 2 small hearts in one of each pink fabric). Test out how you’d like the inside hearts to look – do you want them straight on like the top 2 hearts, or do you want them “wonky” like the bottom two?

~ Iron the smaller hearts on top of the larger hearts with the opposite fabrics.

~ After the smaller hearts are in place, remove the paper backing from the larger hearts and lay them down on your background in a way that is pleasing to your eyes. I try a few looks and photograph them so I can see a different perspective. When it is to your liking, iron the large hearts down.

~ Back your mug rug top with the Tear Easy stabilizer making sure to cover the area where the hearts are located.

~ Test your appliqué stitch to make sure it is to your liking (I like to use a small/narrow button hole stitch for smaller appliqué pieces – on my Janome, it is a 3.0 length) and appliqué all 4 hearts using your preferred appliqué method. When I start each new heart, I like to start with both threads coming to the top. Then when the appliqué is complete, I take all 4 threads with a hand sewing needle and bring them to the back. This just prevents a mini bird’s nest of thread on the back, which is just my preference.
NOTE: make sure NOT to iron the Tear Easy – it will melt on your project!!

~ Now that you’ve finished the appliqué, your “top” is done! (This is the point where I have to put myself on restriction to my sewing room so that I don’t set the top aside for the next 6 years…)

~ Sandwich the top, backing and batting and free-motion quilt (fmq) the the mug rug. I’m working on getting more fmq practice! Otherwise, you really do not need a lot of “quilting” to stabilize your layers in this small of a project. You could simply outline your hearts 1/4″ away and then stitch in the ditch of your background rectangles, and that would probably suffice.

~ After quilting, I trim the batting and background to the edges of the mug-rug, then check to make sure the dimensions look nice.

On this project, I felt there was too much “empty space” above and below my hearts, so I trimmed 3/8″ off both the top and bottom edges. The mug rug top is now 9″ x 6.75″. When bound, I think this will look perfect!

~ Bind quilt using your favorite/preferred method.

~ Wa-LA! You’re done! Congratulations and Happy Valentine’s Day!
——————————————————————————————————————————–

I love this mug rug – the different shaped hearts are SO much fun! Tomorrow Michele from Quilting Gallery will be here to share a fun wall hanging with us – I can’t wait to see how she made it!

NOTE: Don’t forget, I am one of the bloggers who is going to lose Google Friend Connect in March 2012, please take a moment and follow me via Bloglovin’, Facebook, RSS or networked blogs.  You are important to me and I want to be able to stay in contact with you!  Check my side bar for all the best ways to stay in touch after GFC goes bye bye!

Valentine’s Day Showcase – Jenna from SewHappyGeek

Welcome to Day 8 of the Valentine’s Day Showcase! I have Jenna from SewHappyGeek here for you. I started following Jenna early in 2011 and was blown away by her amazing tutorials, when I joined SewBeeBlissful I continued to be amazed by her spirit. I hope you enjoy her wonderful mug rug tutorial!

1. What got you hooked on your craft of choice? The allure of cutting fabric into little pieces and making something completely different and wonderful out of it.

2. What lights your crafting fire (ie. what keeps you crafting, why do you do it?)? Oh gosh. My twitter friends and blog followers keep me from feeling terribly washed out when I’m frustrated, and there’s always the joy of using new fabrics too. Flickr is a great source of inspiration too.

3. What is your favorite Valentine’s themed junk food? Well, I live in England so we don’t get any specialised sweets, and actually the English are different about Valentine’s Day than Americans, but I do always buy nice chocolates for DH and DD. My mum always used Valentine’s Day as a means to tell us how much she loved us, so I do the same.

Jenna, the blog is yours – take it away!

———————————————————————————————————————————–

My daughter Savi is pretty enamoured with this mug rug, and she’s always so good and cheerful that this Valentine’s Day I’m giving her this special handmade gift. I’m really lucky to have such a great and supportive family, and it’s so nice to have a full time cheerleader in my corner. Thanks, Savi. Mummy loves you!

Ingredients:

  • one printed heart pdf pattern from Carol Doak’s free patterns page (just scroll down till you see Crazy Patch Heart)
  • OPTIONAL: an 8″ x 8″ scrap of calico or thin white cotton fabric to make a foundation
  • assorted scraps for the heart foundation/paper piecing block
  • 4 strips of fabric 1.5″ x 6.5″
  • 2 strips of fabric 1.5″ x 10.5″
  • 2 strips of fabric 2″ x 10.5″
  • 2 strips of fabric 2″ x 11.5″
  • Wadding 12″ x 14″
  • Backing for 12″ x 14″
  • 55″ worth of binding (need a binding tute? No problem!)

Finished size: about 10″ x 12″ depending on how big the foundation pattern prints. Don’t freak out if it’s not exactly 6.5″ square. Mine wasn’t and I think it looks ok anyway. 🙂

Ok, right off the bat when you look at the next picture you’ll be wondering if I’ve gone crazy. Of course I have, but it has nearly nothing to do with the sewing. Nearly.

I take a class with a lovely lady named Jackie Sparks. She doesn’t have a blog but she’s the chair of my local quilt group, Romsey Quilters. (BTW I do their website too – that’s why it’s so crap). Anyway, she showed me a way to eliminate all the faff of paper piecing by turning it into foundation piecing. All you need is some masking tape, a ruler and a pencil and some calico.

As you can see, I’ve taped my printout down to my mat, then over it I’ve taped a big square of calico, which is so thin you can see right through it. (So it doesn’t add bulk!) Then you simply trace ALL the lines using a pencil and ruler. Make sure you do the outside 1/4″ lines so you have a seam allowance. And I promise you the extra effort is worth it – it makes life SO much easier!

So I’ve drawn all my lines and numbered the spaces in pencil too. That’s important. Do that now.

Clearly, if it’s numbered, we’ll start with #1. ***#s 1, 9, 10, 11 Cut a piece of fabric that’s larger than the space – it’s a tiny space so a square of whatever will do. Place it RIGHT SIDE UP on the BACK of the numbered side and pin in place. See how I’m holding it up to the light to make sure there is plenty of seam allowance on all sides? You should do that too.

Now I’ve cut a big piece for #2. I’ve place it RIGHT SIDE DOWN (Facing down) on top of the #1 piece. See how the only thing actually IN the #2 space is a tiny little seam allowance? That’s because we’ll be flipping it Right Side UP after sewing that line. Also you need to make sure that when you do flip and iron the square of fabric will cover all of the #2 space plus at least 1/4″.

Do what the picture says. Start stitching about 2 stitch lengths before, and stop about 2 stitch lengths after the line.

This is important. You MUST iron after every seam you sew. That keeps it crisp and sharp, which is why you’re doing a foundation in the first place.

Now fold back the calico and trim the seam allowance to 1/4″. MAKE SURE you don’t cut the calico!!!

Now we’re getting to larger pieces. Here’s how to deal with them: 1) Make sure you cut a piece large enough to cover #3 plus AT LEAST 1/4″ on all sides. Personally I cut much larger then trim down. 2) Place it face down on the front, positioning it so the seam allowance is roughly 1/4″ past the line between #’2 and #3. 3) Then pin the line to test your seam before you sew it. 4) Turn it so you’re looking at the numbered side and hold it up to the light as shown above to make sure that once you stitch the line, there is plenty of fabric to cover #3. In this case there’s more than enough.

5) Now reposition your pin so you’re not sewing it and you can sew that line between #1/#2 and #3. PRESS!!!

Here’s how it looks after you’ve added #4. I know it looks messy and awful, but you’ll trim so don’t worry about it. Just worry about the seams and making sure you have enough fabric. Just follow steps 1 through 5 as outlined above and you won’t go wrong.

Here it is after I sewed all the pieces. Doesn’t that look awful?

Here’s the back of that foundation piece. Now that looks all nice and neat, doesn’t it? AND NO TEARING (or tears!)

Now you’re ready to trim the foundation along those outside lines and add your 2 6.5″ strips to the sides. (Again, if yours printed out smaller, don’t fret. Just trim the edges of the strips and decide if you want to add more.)

Here she is all pieced, basted and quilted. I tried a fancy meandering heart FMQ. Some of it looks good, some of it looks like thread vomit as I showed you before. Now all you need to do is put the binding on and you’re good to go!


© Copyright J C Excell, 2011. You are welcome to use any SewHappyGeek tutorial for personal use. You are even welcome to make a couple to sell, but you are not given permission to use my pictures or my words without giving me credit and linking back to the original. You are NEVER allowed to copy an entire tutorial or post.
Sometimes my pictures have my family in them and they are never intended for public use. Also, I work very hard to provide free tutorials for my lovely readers, and anyone copying or selling my tutorials is guilty of copyright infringement.

———————————————————————————————————————-

I am so in love with this technique – I am definitely going to be trying it in the very near future! Monday I am bringing you my friend Brandy from When Life Hands You Fabric…Make A Quilt. She has a fun project in store for you!

NOTE: Don’t forget, I am one of the bloggers who is going to lose Google Friend Connect in March 2012, please take a moment and follow me via Bloglovin’, Facebook, RSS or networked blogs.  You are important to me and I want to be able to stay in contact with you!  Check my side bar for all the best ways to stay in touch after GFC goes bye bye!

Valentine’s Day Showcase – Lyanna from Purple Panda Quilts

Welcome to day 7 of the Valentine’s Day Showcase! Today I have Lyanna from Purple Panda Quilts. I first met Lyanna when I joined Sew Bee Blissful and we quickly became friends. I participated in her Stocking Drive and I look to her all the time for design inspiration and help. She is brilliant!

1. What got you hooked on your craft of choice? Well I love design and anything having to do with color – photography, art, graphic design, etc. One day I woke up and told my husband I wanted a sewing machine so I could quilt – he got me one and the rest, as they say, is history. (You can read all about my quilting journey on my blog)

2. What lights your crafting fire (ie. what keeps you crafting, why do you do it?)? Not to sound like a broken record or anything, but I love design and colors. Quilting is a way for me to turn my ideas into reality. I always enjoy seeing my finished projects whether they are billboards or blankets.

3. What is your favorite Valentine’s themed junk food? I love dark chocolate anytime of the year! =) Especially the dark chocolate M&M’s.

Take it away Lyanna!
———————————————————————————————————————————-

Hello, it’s Lyanna from PurplePandaQuilts. I’m so glad that Melissa has invited me to participate in her Valentine’s Day Showcase. I’ll be the first to admit I’m not a huge Valentine’s Day fan, but I love a challenge and Melissa rocks, so I jumped at the chance to create something. I wanted to make something that was easy and fast (I didn’t have a lot of time on my hands) — this entire project took me only 2 hours from start to finish. Easy peasy!

Ready to get started and see what I designed for you to make?

Ok here, it goes!


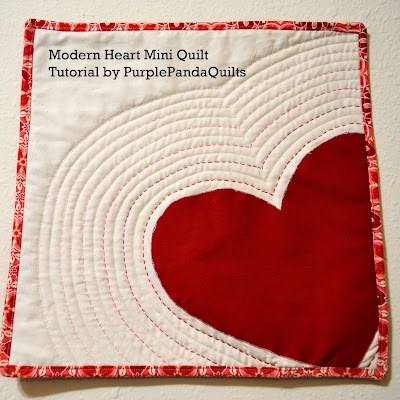
Modern Heart Mini Quilt

Supplies

– 1 15×15 inch piece of fabric for quilt front (I used Kona Natural)

– 1 16×16 inch piece of fabric for quilt back (I used Kona Red)

– 1 11×11 inch piece of fabric for the heart applique (I used Kona Red)

– 1 8.5 x 11 inch piece of printer paper for heart template

– 1 8.5×11 inch piece of Heat n Bond Lite

– 1 16×16 inch piece of low loft batting

– 68 inches of binding

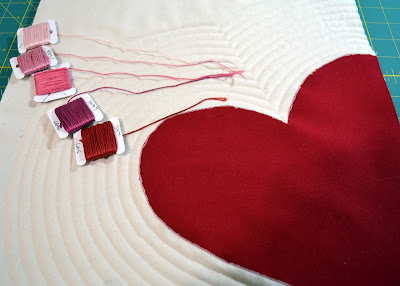
– Assorted colors of embroidery floss (I used DMC 347, 3687, 3833, 893, 151 818)

– Rotary Cutter

– Scissors

– Thread

– Iron

– Thimble

Instructions

1. Gather your supplies.


2. Cut a heart template out of the 8.5×11 piece of paper and use it to cut out the heart applique from your red fabric. 

3. Following the directions on your Heat n Bond Lite, fuse the adhesive to the wrong side of your heart.

4. Lay out your quilt top and the heart. Place the heart in the desired position on the front of the quilt. I placed mine with part of the heart hanging off the front of the quilt.

5. Iron the heart into place, following the directions of the Heat n Bond.

6. Applique the heart onto the front of the quilt. I used a zig zag stitch.

7. Trim front of quilt to a 14×14 inch square. Make a quilt sandwich by layering the outside fabric, batting, and the top right sides out.

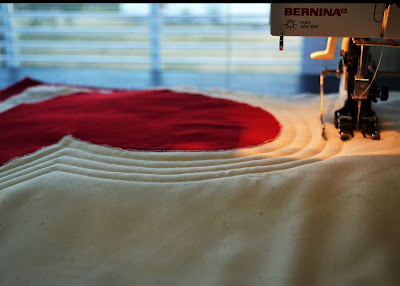
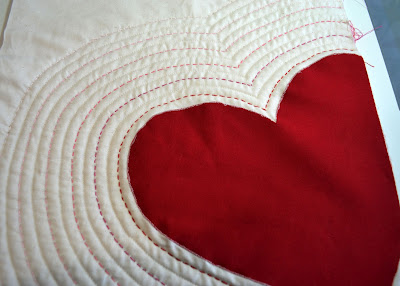
8. Pin and machine quilt as desired. I quilted 11 lines around the heart, each a quarter inch apart using a neutral colored thread.

9. Square up the quilt sandwich, and trim it to 14×14 inches

10. Hand quilt around the heart. I used my previous quilting as a guide, and hand quilted around every other line. This was my first time hand quilting, so if you need some instructions I highly recommend this tutorial from from Sew Mama Sew. My tip would be to get a thimble! This part took the longest of the entire project but is totally worth it, in my opinion.

11. Bind the quilt as desired.

12. Hang (you can attach a hanging sleeve following this awesome tutorial or use grommets following this tutorial both from Tallgrass Prairie Studios)  and enjoy your Modern Valentine’s Day Mini Quilt!


As always, be sure to let me know if you have any questions.


Happy Valentine’s Day!
———————————————————————————————————————-

Thank you Lyanna! Your project is truly stunning! Tomorrow we have a fabulous paper piecing tutorial from Jenna at Sew.Happy. Geek!

Have you started your project yet?

NOTE: Don’t forget, I am one of the bloggers who is going to lose Google Friend Connect in March 2012, please take a moment and follow me via Bloglovin’, Facebook, RSS or networked blogs.  You are important to me and I want to be able to stay in contact with you!  Check my side bar for all the best ways to stay in touch after GFC goes bye bye!

Scroll to Top