Valentine’s Day Showcase

Valentine’s Day Showcase – Debbe from Pieces to Love

Welcome to day 6 of the Valentine’s Day Showcase! Today I have my friend Debbe from Pieces to Love. She has a gorgeous candle mat for you that is an original design and positively stunning!

1. What got you hooked on your craft of choice?
I have always enjoyed sewing and making crafts.  When I was in high school, I worked at a fabric store and continued to do so all the way through college.   I made my first quilt my senior year of college and it has just grown from there, just like my fabric stash.
2. What lights your crafting fire (ie. what keeps you crafting, why do you do it?)?
Sewing is my outlet.  When I get stressed out my first go to is my sewing, where I have to focus on what I am working on and not the petty things that had me wanting to strangle someone.  It also give me ‘me time’ which when you are a stay at home mom, sometimes you just need that solitude.  I’m not a super hero so I create or re-create things as much as possible.
3. What is your favorite Valentine’s themed junk food?
Hmm…I love the boxed candies, they don’t even have to come in the pretty little heart package either.  My favorites are the ‘raspberry creme’ and ‘orange creme’  then the caramels as long as they are ooey gooey and not hard.
Take it away Debbe!
———————————————————————————————————————————————————-

When Melissa @ Sew Bittersweet Designs asked me to be a part of her Valentine’s Showcase, I got a little excited.  Obviously I agreed to be a part of the fun.  Then a few days later the regret hit, I had no clue what I was going to make.  I kept thinking of applique projects, paper piecing projects, yummy sweet treats, needless to say I was a bit overwhelmed and every time I thought I had something to do, I would see the same thing posted around blog land.  I finally came up with the ‘Kissing Hearts’  This is my own design, I spent a lot of time with my trusty seam ripper (which I think needs a name, Jack maybe?) as I learned what worked and didn’t work during the sewing process.  This is a ‘fat quarter friendly’ or ‘scrap friendly’ project that can be made in no time at all.

For an approximate 17″ block, you will need to cut the following pieces:

2- 6.25″ squares  (use 2 different fabrics)
8- 3″x4.25″ rectangles (4 each of 2 different fabrics, same as your squares)

(For the next 3 cuts of fabric I used the same white on off white fabric)

4- 3″ squares

1 1.5″x24″ strip of fabric (or 2 1.5″x12″ strips)

2- 2.5″ x WOF (width of fabric)
(or 2- 2.5″ x 13″  and 2- 2.5″ by 18″)

Take the 2  6.25″ squares and cut in half on the diagonal.

From then 1.5″x24″ strip of fabric (or 2 1.5″x12″ strips) cut 16 1.5″ squares.

Take your 16 1.5″ squares and draw a line on the diagonal from corner to corner. (This is going to be your sewing line)

.

Now that you have everything cut and marked, it’s time to sew! All seams are 1/4″ unless otherwise specified.

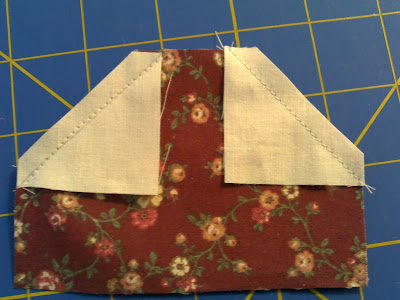
Take your 8 3″x4.25″ rectangles and your 16 1.5″ squares.  Line you squares up on the corners of your rectangles like in the picture below and sew on the line you drew.

Next, line your ruler up on your stitching line and trim off the excess leaving a 1/4″ seam.

You should have something that looks a little like this.

Press your ‘flaps’ open.  Make sure to press 1 seam allowance to the light and one dark You only need to do this on 4 of the pieces, so when you sew them together they line-up nice and pretty.

You should have 8 pieces that look like this.

Now, take your 8 rectangles and sew them together.  Match up your seams where you pressed one seam forward and one backwards so they ‘lock together’.
Once you sew them press again, and admire your pretty points.  These will be the tops of your hearts. (These should measure 8″ across)
Next, take your 4 triangles and lay out a square.  Sew the triangles together so that  when you open them up they will lay in the alternating  order

Press your seam toward the dark of each peace.

Now line up the seams locking them together.  If you run your finger down the seam you can feel if they are locked together or not.  You may want to place a pin or two so it doesn’t move on you.  I tend to live on the edge most of the time and don’t use pins.

Press your square open and you should have an 8″ that looks something that looks like this. Well I hope it isn’t this blurry. :o)
Now, sew your 4 3″ squares to the ends of 2 of your heart tops.  If you lay everything out in a square it should look like so.

Take the 2 heart tops that you did not sew the squares onto and sew them to the large center square and press open.  Then sew the other 2 heart tops that have the squares sewn to them to the other two sided of the center block.

Your piece should now look like this.

It is now time to sew on the outside borders. Pick 2 of your border strips and sew them to opposite sides of your block. Then repeat on the other two sides.

Use your ruler and rotary cutter to ‘square up’ your block.
Now That you have your block all squared up.  Layer it with your favorite batting and add some backing  and quilt as desired. Happy stitching to all, I hope you come to visit me over at Pieces to love.
My finished block.

Action shot, sorry for the poor lighting.

Thank you Melissa, for hosting and giving me the opportunity to create something for your Valentine’s Showcase. Through the blood, (yes, there was blood involved), and almost tears from banging my head against the wall, I enjoyed creating something new and would love to do something again.
———————————————————————————————————————

Thanks so much Debbe! Tomorrow Lyanna from Purple Panda Quilts will be here sharing a beautiful mug rug with you!

NOTE: Don’t forget, I am one of the bloggers who is going to lose Google Friend Connect in March 2012, please take a moment and follow me via Bloglovin’, Facebook, RSS or networked blogs.  You are important to me and I want to be able to stay in contact with you!  Check my side bar for all the best ways to stay in touch after GFC goes bye bye!


Valentine’s Day Showcase – Lisa from Cupcakes, Hairbows & Kiddos

Welcome to Day 5 of the Valentine’s Day Showcase. There have been some absolutely amazing projects so far and today I have a yummy treat in store for you. My best friend, Lisa, just launched her new blog, Cupcakes, Hair Bows & Kiddos (yesterday!) and she is here sharing her very own original Dark Chocolate Cupcakes with Dark Chocolate Cinnamon Butter Cream with us! Please go check out her blog and follow her – she doesn’t have much now, but believe me when I say you won’t regret the decision!

1. What got you hooked on your craft of choice?
I love the process of baking, and I especially love tasting the results!

2. What lights your crafting fire (ie. what keeps you crafting, why do you do it?)?
I love having things that I have made, to give to the people who are special to me. Whether it be a bow to match an outfit for my daughter, a quilt, a homemade card, or a tasty baked good. It is so fulfilling to see someone smile and enjoying something I made especially for them.

3. What is your favorite Valentine’s themed junk food?
Chocolate, of course!! 🙂

Ok Lisa, teach us your yummy baking secrets!
———————————————————————————————————————————————————————————

Thank you, Melissa, for letting me invade your blog today. I am Lisa from Cupcakes, Hair Bows and Kiddos. I am just starting out on my blogging adventure, and I would love it if you would follow along. My blog is about baking, quilting, and crafting with, and for, my kids.

Now I know that you are all crafting away right now, and getting your projects ready to link up in Melissa’s Valentine’s Day linky party. But, have you thought about dessert for you and your sweetie (or kids) to share on that special day? No worries… I have got you covered! How about some Dark Chocolate Cupcakes with Dark Chocolate Cinnamon Butter Cream? What says romance more than dark chocolate and the spice of cinnamon? If you ask me, not much. So let’s get baking!

First off let’s talk cocoa powder. I love dark chocolate and was so excited too come across this deliciousness. Thank you Hershey’s!

You can of course use any brand, or type of cocoa powder you choose, this is just the one I like.

You will want to preheat your oven to 350 degrees F.

First we are going to cream together the butter, brown sugar and sugar.

I use my trusty KitchenAid stand mixer, but a hand mixer will work just fine.

Mix them until they are fully combined and look something like this.

In a separate bowl, combine the rest of the dry ingredients.

Mix with a spoon until combined. Should look something like this.

Set this aside.

To the butter and sugar mixture add your eggs, oil, warm water and vanilla. I like to crack my eggs into my glass measuring cup with my oil, that way if there are any shell pieces they are easy to get out.

Mix until fully combined. Your mixture should now look something like this.

Now it is time to add in your dry ingredients. This is best done 1/2 cup at a time. Mix between each addition. Once all mixed, your batter should look like this.

It should should be thick, but still fall off your mixer’s paddle.

For this batch I used a Wilton brand heart-shaped silicone mold pan, and Wilton brand silicone heart-shaped cupcake molds. They look like this:

I filled the small heart molds about 2/3 full and the cupcake molds to the line on the inside. Here they are before baking:

Then I sprinkled the tops with some pretty nonpareils,

and baked.

If you use small molds like my blue one, or mini-muffin tins, it will take 7-10 minutes and normal size cupcakes will take 10-15 minutes, or until a toothpick inserted in center of cupcake comes out clean.

Remove from oven and allow to cool completely before frosting.

While you are waiting for your cupcakes to cool, let’s get started on the frosting. First you want to cream together the butter and the shortening.

Sift your powdered sugar. I used 2 cups for mine.

Beat until fluffy. Once it looks like this

add your cinnamon extract, cocoa powder and milk, and mix completely. Start with 3 tablespoons of milk. If you want a thinner butter cream, add more. (3 was perfect for mine) It should look something like this

From here you can either spread on your frosting onto your yummy cupcakes, pipe it on nice and pretty.

Here are my cooled cupcakes…

And here they are all dressed up!

And what would making cupcakes be without a little helper?

Enjoy!


Dark Chocolate Cupcakes with Dark Chocolate Cinnamon Butter Cream

Preheat oven to 350 degrees F

For the cake:

6Tbsp butter
1/4C packed brown sugar
3/4 granulated sugar (or superfine sugar)
2 eggs
1/3C veggie oil
2tsp vanilla
1.5C flour
1.5tsp baking powder
1tsp cinnamon powder
1tsp salt
1C cocoa powder (I used dark chocolate)
1C warm water

For the Frosting:

1/2C(8Tbsp)unsalted butter (softened)
1/2C(8Tbsp) shortening (room temperature)
2-3 cups powdered sugar
3/4C cocoa powder
3-5Tbsp milk
1/4tsp cinnamon extract

Makes 18-24 standard cupcakes. I got 12 standard size and 24 mini hearts out of my batter. Bake minis 7-10 minutes. Standard size 10-15 minutes.

I hope you enjoy your cupcakes. Thank you for reading. Thank you again Melissa for letting me share my recipe. I hope you all have a wonderful Valentine’s Day!
—————————————————————————————————————————-
So I will share with you the cruelest joke of all – I am allergic to chocolate and I can’t have any of Lisa’s cupcakes – so you all have to make them and then tell me what I am missing out on!!!

Have you started your project for the Showcase Linky Party yet? We have some great prizes for three lucky entrants – so you better get creating!

NOTE: Don’t forget, I am one of the bloggers who is going to lose Google Friend Connect in March 2012, please take a moment and follow me via Bloglovin’, Facebook, RSS or networked blogs.  You are important to me and I want to be able to stay in contact with you!  Check my side bar for all the best ways to stay in touch after GFC goes bye bye!


Valentine’s Day Showcase – Kris from Fabric Problem

Welcome to Day 4 of the Valentine’s Day Showcase – if this is the first time you have visited this month, head over to the Valentine’s Day Showcase page to learn more about what’s going on. I am hosting 10 days of tutorials from some of my favorite bloggers and crafty friends and then starting February 15th a linky party for you to show off what you made for Valentine’s Day – there will be some fun prizes too!

Today I have Kris from I don’t have a problem, I have a well-rounded fabric stash! – if you are on Facebook and you sew – this is one group you need to join! It is so much fun and so supportive!

Before Kris’s fun tutorial – I thought we should get to know her a bit:

1. What got you hooked on your craft of choice?
I’ve been fascinated with designing clothing, toys, etc. ever since I was a kid.  I used to spend hours drawing designs that I wanted to create someday.  The only problem was, I had NO sewing experience other than a truly disastrous skirt that I made in 8th grade Home Ec!  Of course, my lack of know-how didn’t keep me from haunting fabric stores and thinking up things I’d like to create, so my fabric stash started growing before I even had a sewing machine in the house.  I recently worked up the nerve to cut into my stash and start creating, and I’ve been slowly but surely picking up new techniques (and making up my own weird ways of doing things) ever since.  I still have a LONG way to go, but it’s really nice to finally be able to take my ideas from paper to reality! 

2. What lights your crafting fire (ie. what keeps you crafting, why do you do it?)?
In some ways, I’m an impulse crafter- an idea pops into my head and I HAVE to get it done.  Fabric shopping is dangerous for me, because I go in looking for one thing and come out with supplies for eight other projects that were too good to pass up!  When I’m in a slump, challenges and bees help me get back on track, and I get a lot of inspiration from seeing the cool things that others have created. 

3. What is your favorite Valentine’s themed junk food?
That’s a tough one!  Anything chocolate, of course, but I really love the Lifesavers strawberry and cream lollipops I used to get as a kid.  They’re not easy to find these days, though!

Take it away Kris!
___________________________________________________________________________

Today’s tutorial is something sweet and squishy for your favorite sweetheart: a Valentine’s Owl Stuffie! This is a fun little gift for kids, teachers, and friends, and it’s fun to make, too! You can download a printable PDF version of the tutorial below, click the images or visit http://tinyurl.com/ValentinesOwlStuffieTutorial ; . Happy Valentine’s Day, and happy sewing!

PLEASE NOTE- THE PATTERN PIECES BELOW AREN’T TO SCALE! YOU’LL NEED TO PRINT THE PDF TUTORIAL TO GET THE FULL-SIZED PIECES!

_____________________________________________________________________

Isn’t that the most precious owl you have ever seen!!! You know you want to make one for yourself…and maybe for the little girl in your life too 🙂  Tomorrow we will have Lisa – future food and craft blogger. I have known Lisa for almost 20 years and she is an AMAZING baker – she has a sweet treat in store for all of us.

Have you started working on your entry for The Showcase yet?

NOTE: Don’t forget, I am one of the bloggers who is going to lose Google Friend Connect in March 2012, please take a moment and follow me via Bloglovin’, Facebook, RSS or networked blogs.  You are important to me and I want to be able to stay in contact with you!  Check my side bar for all the best ways to stay in touch after GFC goes bye bye!


Valentine’s Day Showcase – Vicki from Sassy Blog

Welcome to day 3 of the Valentine’s Day Showcase – today I have Vicki from Sassy Blog for you! Vicki and her daughter Jennifer own and operate Sassy Packs – one of the sponsors for the Valentine’s Day Showcase. They are very talented have a lot to offer both new and experienced quilters alike! Please take a few moments to check out their blog and shop.

1. What got you hooked on your craft of choice? I was looking for a winter hobby a few years ago after I quit working. Most of my time was focused on golf, but there were a few months when it was just too cold. So I took a beginning quilting class. I didn’t expect it to hook me as much as it did, but I just loved it! First I joined a small quilting group and then a guild, which helped expand my knowledge – not my skill so much (haha!), just my knowledge! The groups really showed me how big the world of quilting is and much there is to learn!

2. What lights your crafting fire (ie. what keeps you crafting, why do you do it?)? The idea that my quilting interests are always changing. I’ve learned to never say I don’t like this style or that block, because as soon as I do I see it done in new fabrics or a layout that makes me fall in love with it. And then I want to make one! I guess in a way, it’s like golf – you never really master it; you just keep learning and improving.

3. What is your favorite Valentine’s themed junk food? Cinnamon candy!! Red hots, cinnamon hearts, cinnamon Jolly Ranchers and hot tamales (but those are a year round fav!).

______________________________________________________________________________________________________

Hi Melissa and friends! Thanks for having me be a part of your Valentine's Day Showcase. I have a super quick placemat and napkin tutorial. (It'll probably take longer to read the tutorial than it will to actually make the placemats!)


I'm using a striped border print for the body and red Kona for the binding. I also used the same red Kona for the napkins with a light-weight white batiste on the back. I'm sure you could use white Kona also - I just wanted to make them a little lighter in weight.

I used a yard of the border print and had plenty left over - I could easily make 2 more.

The napkins and binding will use about 5/8 yard of red Kona.

The white on the back of the napkins will take less than 1/2 yard.

You'll also need 1/2 yard of backing for the placemats.

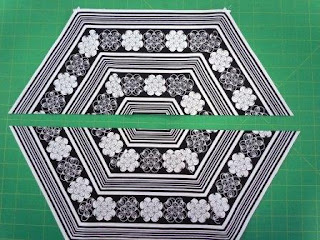
Cut a strip of border print 7-1/2" wide by the length of the fabric (I used scissors to follow the lines).

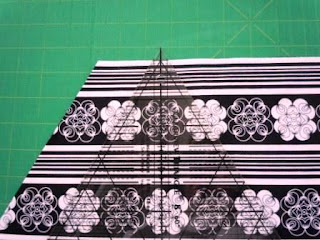
You can cut the wedges with either a 60 degree ruler, or your regular quilting ruler with marked angle lines. I'll do the 60 degree ruler first. Place the ruler near the left edge, making sure you're all the way on the fabric:

Be sure the top line is straight with the fabric's cut edge:

Cut the left side with your rotary cutter (you may have to go to the other side of your table). Don't move the ruler. Cut along the right side of the ruler:

Now lift the ruler, turn it upside down and place it for the next cut:

Cut along the right edge, flip the ruler and cut again. Continue until you have 8 wedges - you may have to cut another strip of fabric.

Note: if your lines are perfectly symmetrical, you can just pile these up. If the stripes are different (like mine), you have to keep the "up" and "down" triangles separate. Otherwise, the lines won't match up when you sew them together.

Finally, we need to cut the long wedges. Mark a spot 2" over from the top of your last cut and lay the ruler's left edge on that spot. Cut 2 long wedges from each direction (total of 4):

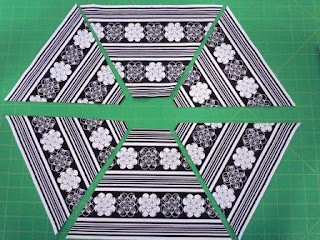
Lay out 4 triangle and 2 long wedges (from the same matching piles) as shown below:

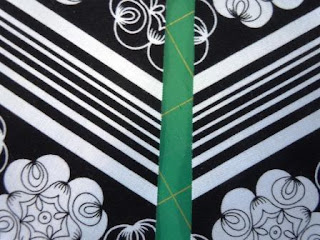
Sew the top three together and then the bottom three together, matching the lines along the seams:


You should have two pieces that look like this:

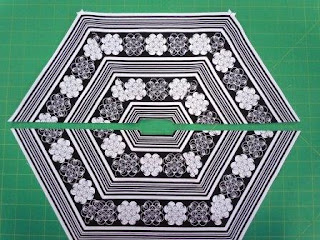
Notice that the center is notched out - lay a ruler along that edge and trim both side even:

Sew these two pieces together!

Add batting and backing; quilt and bind!

*******

BINDING TIP: If you sometimes get those nasty little "peaks" when turning 60 degree corners with binding, click here to see how I solved that problem!

Now, if you don't have a 60 degree ruler:

Most quilting rulers have angle lines marked on them. Find the 60 degree line and lay it even with the bottom edge of your fabric, as shown below. The edge along the left is now a 60 degree line - cut there:


To cut the other side, first mark a point 1/2" from the top cut (see pin in photo below) and then turn your ruler and lay the other 60 degree line along the bottom of the fabric (there are two lines forming an X across the "60" on the ruler):

Continue cutting pieces as outlined above. When you are ready to cut the long wedge, mark a spot 2-1/2" from the previous cut and line the right side up with that mark.

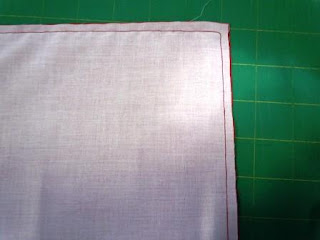
To make coordinating napkins, cut (2) 13-1/2"  squares from the red and 2 from the white. Place them right sides together and stitch 1/4" from the edge all the way around, leaving a couple inches open on one side to turn.

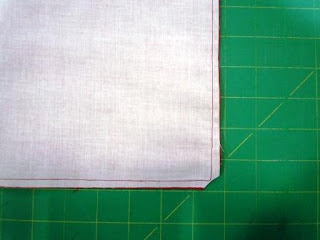
Trim the corners:

Turn and topstitch close to the edge:


Ugh! That last picture was taken at a different time than the others! It really is red, not pink!

And we're all finished!!:


Oh - I need a white tablecloth on that table (and some wine in that glass!)!

Thanks everyone! We blog at http://www.sassypacks.blogspot.com/. We'd love to have you come over for a visit and follow us! :)  Happy Valentine's Day!
_________________________________________________________________________

Thank you Vicki for showing us not only how to use a 60 degree ruler - but also how to do this project with our standard quilting rulers! Come back on Monday for a project from Kris over at I don’t have a problem, I have a well-rounded fabric stash!

Will you be spending your weekend whipping up a Valentine's Day Project to enter into the showcase? Get cracking!

NOTE: Don’t forget, I am one of the bloggers who is going to lose Google Friend Connect in March 2012, please take a moment and follow me via Bloglovin’, Facebook, RSS or networked blogs.  You are important to me and I want to be able to stay in contact with you!  Check my side bar for all the best ways to stay in touch after GFC goes bye bye!
Valentine’s Day Showcase – Connie from Quilting by the River

Welcome to day 2 of the Valentine’s Day Showcase!

Today Connie, from Quilting by the River, has an amazing tutorial for a Valentine’s Day table runner – change the fabrics and this will work for any time of year! Before the tutorial, let’s get to know Connie a little:

1. What got you hooked on your craft of choice? When I was about 16 I had a girlfriend whose mother was always cutting small squares of fabric and making quilts. Every time I went over there I was fascinated by what she was doing and I soon started cutting up scraps and making 9 patch blocks. My first quilt was hand tied with a blanket inside and flannel on the back. Over the years I have switched to painting, digital scrap-booking, counted cross-stitch but I always come back to quilting!

2. What lights your crafting fire (ie. what keeps you crafting, why do you do it?)? I love working with fabrics and the challenge of putting the right colors and prints together to make something special. Quilting the piece can also give it an entirely different look. I also love looking and adding to my beautiful stash!

3. What is your favorite Valentine’s themed junk food? My favorite Valentines’ treat is Hershey Kisses, they melt in your mouth!

And now – Connie – Take it Away
___________________________________________________________________________

Hi, I’m Connie from Quilting by the River and I’m going to show you how to make a string pieced runner that would be perfect for Valentine’s Day. Thanks so much Melissa for inviting me to be part of the Valentine’s Day Showcase!
The first thing you want to do is find a helper…..who will help you pick the string pieces to use in your blocks. Simon loves to help out!
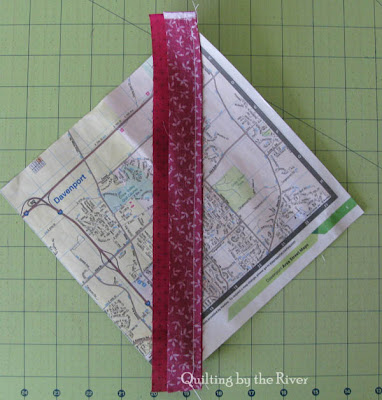
The blocks in the runner are made from 4 inch squares of strings. I like to start with a 8 inch piece of paper from a telephone book and make a 8 inch block. I used strips varying in size from 1 inch to 2.5 inches.

Start in the middle and put one strip right side up with another right side down on top of it and stitch. I have a couple used needles that I save for using on paper; use a small stitch so it will be easy to tear off the paper when you are done.

Continue adding strips until you cover the entire piece.
I like to starch the block, then flip over and trim it to the edges of the paper.
Finished 8 inch block.
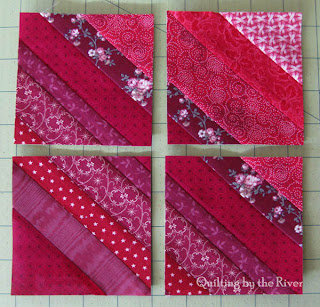
Now I cut the block as shown into 4 pieces.
You could just make 4 inch blocks but I prefer to do it this way.
  • Make 4 – 8 inch blocks
  • Cut into 16 – 4 inch blocks (you will have 2 blocks left over)
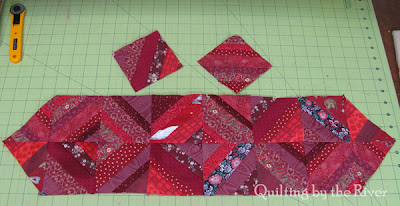
  • Take 2 of the blocks and cut them diagonally for your ends
Sew your blocks together as shown.
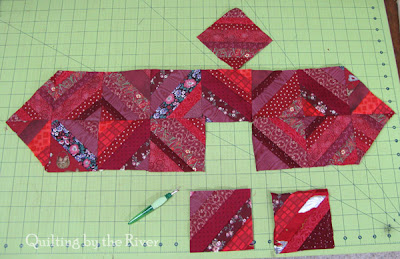
When I took a picture of the blocks pieced together I noticed how the white in this block was distracting.
I removed it and added a different block…..much better.
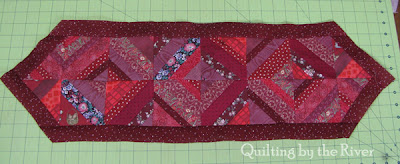
Next add a 1.5 inch border.
Then add a 3 inch border.
I used Warm & Natural batting, did some stipple quilting in the center and a free motion leaf on the border. The binding is 2.5 inch strips that I sewed to the right side of the runner, then machine stitched it down from the front. The runner finishes at 14 x 36 inches.
I hope you enjoyed this tutorial and make a table runner!

___________________________________________________________________________

Thanks so much Connie for this wonderful tutorial! I love how versatile it is – change the fabrics and it can work for virtually any time of year! Tomorrow we will have Vicki from Sassy Blog – make sure you stop by to see her creation.

NOTE: Don’t forget, I am one of the bloggers who is going to lose Google Friend Connect in March 2012, please take a moment and follow me via Bloglovin’, Facebook, RSS or networked blogs.  You are important to me and I want to be able to stay in contact with you!  Check my side bar for all the best ways to stay in touch after GFC goes bye bye!

Scroll to Top