2012

Ole Frog Eyes Review & Giveaway

(note: Snoodles from Lily Pad Quilting gave me a one month trial so I could give her my thoughts on her software, I then offered to do a review on my blog, the thoughts and opinions presented are my own – and PS. I will be signing up for a subscription when my trial is over!)

Have you heard of Ole Frog Eyes? Ole Frog Eyes is an online quilting tool for those of us who are not lucky enough to have a design wall. There are lots of different types of design walls. You can buy a fancy portable one – but those can run you upwards of $150.00. You can make one – if you have the space – with simple flannel or quilt batting. You can use your floor – but that is rather temporary…

This has been my solution since…well forever. I have never had the space for a design wall.  Well, this is not really convenient – especially when I am working on 4 or 5 quilts at a time. I can’t have all the blocks out at once; I can’t have more than one quilt out at a time. This is where Ole Frog Eyes comes in; they are a VIRTUAL design wall!

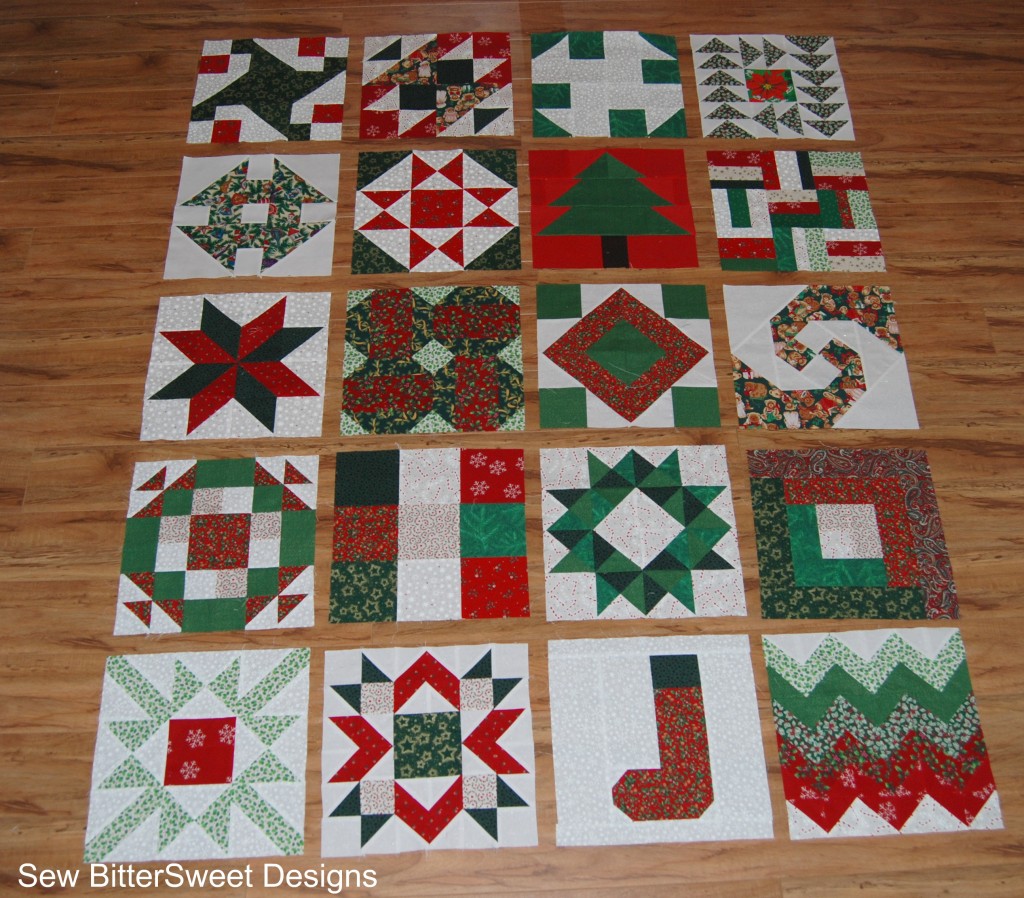
Click here to see my whole Vintage Christmas Sampler in Ole Frog Eyes.

There are several cool features that come with your virtual design wall.

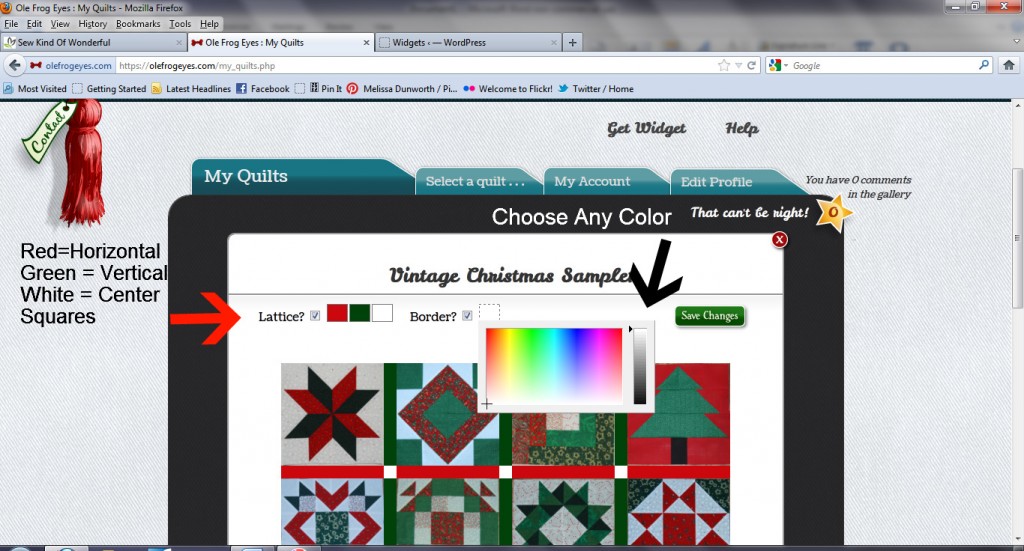
You can upload any block you want, then you can choose borders, in virtually any color, and also select colors for you lattice (sashing). The lattice allows you to select up to three colors: horizontal, vertical and what I will call the center squares – where the horizontal and vertical sections meet.

Do you remember my post last week of all the blocks I had completed from SewHappyGeek’s SewHappyQuilt QAL? I had to make a collage of my blocks because I just don’t have much space to lay out my blocks. Well here they are all laid out – with potential sashing and border colors!

Here are the basics for using Ole Frog Eyes:

  1. Your image must be a jpeg
  2. Crop your photo to a square – just like your block
  3. Make sure the file size is no more than 30 kb – there is an awesome video tutorial on Ole Frog Eyes on how to edit your photos and resize them
  4. Click on Create a Quilt
  5. Name It
  6. Select your template – classic or on point
  7. Enter number of columns
  8. Enter number of rows
  9. Check the box if you want to have a lattice (sashing)
  10. Check the box if you want to have a border
  11. Then start uploading your photos and select your colors for lattice (sashing) and border

Here is what it looks like when selecting your lattice (sashing) and border colors. As you can see, they offer every color under the sun.

Things I like about Ole Frog Eyes:

  • Virtual Design Wall! I’m not sure I need to say more about that. I have a 2 year old and limited space in my sewing room. Virtual anything is beyond welcome!
  • You will never have to pick your quilt blocks up again!
  • Lots of choices for the lattice (sashing) – up to three different colors – this allows more design options
  • Border – this allows me to visualize my end product and give me an idea of what colors will work well
  • Ease of use – after watching the video on making my image size smaller, I was off and running. I have 2 more quilts in the works that I am going to be uploading to Ole Frog Eyes
  • Visual progress: with each block I upload – I can see the progress I am making on my quilt. When I started uploading my Sew Happy Quilt blocks I realized that there were some prints that I had overused and some that I hadn’t used at all, this allowed me to even up my usage of the fabric line and my quilt is more balanced now.
  • Affordable! It is only $2.50 per month.  On almost any budget that is easy to swing.
  • If you have any issues – you just have to pull the red cord and an email window will open to message the website administrator for help! (makes me feel so luxurious to have a cord to pull for instant help)
  • You can display your quilts online and have people comment on them – and who doesn’t love positive feedback!

Area’s for Improvement:

  • I would love to see the next version of Ole Frog Eyes to have a drag and drop feature. That way after uploading you blocks you can easily move them around into a layout you like better. Right now you have to delete your blocks and reload them.  I have spoken to Snoodles about this and I do believe it is something they are working on for the next version.

Final Thoughts:

This is a great product for anyone who has the following limitations: limited space, pets (pet hair on blocks = more work cleaning later), toddlers (mine likes to play with my blocks), no sewing space (kitchen table double as your sewing area?).  It is also great for figuring out fabric usage, layout, lattice (sashing) and border colors.

Now for the giveaway! Snoodles and Padsworth (the Ole Frog Eyes mascot) have decided to give two of my wonderful reader’s free one-month subscriptions to test drive this awesome software!

So how can you enter?!? Two ways to enter:

  1. Check out the Ole Frog Eyes website and tell me why you would like to use it? Personally – I like being able to see my fabric/color distribution. (entry 1)
  2. Blog, Tweet, or Facebook about this giveaway, come back and give me the link. (entry 2)

Please make sure you are following my blog – there are lots of ways to do it (this is mandatory to enter but does not count as an entry).

Good luck! The giveaway will be open through 9pm Friday March 9th. I will announce the winner on Saturday March 10th.

And the Winners are…

I love starting the weekend out with announcing a winner or four! Today I am heading off to the Sew Expo in Puyallup, WA and I am so excited because my mom is coming with me! And to top it off, today is my hubby’s birthday – we are taking him out for a nice dinner tonight to celebrate!

Before I head out though I thought I should let everyone know who won the charm packs from Fat Quarter Shop!

As a reminder – each winner has one a charm pack of Hello Luscious.

Winner 1: Nancy D – “I follow FQS via email, their blog and now on Pinterest too!”

Winner 2: MBMeadows – “I follow FQS on twitter!”

Winner 3: Diana – “Follow Fat Quarter Shop on Pinterest as Diana Z.”

Winner 4: Ashley G – “I like you on FB!”

Congratulations Everyone! I will be emailing everyone when I get home from the Sew Expo!

Look back on Monday – I am doing a fun review and a giveaway. Have a wonderful weekend!

It’s Friday! Woot!

Today is Friday – in a couple of hours my parents will be landing! I am so excited to see them, we haven’t seen them since Christmas.  On Saturday, my hubs and dad are going to watch Anne so that my mom and I can attend Sew Expo in Puyallup WA. This will be the third time my mom and I go and I am really excited to attend – look for pictures and fun on Tuesday next week!

Today also marks the last day to enter the giveaway from Fat Quarter Shop. Have you seen the 2012 Designer Mystery Quilt Block of the Month they are putting together? Of course you haven’t…it is a mystery!

There are 12 Moda Designers for this BOM and each designed a block:

Aneela Hoey
Bonnie
& Camille
Blackbird Designs

Bunny Hill Designs

Cosmo Cricket

Fig Tree Quilts
Me and My Sister Designs
Minick & Simpson
Kate Spain
Pieces from My Heart
Primitive Gatherings
Sweetwater

I have a feeling I will be signing up for this as a gift to myself for Mother’s Day. The colors and this teaser block just have me falling in love!

What about you? Do you sign up for Mystery Quilts, BOMs and QALs with a recipient in mind or do you sign up, make the project and then figure it out later?

I will be back tomorrow with the winner of the giveaway!

Quilting Along

Last December when Jenna at SewHappyGeek debuted her SewHappyQuilt QAL – I just knew I had to participate.  I already had the perfect fabric in mind. Well, aside from this week, I have managed to keep up 100% with the QAL. I haven’t done this week’s block yet, I decided to baste my Sister-In-Law’s baby quilt today. I am hoping to get the 11th block done tomorrow or Monday.

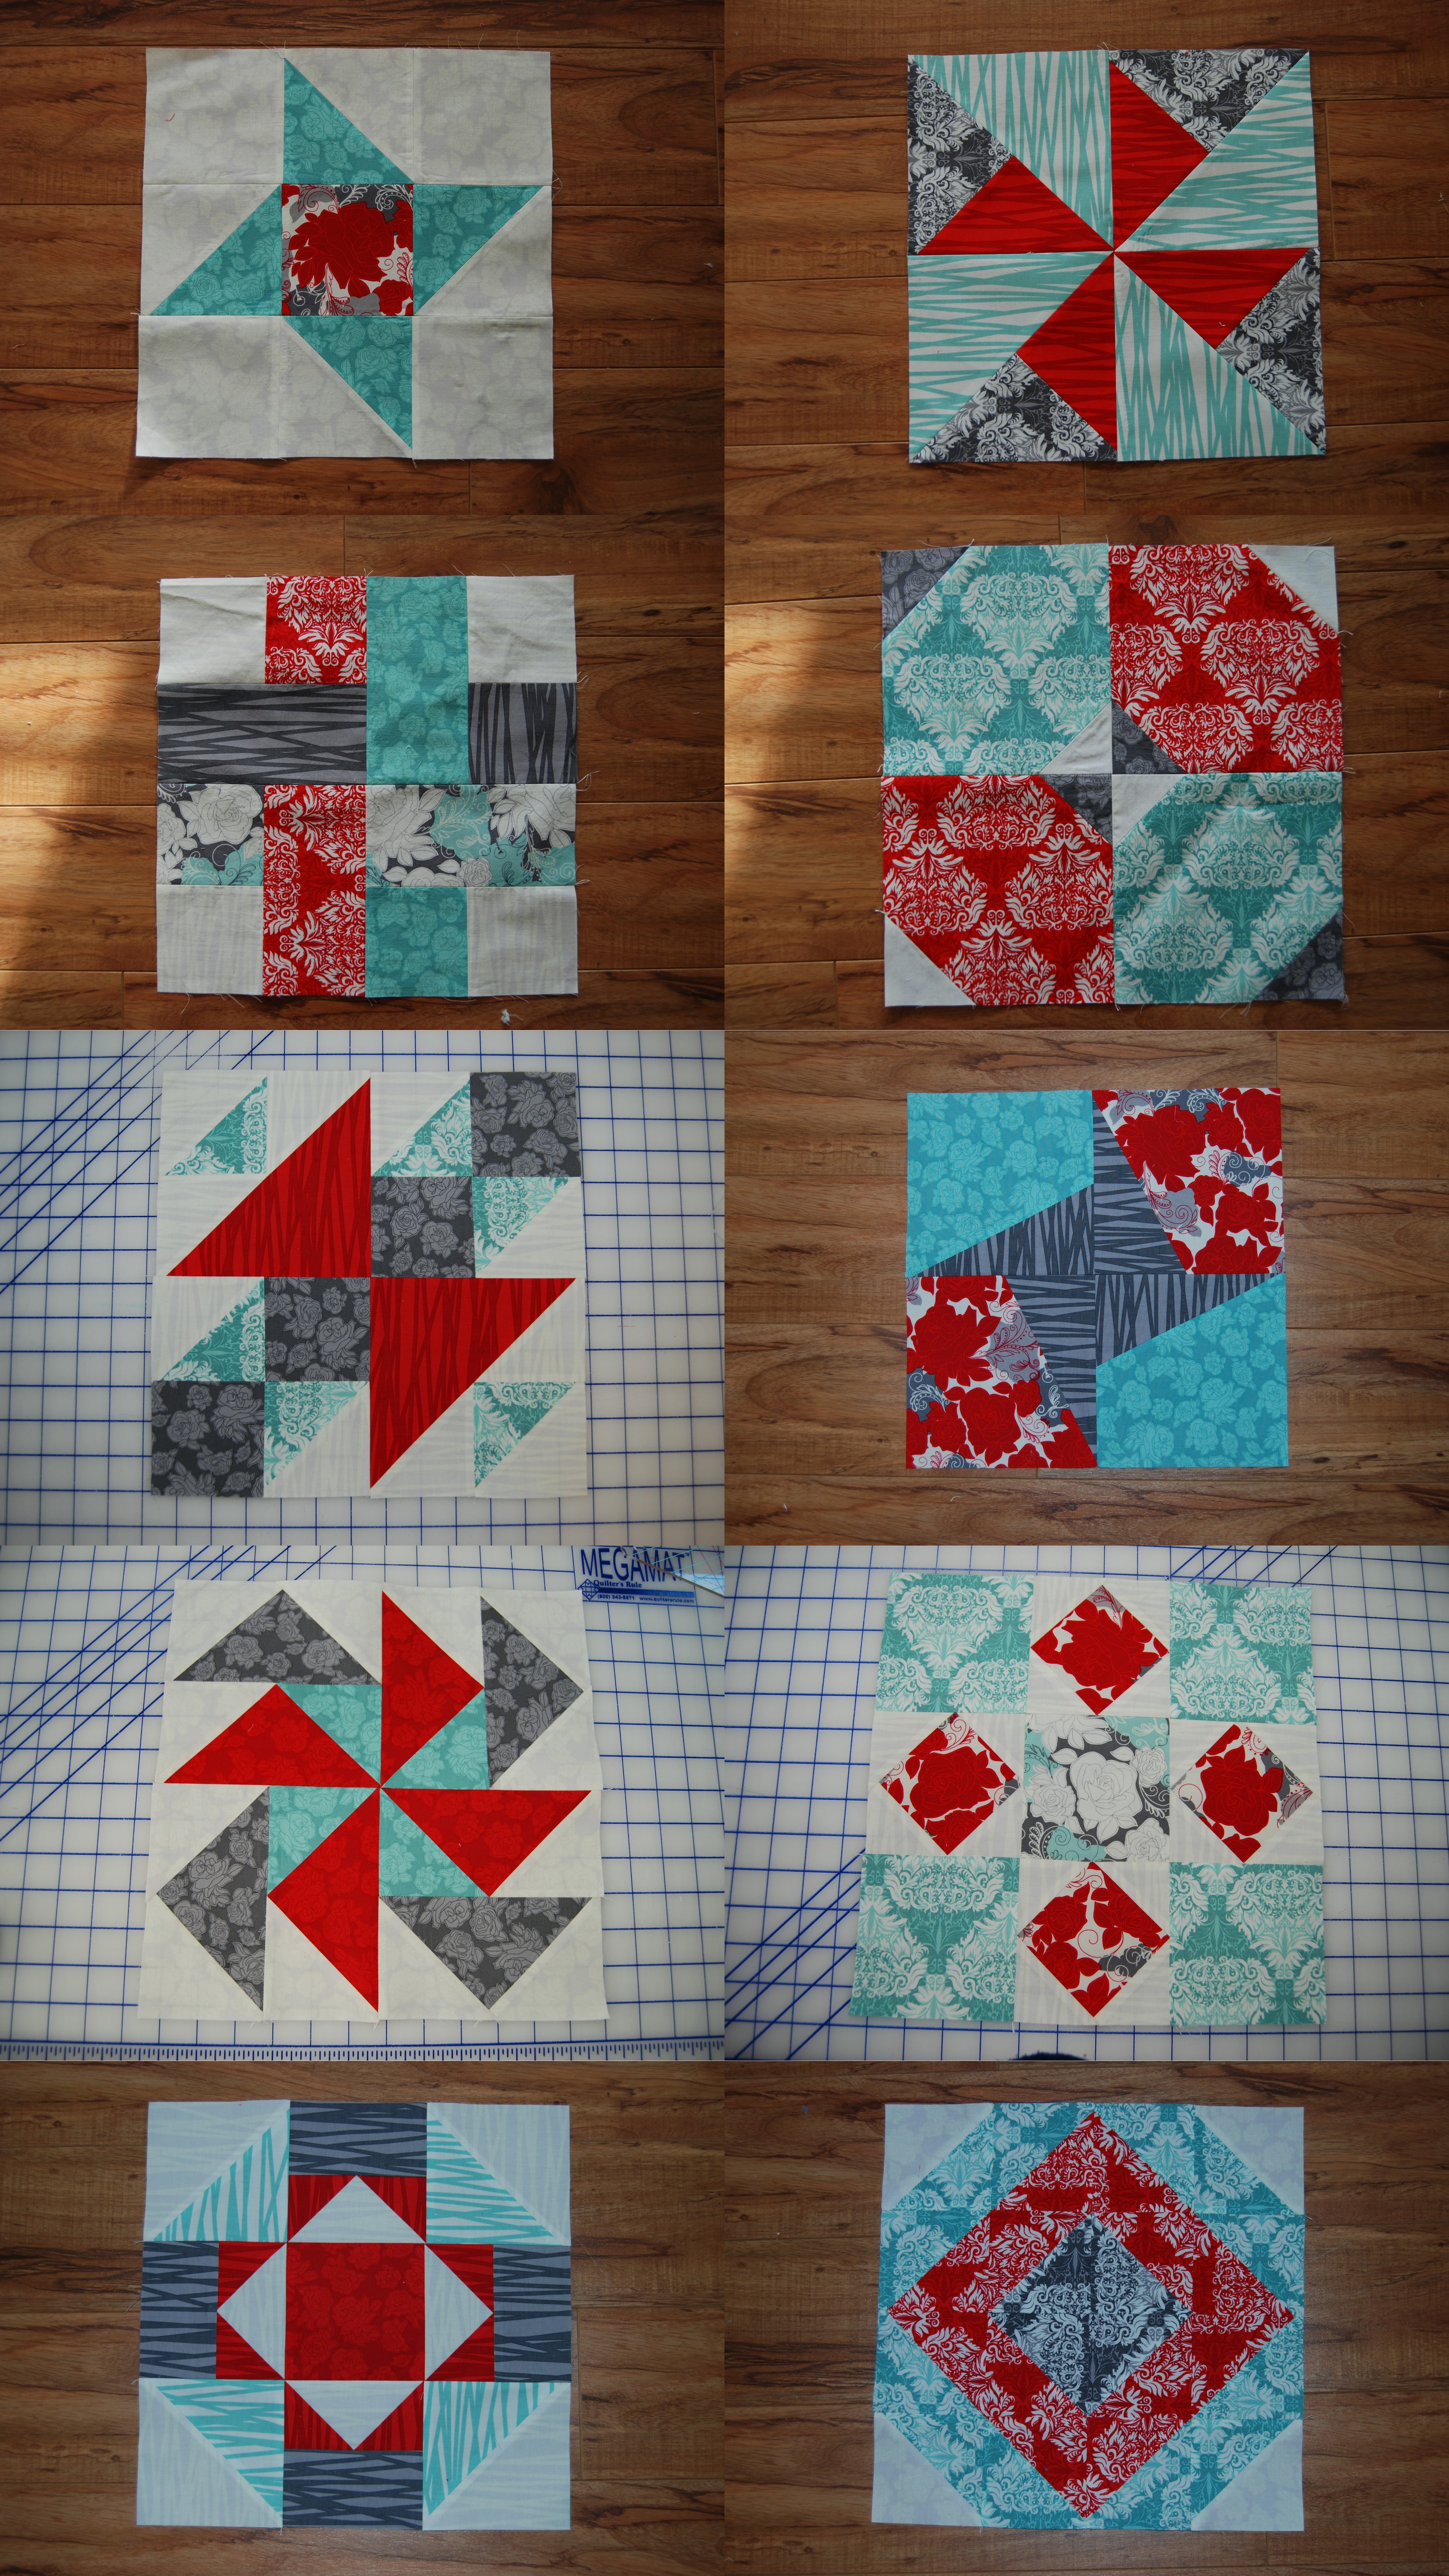
Here are my blocks so far. I am using Rendezvous by Khristian Howell. I am sew in love with this line! I am thinking I should have enough and will also be using the line for the backing.

What do you think? Isn’t this going to be a fabulous cuddle quilt? I already know where it is going to live in my house – in my sitting area in my bedroom – which we are still working on.

Tri-Recs Tool Review & Mini-Tutorial

(Fat Quarter Shop provided me with this tool, the review is entirely my own)

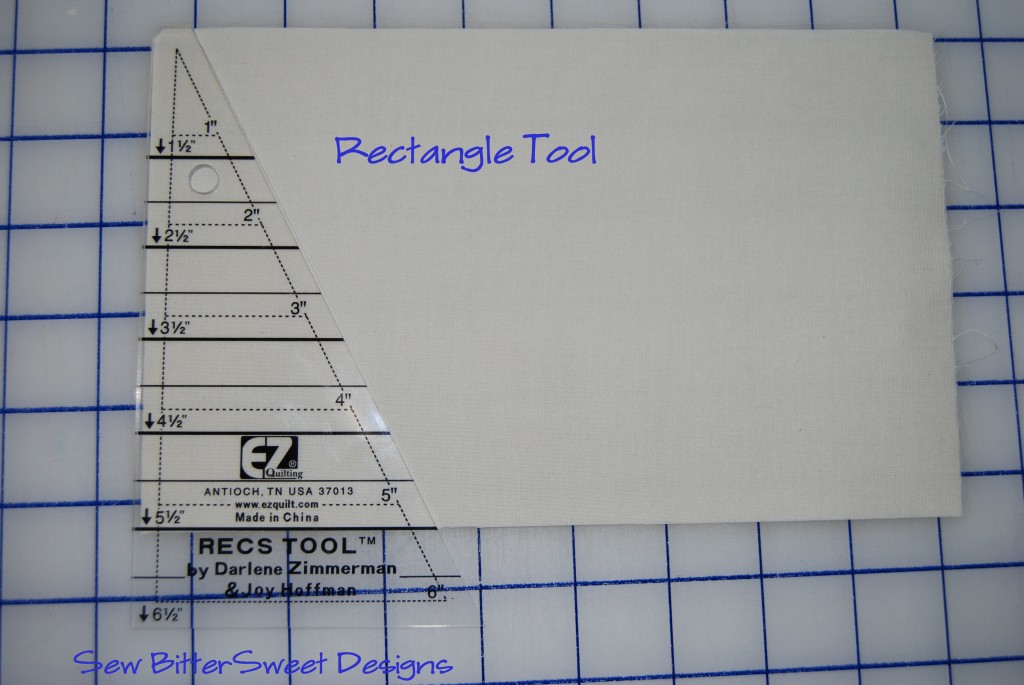
When using the Tri-Recs Tool you will work primarily with strips – 1.5” to 6.5” wide by width of fabric (WOF). As seen in yesterday tutorial of my Scrappy Trees block – you can easily use this tool with scraps as well.

The Tri-Recs Tool comes with 2 acrylic triangles and 2 pamphlets full of instructions and block diagrams. The thing I love best about the tool is that it has notches in multiple spots for easy alignment of your fabrics.

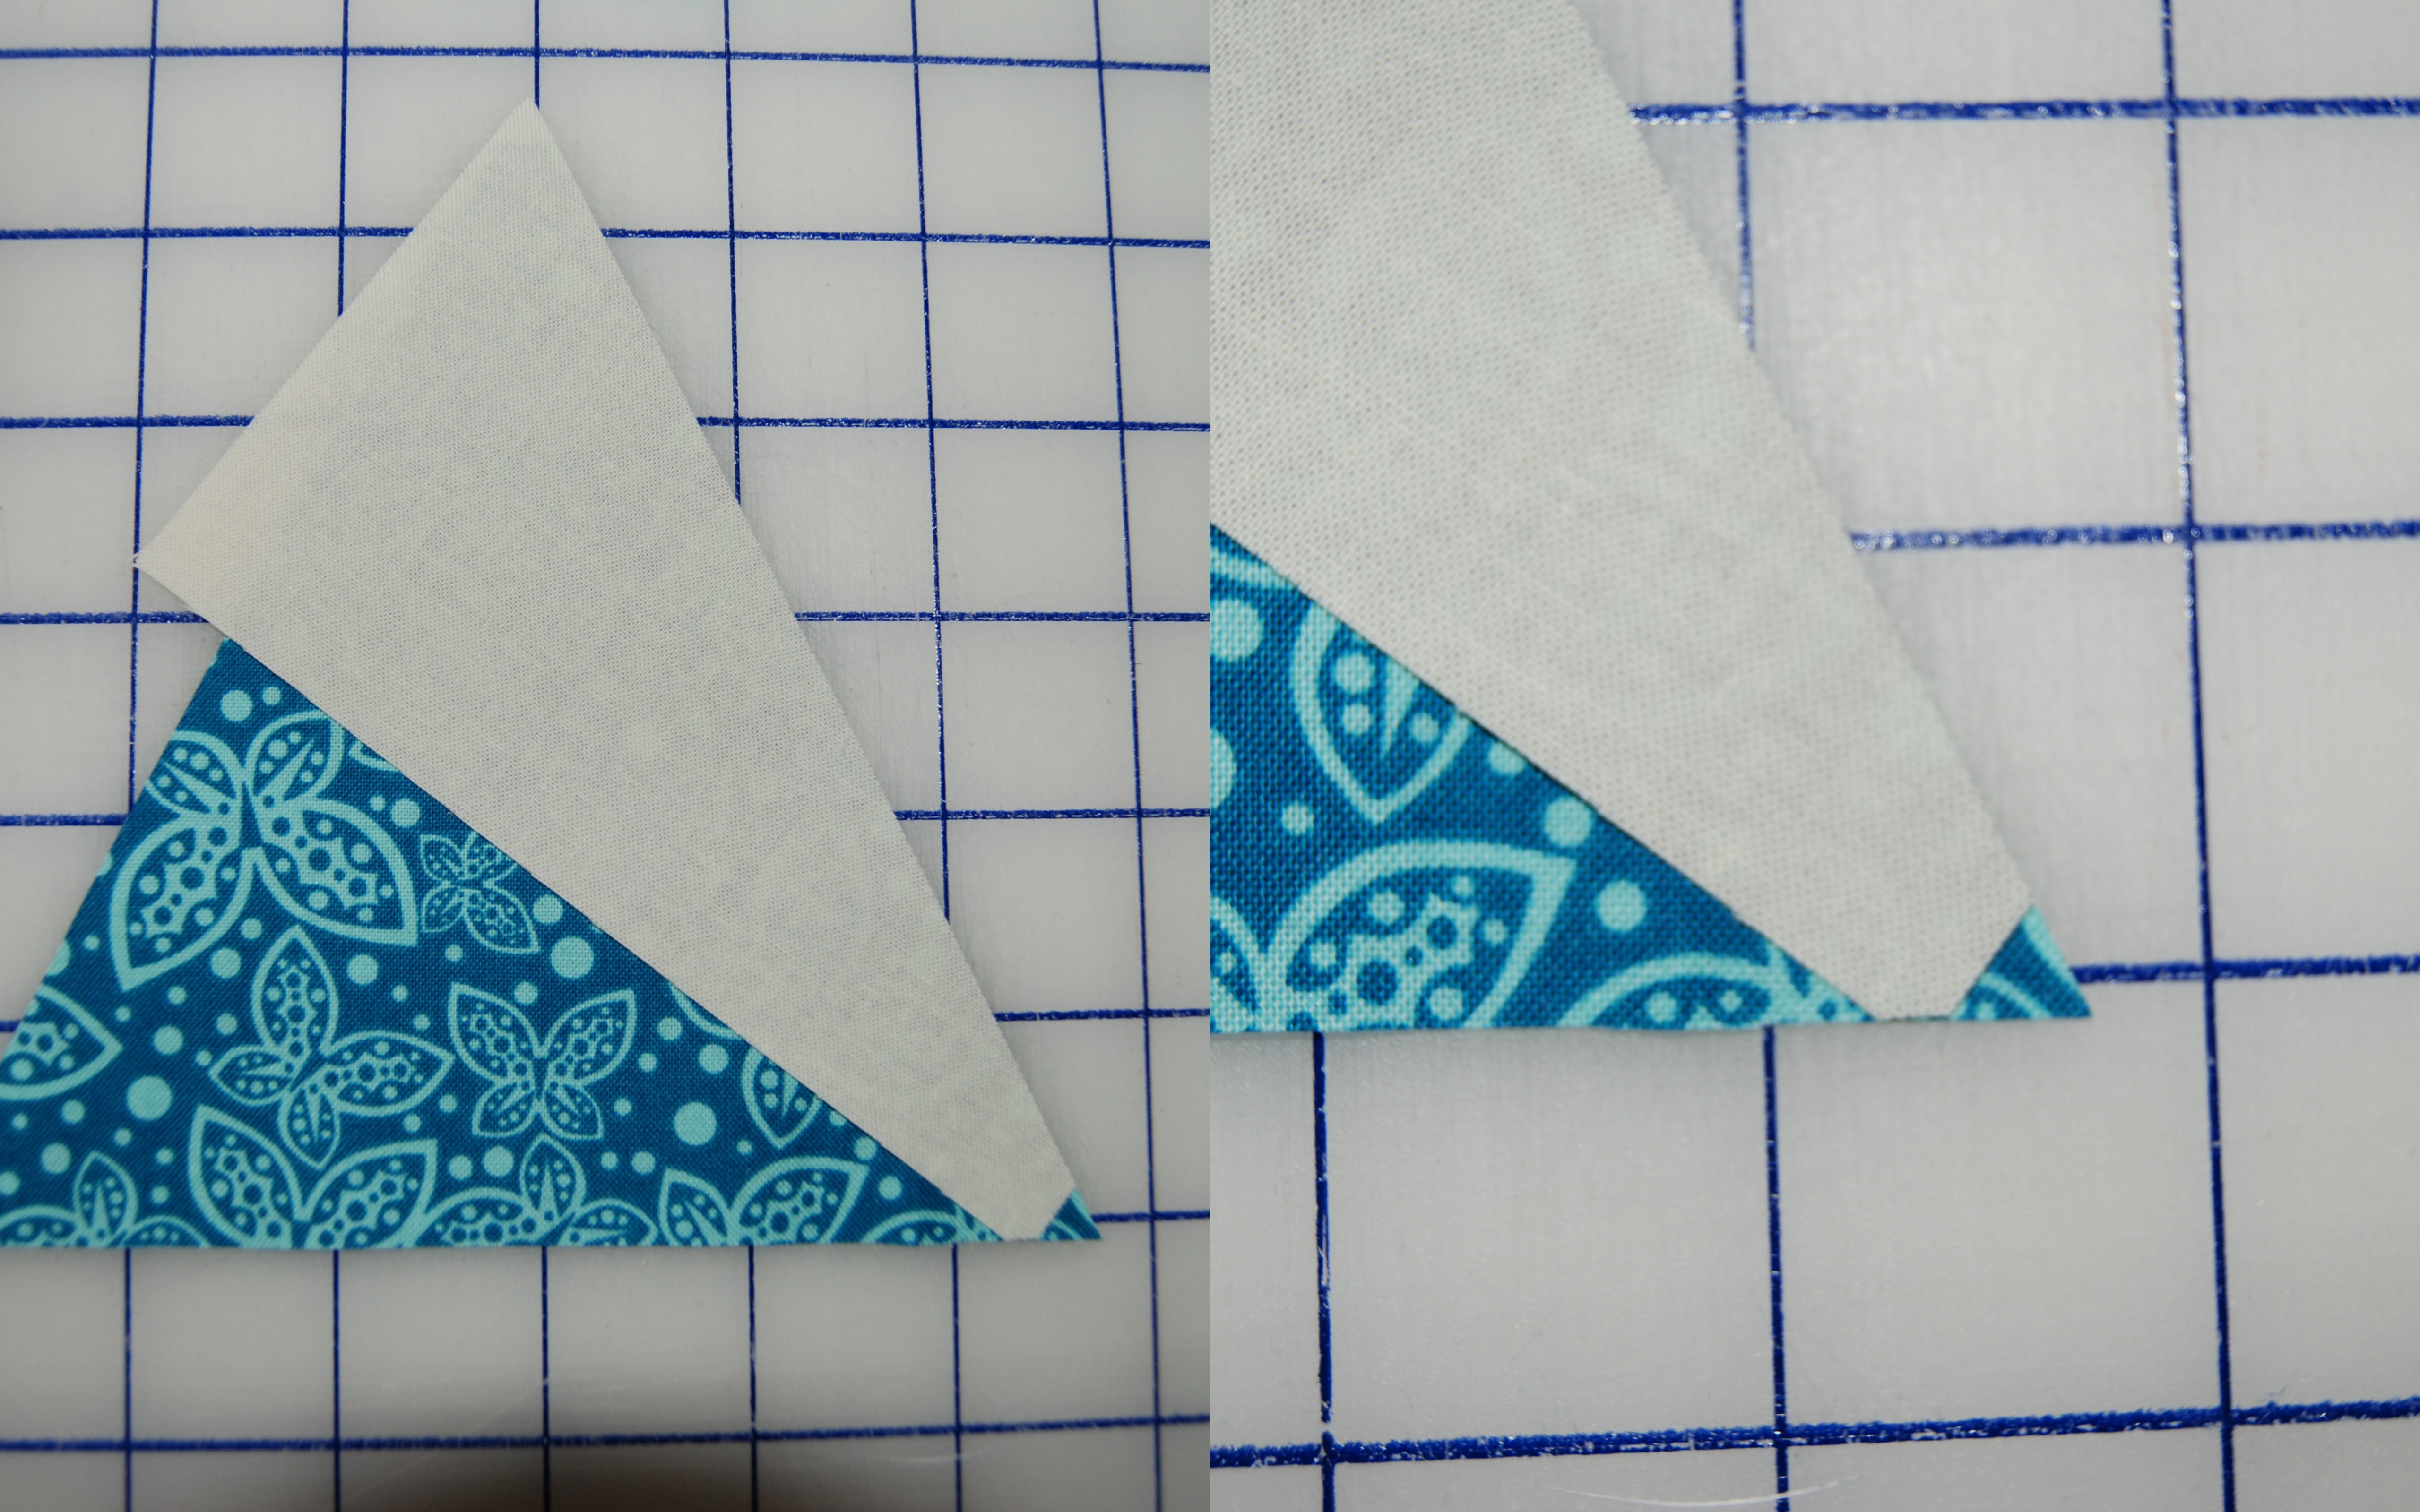
When used correctly you will have 2 separate notches in your “rectangle” pieces.

It is these notches that allow for perfect alignment every time – which in turn helps to avoid unnecessary and tiresome trimming of your blocks.

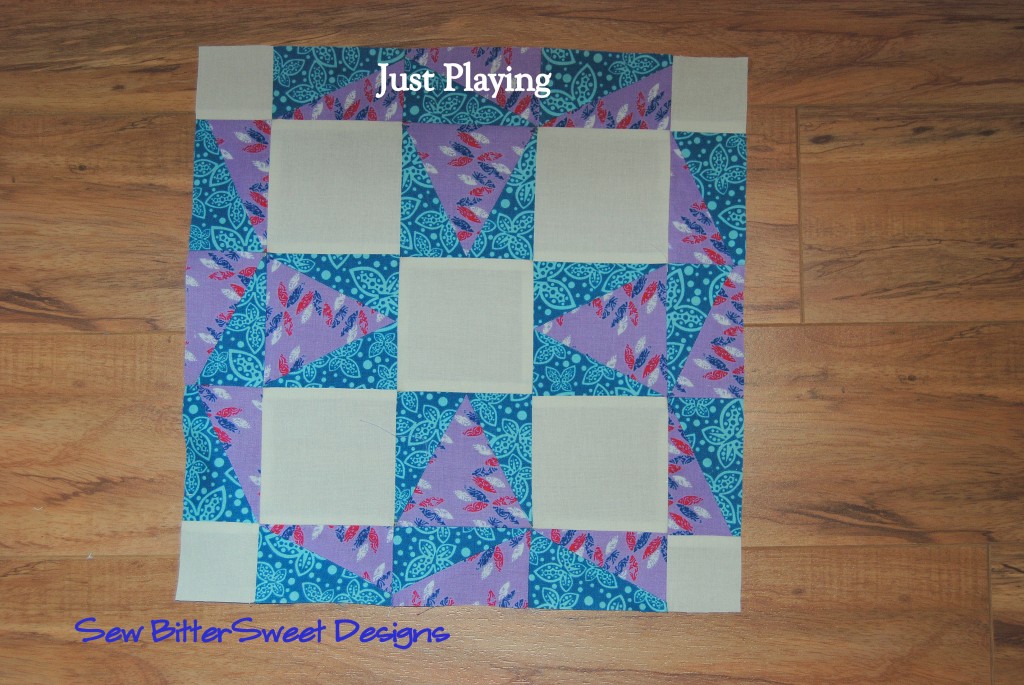
I started out with 2 strips of Imperial Pheasant measuring 3.5” by WOF and I started cutting and sewing, absolutely no plan in mind. I simply wanted to work with the ruler and see what it could do. I then proceeded to create a block that I had a hard time looking at without going cross-eyed (it would be better with different fabric placement choices!), but in creating it I realized that I didn’t trim a single piece and my block measure exactly 12.5”x12.5”! Now I ask you, how often does that ACTUALLY happen?!?

As you can see I incorporated both tools creating triangles in squares and rectangles in the block. The fact that I didn’t have to trim just astounds me.

Next up, I wanted to create something that I dearly loved. Again, I had no real plan, but knew that whatever I made needed to be wall hanging size (Imperial Pheasant reminds me of my mom – especially these colors and Mother’s Day is coming…).

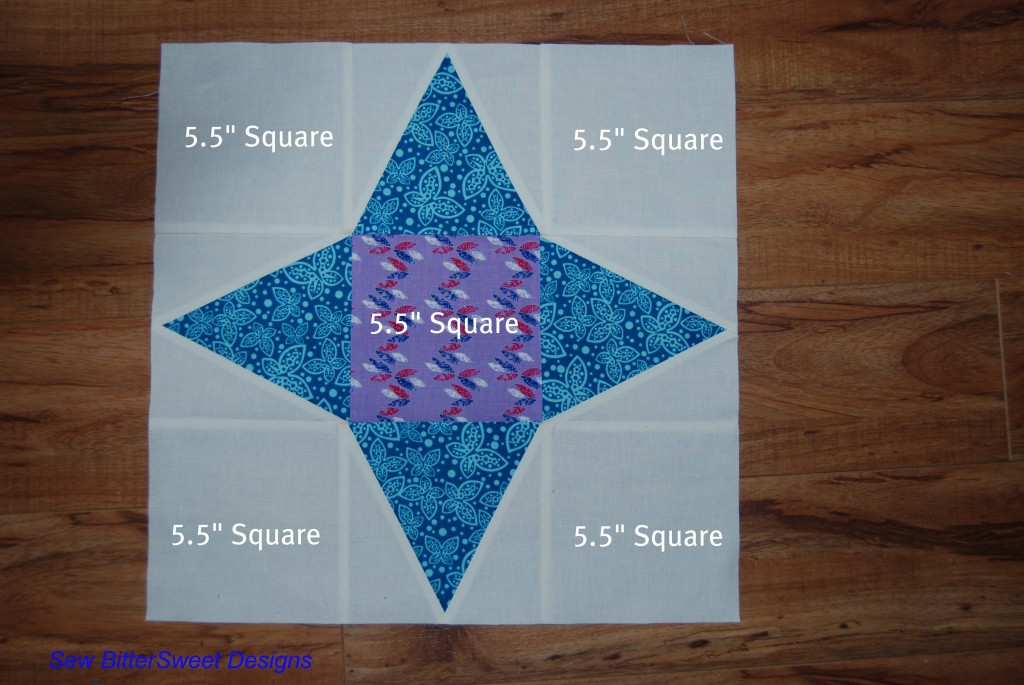
This time I cut 1 strip of the blue – 5.5” by WOF, 1 strip of cream 5.5” by WOF and I still had my 3.5” strips of blue and purple from the first block. I also cut 1 purple 5.5” square. I created this:

Using the 60⁰ Triangle Tool on the blue – I cut four 5.5” triangles. Using the Rectangle Tool and the cream, I cut 4 sets of 5.5” rectangle sections (8 total). I sewed those together and then pieced my block.

To make the borders I used the 60⁰ Triangle Tool only and cut alternating blue and purple 3.5” triangles. I pieced those together and added the borders. The border corners were 3.5” squares of the cream.

For more inspiration, my friend Michele from Quilting Gallery has made a gorgeous quilt using the Tri-Recs Tool. You can see her progress pictures here and you can see her finished quilt here. The versatility of the Tri-Recs Tool is beautifully demonstrated in Michele’s Quilt.

Things I like about the Tri-Recs Tool:

  • The notches make it exceptionally easy to sew your sections accurately – when sewing with a consistent ¼” seam, no trimming is required. There is ZERO guess work!
  • There is virtually no learning curve. The two pamphlets and the included diagrams are easy to use and follow – one quick perusal and I was off and creating.
  • You can create finished blocks measuring 6.5” square.  Guiding star before borders was 15.5” square – lots of flexibility with size.
  • This is a great ruler to make borders with – I have never done a triangle or rectangle border now (would never have considered it – too hard!) – now I think they will become a more regular design feature in my quilting projects.

Area’s For Improvement:

  • I really don’t have any…believe it or not.  For both projects I created, I didn’t have any plan, I just started cutting and sewing and the projects went together beautifully, seamlessly and QUICKLY.

Final Thoughts:

If you are ready to conquer triangles and create some wonderful border details then it is time to purchase the Tri-Recs Tool. I didn’t realize just how much I needed this ruler until I had it! I know I will be using it often in future projects.

Do you have the Tri-Recs Tool? You can purchase yours from Fat Quarter Shop and make sure you also enter their giveaway on Monday’s post too!

Scroll to Top