Author name: Melissa Dunworth

Owner/Operator

Me & My Sister Giveaway

Do you know Barb & Mary from Me & My Sister Designs? I first heard of them when I won a Layer Cake of Ready Set Snow this summer.  They are an incredibly talented sister duo and I have yet to see a fabric design or pattern of theirs that I wouldn’t love to get my hands on!

They have generously donated 2 of their pattern books to my readers!  One winner will receive:

Image Source: Me & My Sister Designs

A second reader will receive:


Image Source Me & My Sister Designs

I love Barb & Mary’s patterns and fabrics because they are so playful. They are perfect for almost any project I could want to do for my daughter, niece or nephews.  In fact, from the looks of their blog they have a new fabric coming out that I am positively drooling over: Twirl.  Check out these adorable butterflies that are part of the line:

Image Source: Me & My Sister Designs

Aren’t they adorable?!? I am imagining a cute little duvet cover for Anne’s room right now 🙂

You may be asking: How do I enter?  You must be a follower of my blog.

1. Head over to the My & My Sister blog and join their Newsletter.  Come back here and tell me that you did. Simple enough.

2. Spread the word: blog, tweet or Facebook about this giveaway – come back here and tell me that you did.

Two entries!

This giveaway will be open until midnight September 30th and a winner will be selected via Random Number Generator and announce September 30th sometime after the sun comes up!

Good luck!

This Giveaway is Now Closed!


Welcome Giveaway Winners & Swap

Can I get a drum roll please?!?

The winner of the Pooches & Pickups is:

Tiffany says:

I want to learn paper piecing. Good luck in this new adventure!

The winner of the Retro 30s Charm pack is:

Elizabeth McDonald says:

Congrats on starting your new blog! I tend to sew flat items — quilts, potholders, placemats etc –and I am hoping to take the plunge and learn how to make totes.

I will be contacting you both via email.

On a completely different note…

Angela from Summerfield Quilts is hosting a Christmas Charm Swap

I have a love for Christmas fabric (don’t ask me why because I really don’t know) so I decided to sign up. At the end of the swap you will end up with 112 different charm squares. That is a lot of squares and I figured I could do something really fun with all that fabric.  If you are ready to get in the Christmas spirit go check it out!

Make sure you check in tomorrow because I have a special surprise up my sleeve!

1/4 seams

This post was originally posted at It’s Sew Kiki when we did a blog swap in August – I hope you will find it useful!

Hi! My name is Melissa and I blog at Sew BitterSweet Designs. I am so excited to be here today on It’s Sew Kiki! I just love Kiera’s blog.  I have been quilting for about 10 years now and have finally begun to understand the importance of a 1/4 in and scant 1/4 in seam in quilting and I thought I would share some of what I have learned with you today.

Me & my inspiration

When I started sewing I used my mom’s, then brand new, Janome quilting/embroidery machine. I am still sewing on a Janome machine but this time, I am the one with a brand new one.  Getting a brand new machine has its ups and downs; the only real downside is the really HUGE learning curve. I had to relearn how to sew a 1/4 in seam on my new machine.  Today I am going to share with you a few tips and some tricks on how to get a perfect 1/4 inch seam AND a scant 1/4 inch seam.


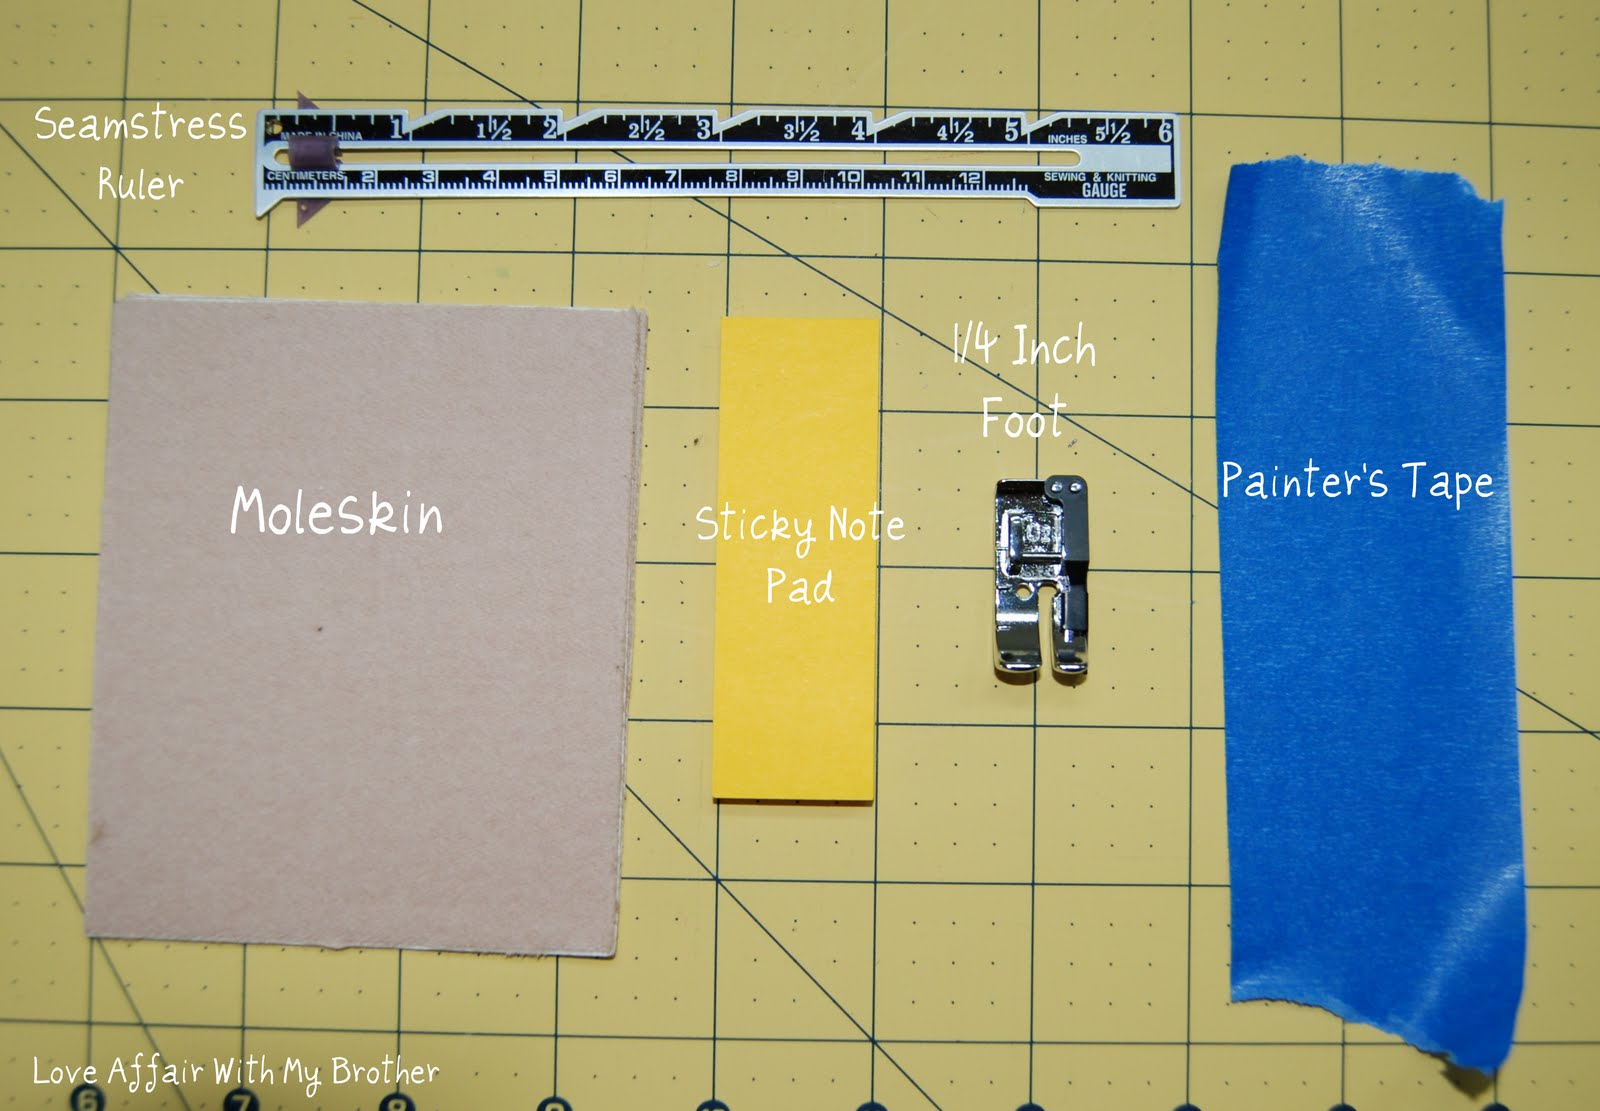
Some tools to have on hand:
  • Seamstress Ruler
  • Clear plastic cutting square
  • Moleskin
  • Sticky Note Pad
  • 1/4 Presser Foot
  • Blue Painters Tape

There are multiple ways to ensure an exact 1/4 inch when sewing, here are a few of the methods I have used over the years – and I tried each of these on my new Janome Horizon before settling on the one that has given me the best and most consistent results. I have also used these on my older, very basic Janome machine.

Blue tape is an excellent option for sewing with an exact 1/4 inch. Just line up your fabric and keep it lined up.  The draw back is that there is no defined edge to butt your fabric to, so you may find that your fabric wanders from time to time.

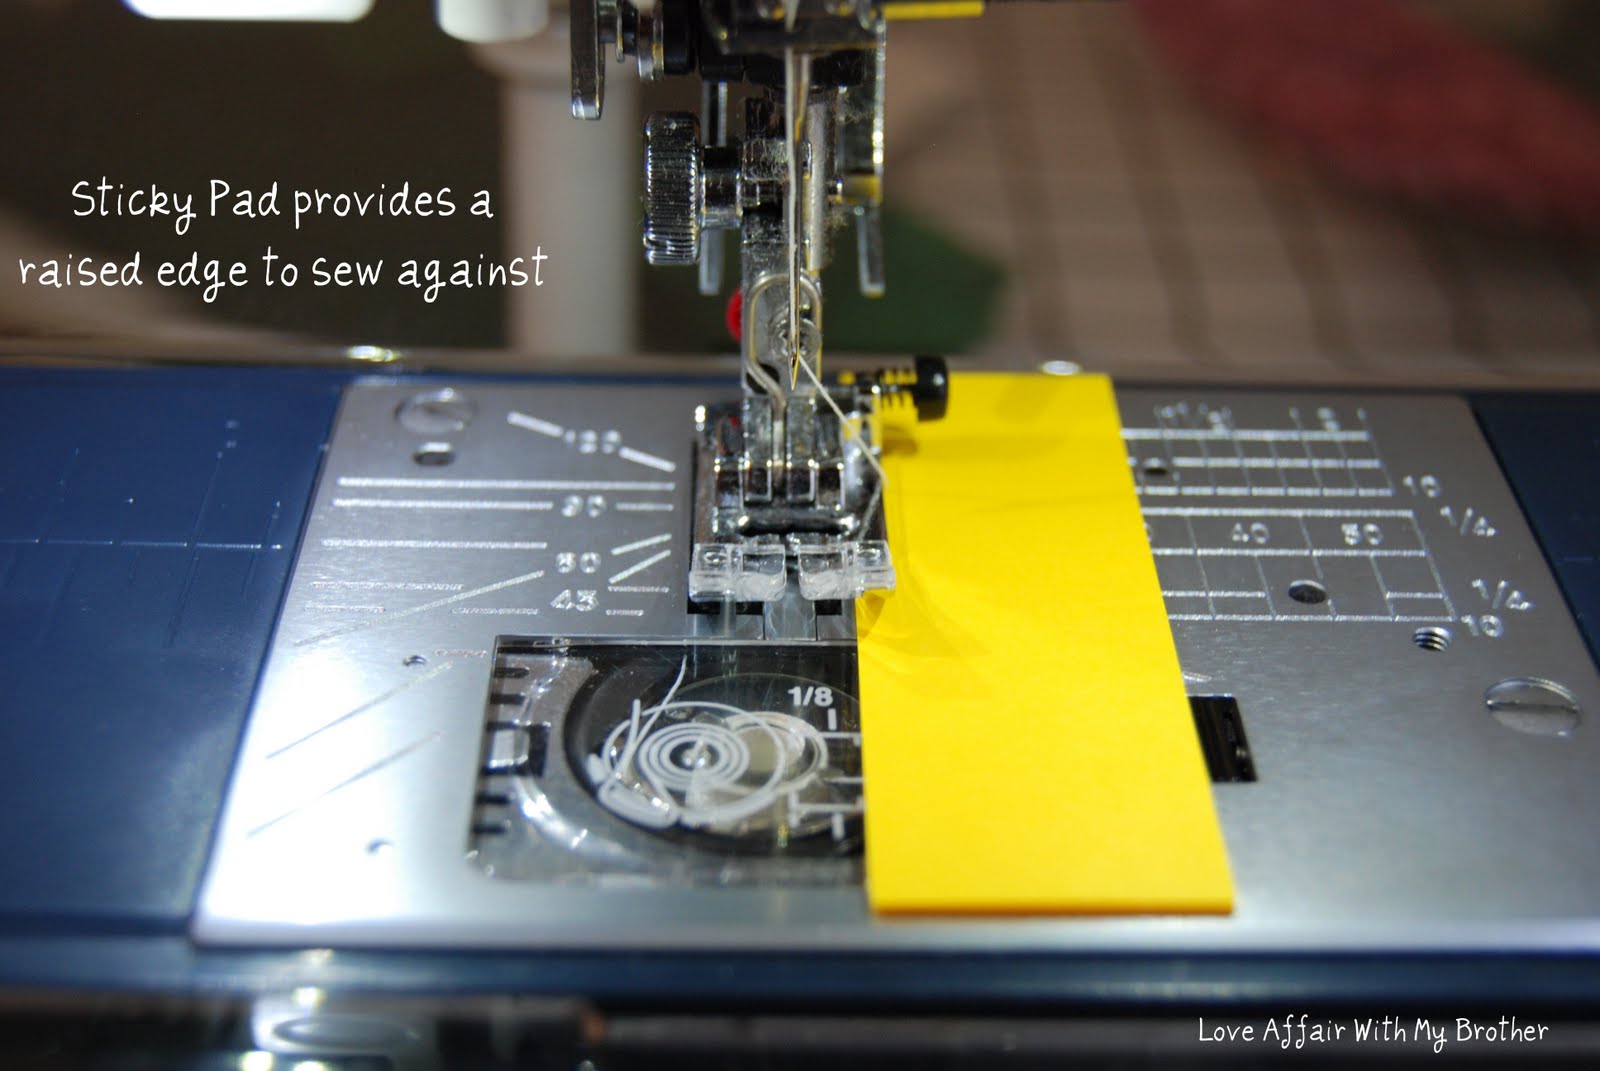
I like the sticky pad because it provides a raised edge which will help prevent your fabric from wandering and keeps your stitching straight. The drawback is that they tend not to stick very well for very long.

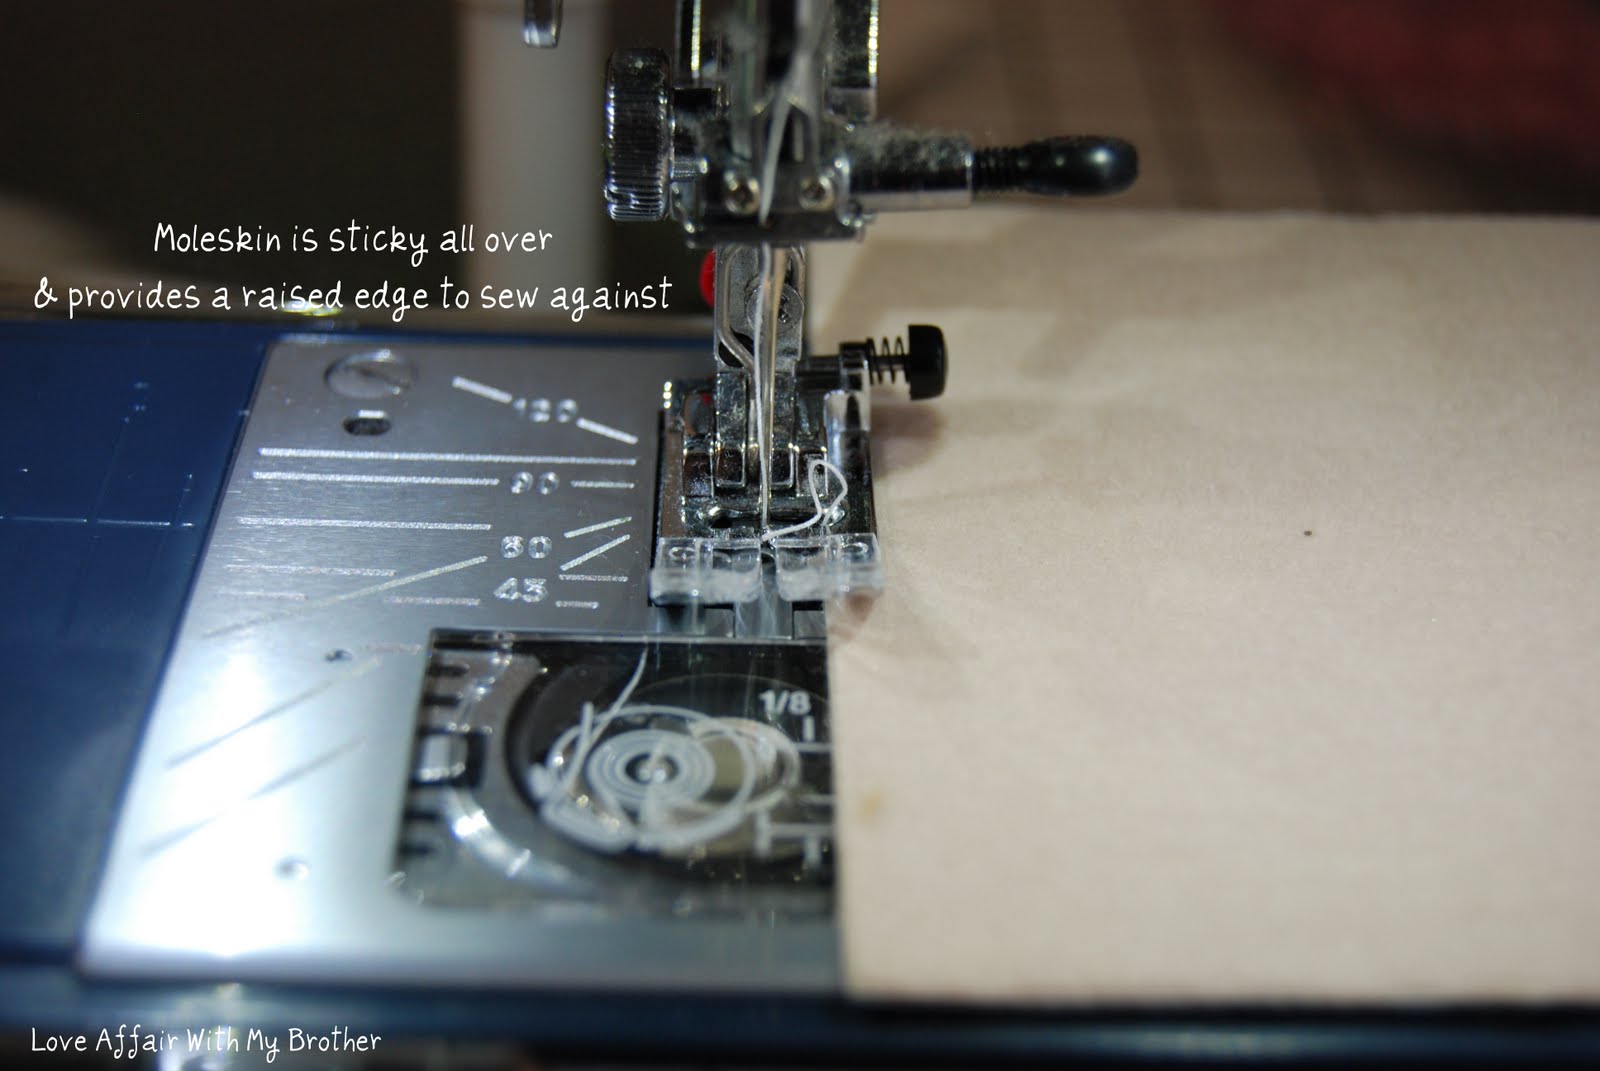
I LOVE moleskin for sewing a 1/4 inch seam.  It is sticky all over on the bottom so when you put it on your machine it isn’t going anywhere. Sadly that is also the drawback, when you take it off to do other sewing it tends to leave a sticky residue that you will need to clean off before moving on to another project.

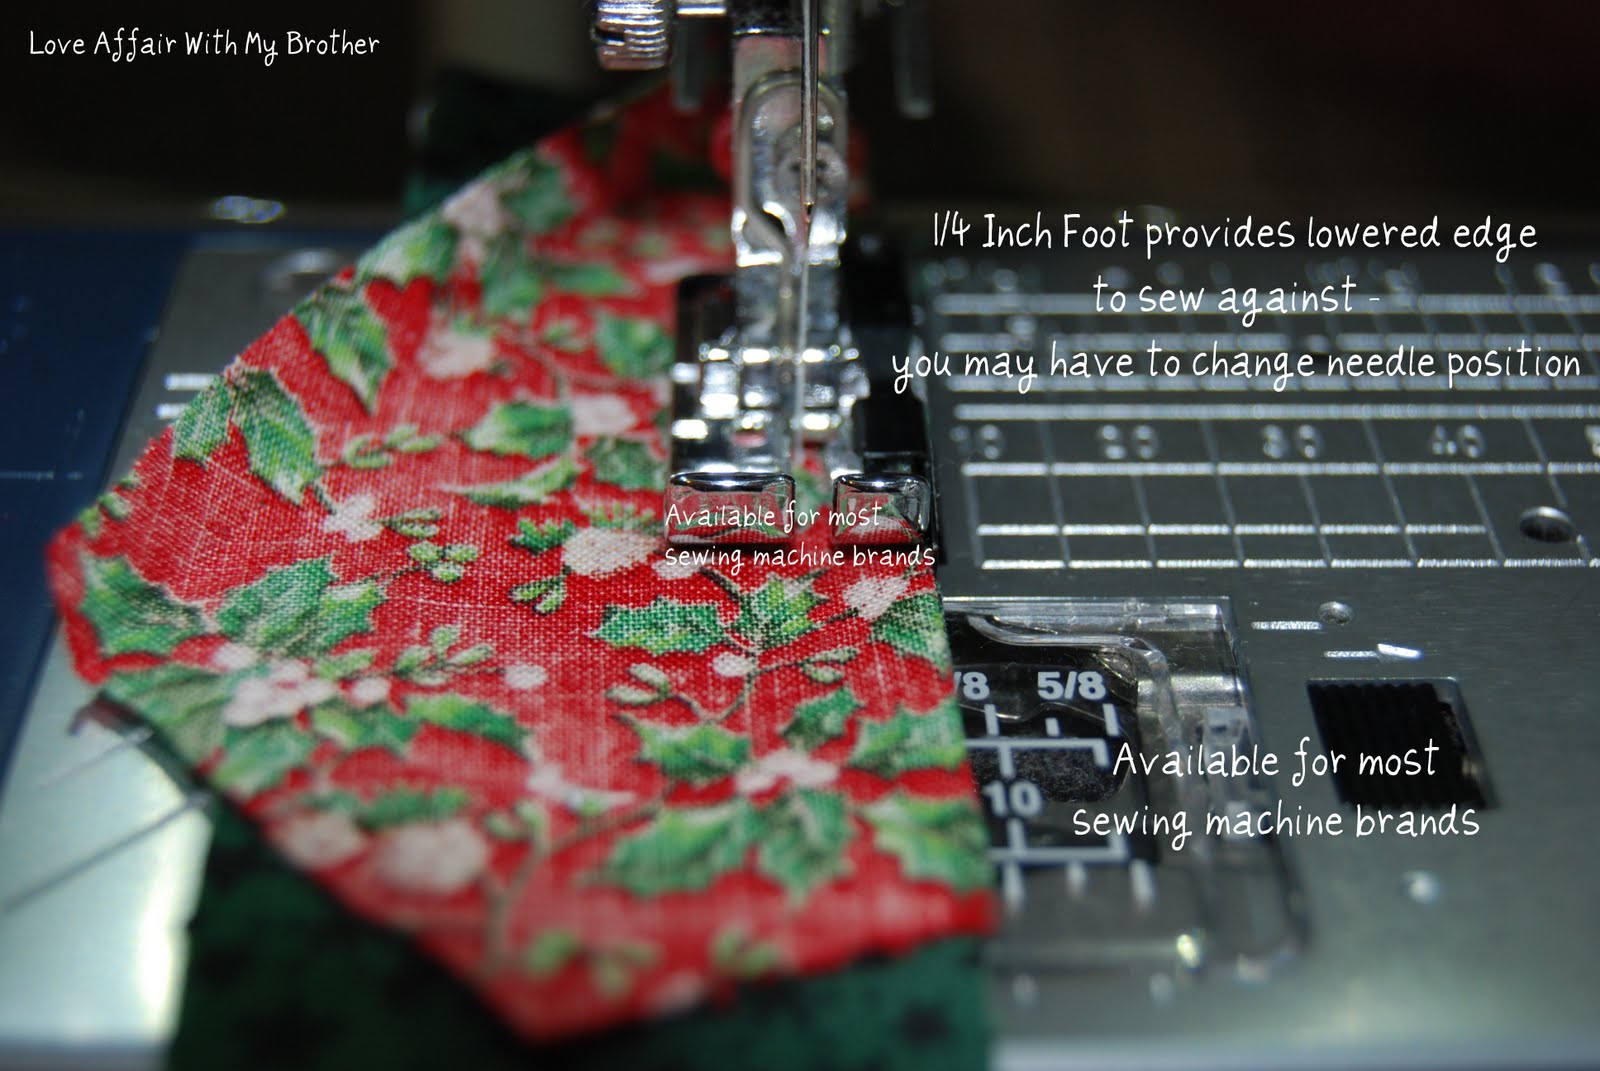
My absolute favorite method is also the most expensive method (sorry). The 1/4 inch presser foot. Almost all sewing machine manufacturers make a foot similar to this one and they can be purchased online at a decent price.  This foot is great because you don’t have to worry about sticky residue and it was designed to work with the idiosyncrasies of YOUR machine.

Note: this foot will not necessarily give you a perfect 1/4 in or a scant 1/4 in seam right out of the gate, you will most likely need to adjust your needle position to get the seam allowance that you want. The foot is intended more as a guide.

You may be asking yourselves “why does she keep talking about a scant 1/4 in seam? What is the difference?”

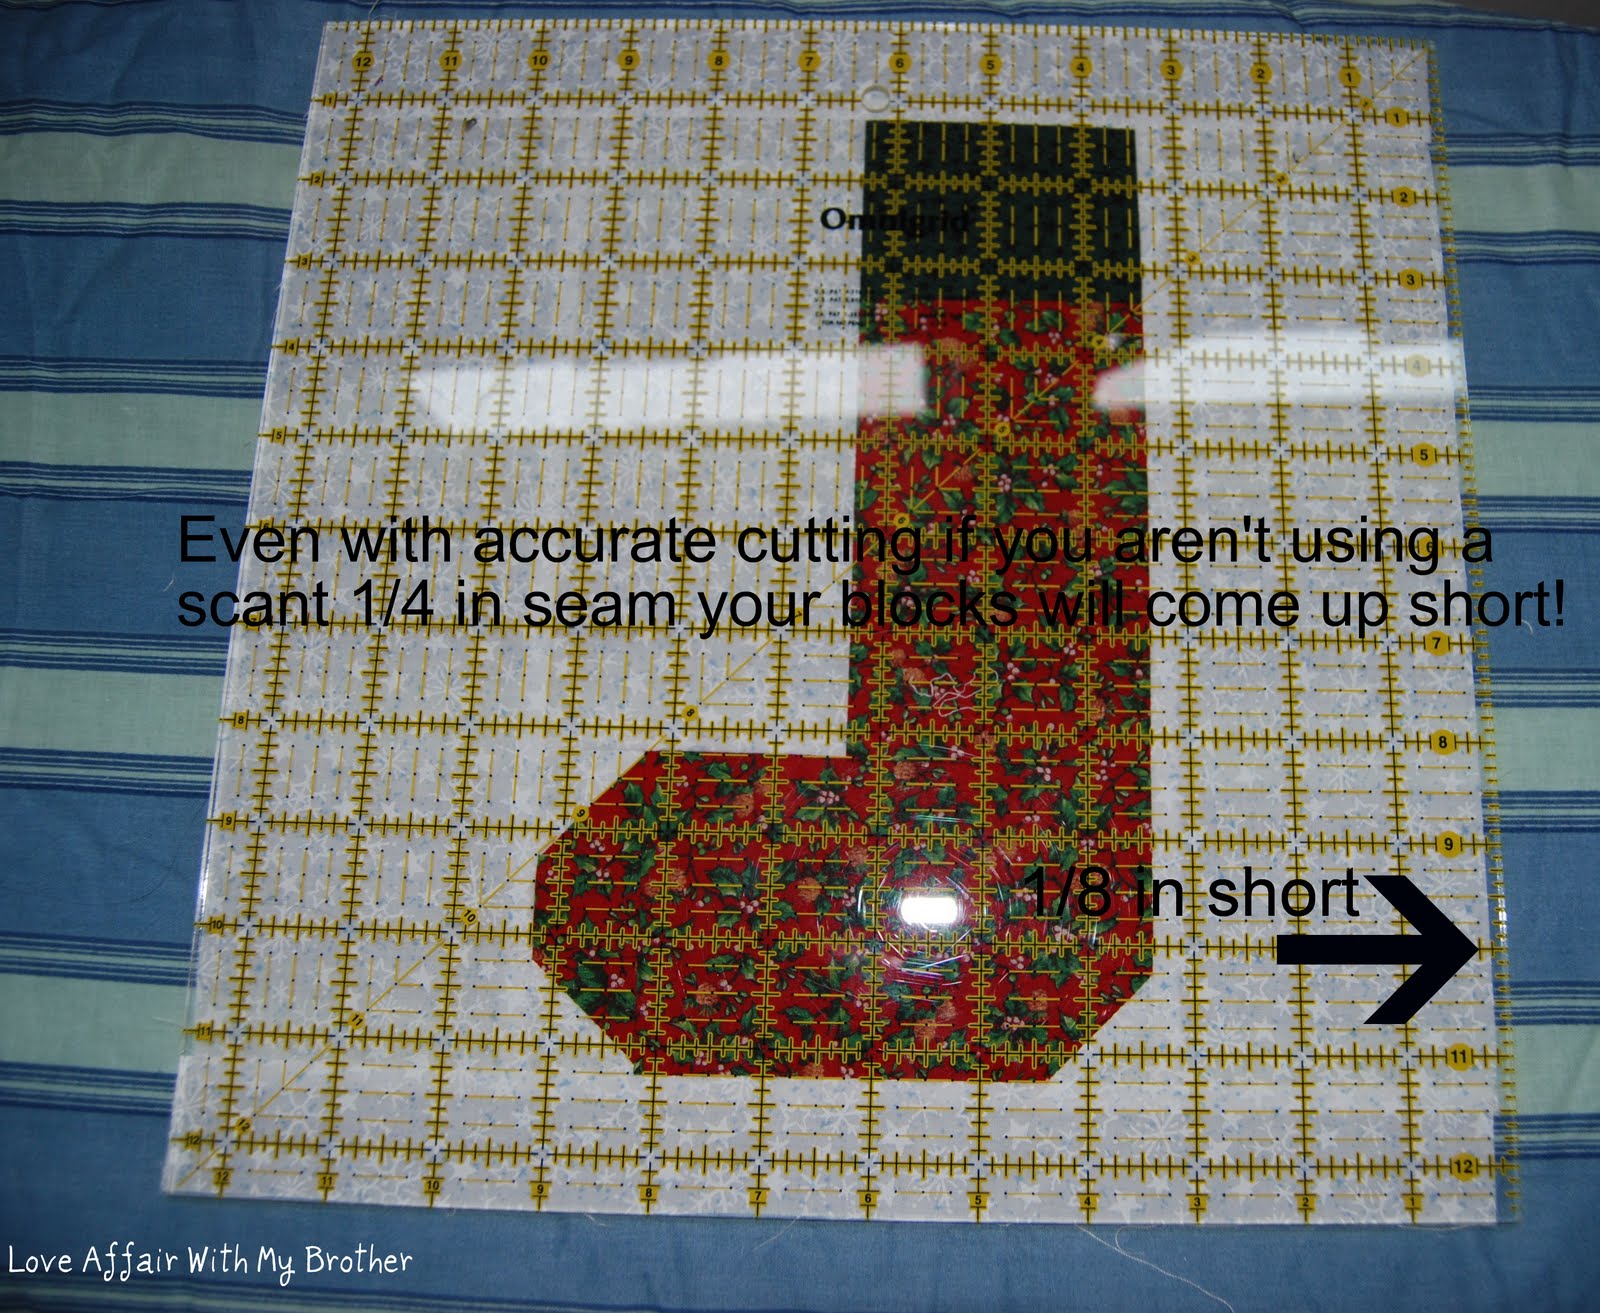
It is the difference between have a block that measures exactly 12.5 inches and one that measures 12.375 inches.  If you cut accurately and sew an exact 1/4 seam every time odds are your block looks something like this:

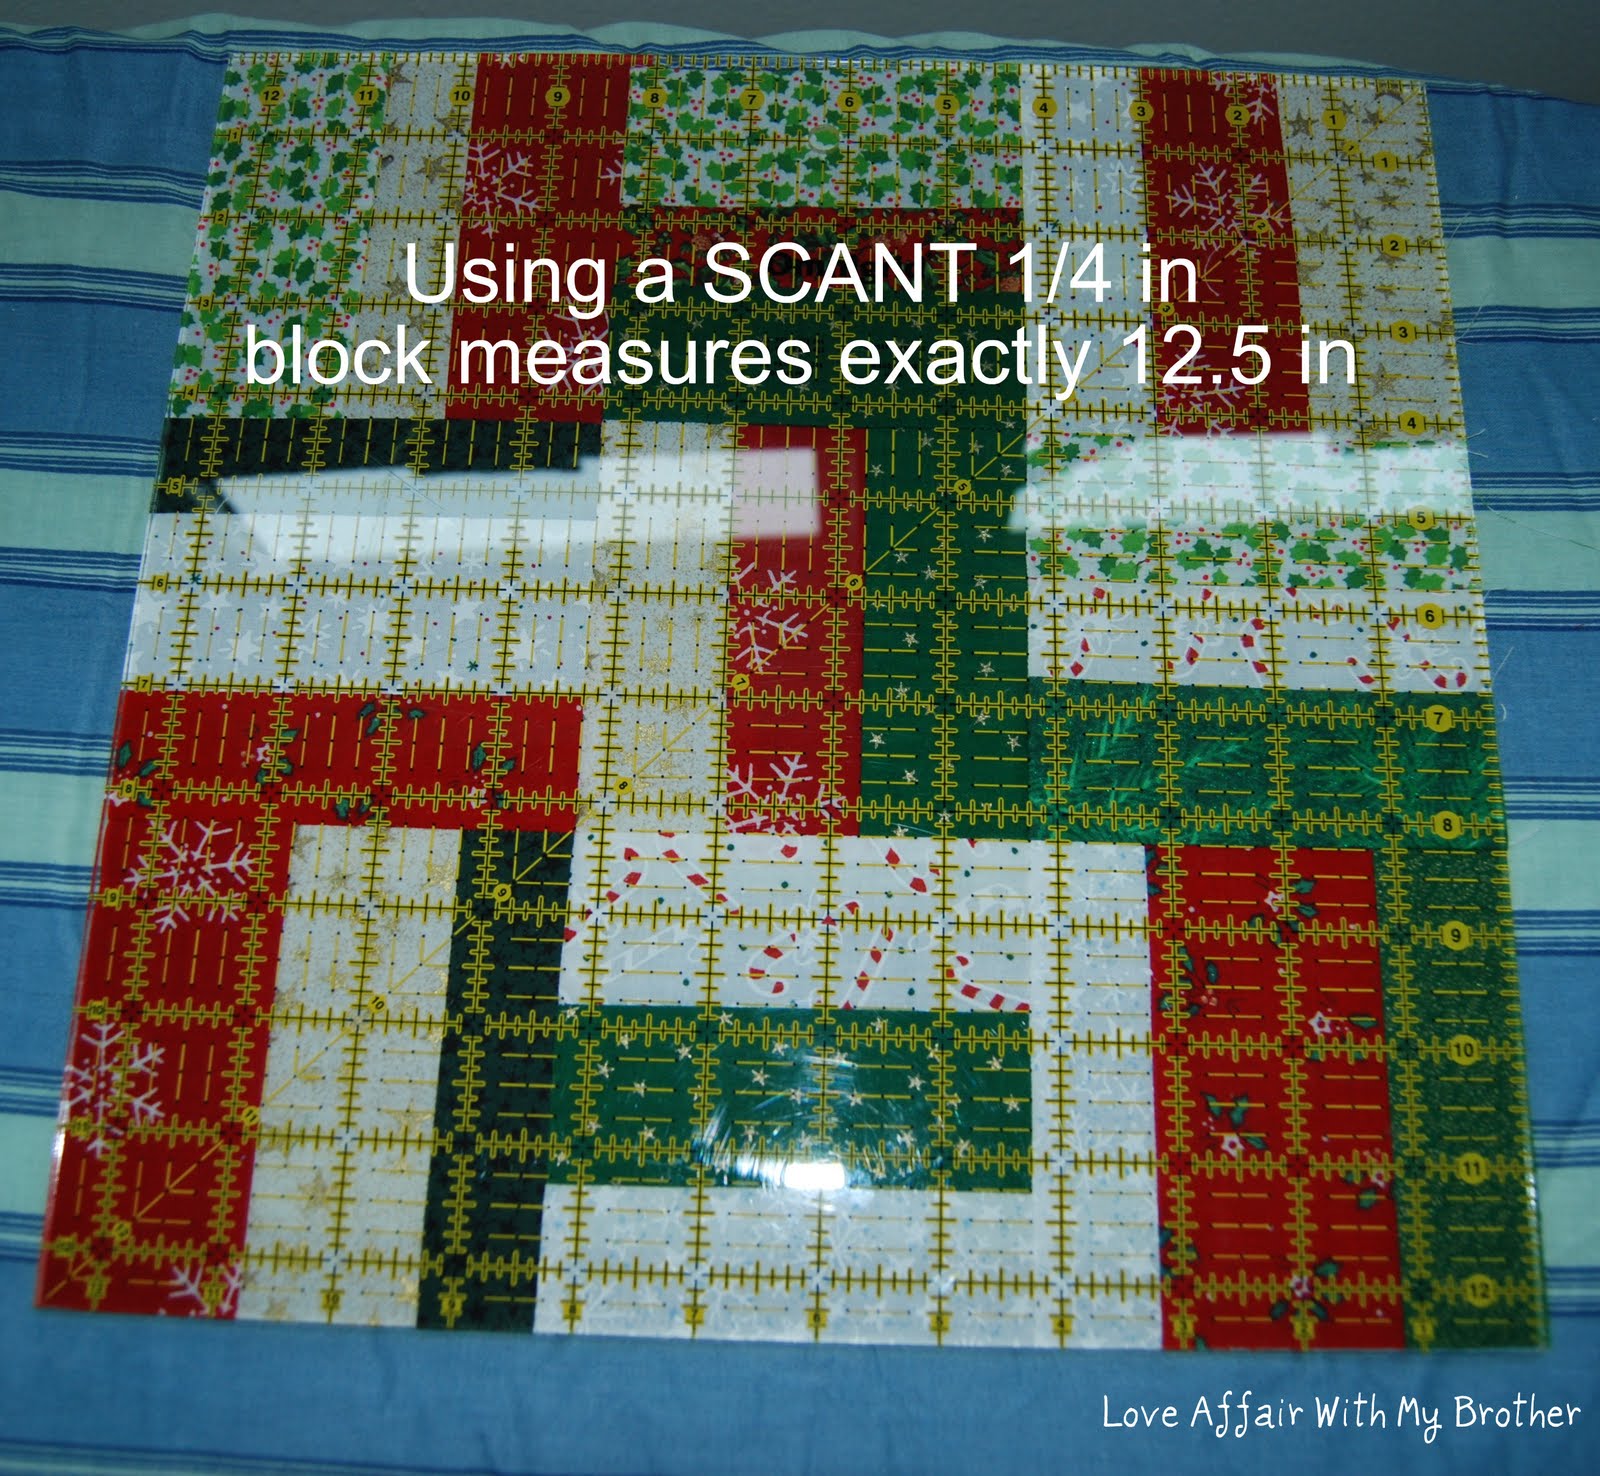
However, if you are sewing with a scant 1/4 in seam (meaning just UNDER 1/4 in) your block should look something like this:

This block required NO trimming and measures exactly 12.5 inches square.  Good luck figuring out the best method for you and your machine on getting a 1/4 in seam and a scant 1/4 in seam.

Thank you for having me Kiera!


Good-Bye Idaho

If you’ve stopped by from Love Affair – thank you so much for coming over! I’m so happy you’re here!

Make sure you stop by my welcome post and enter to win my giveaway!

Today I am wrapping up my vacation in Idaho. I have had such a wonderful time. I got to meet my bestie’s baby girl, play with her son, and take my daughter on a boat ride for the first time.

We did so much with the time we had here. I helped Mrs. L learn how to use her new walking foot, bought the backing for the quilt she is making her son (my birthday gift to him), showed her the quilt I made for her daughter’s first birthday (check out this post to see it), and relaxed and recharged my batteries.  We decided that we need to start getting together like this at least 2 times per year. Once at her house and once at mine.  That way we are both doing the same amount of driving AND we get to see each other more often.

Some “quilting” did actually get accomplished while I was here – we pin basted Mrs. L’s first quilt! We ended up trying 2 different backings – the first one was a few inches too short, and the second one was too, luckily we had a brand new seam ripper sitting nearby and we were able to “make it work” as Tim Gunn would say.


Dr. Seuss Quilt

When I get back home I have to get my block for Block Swap Adventures into the mail – it has been done for awhile but for some reason it hasn’t made it to the post office yet.  I also have to write up a Christmas block tutorial for the Christmas Quilt-Along going on over at Quilting Gallery.

Celebrate Christmas Quilt-Along and Super Deals for QuiltersI have a lot of fun ideas up my sleeve, the two that are topping my list are both paper pieced. One is my “Old Snowflake” block. I really love how it turned out and I think it is a beautiful seasonal block.

Old Snowflake for CeLynn

What do you think? Would you like to learn how to make this block? Is there another Christmas block you are dieing to figure out that you think I should do instead?

Do You Read?

I used to be a prolific reader. Every night I would take some time for myself, pick up a good book, snuggle under the covers and read for 20 – 30 minutes. The nice thing is that my husband would do the exact same thing. While we would read different types of books it was nice because it gave us one more thing to talk about. Some nights, instead of reading myself, I would lay there and listen to my husband read out loud to me – he has the kind of voice that can lull me into a nice peaceful sleep.

I have found since moving that we have gotten out of this habit. We have been so busy adjusting to my hubby’s new commute and crazy work schedule that when the end of the comes we literally just fall into bed and pass out. I miss our reading. It was a nice way to decompress after a long busy day of toddler chasing.

I have decided to set a new goal for myself (in the hopes that my hubby’s work schedule calms down some – maybe I am being a little too hopeful on that one!)…I want to spend at least 20 minutes every night reading. I’m not setting a goal as to what I will be reading – in fact I am starting out with baby steps – I am re-reading the Harry Potter series for probably the 12th time.

My mom left me several mystery novels the last time she came to visit and those will be next.  What about you? Do you take the time to decompress at the end of the day? How do you decompress?

Scroll to Top