tutorial

Star & Dot Wall Hanging Tutorial

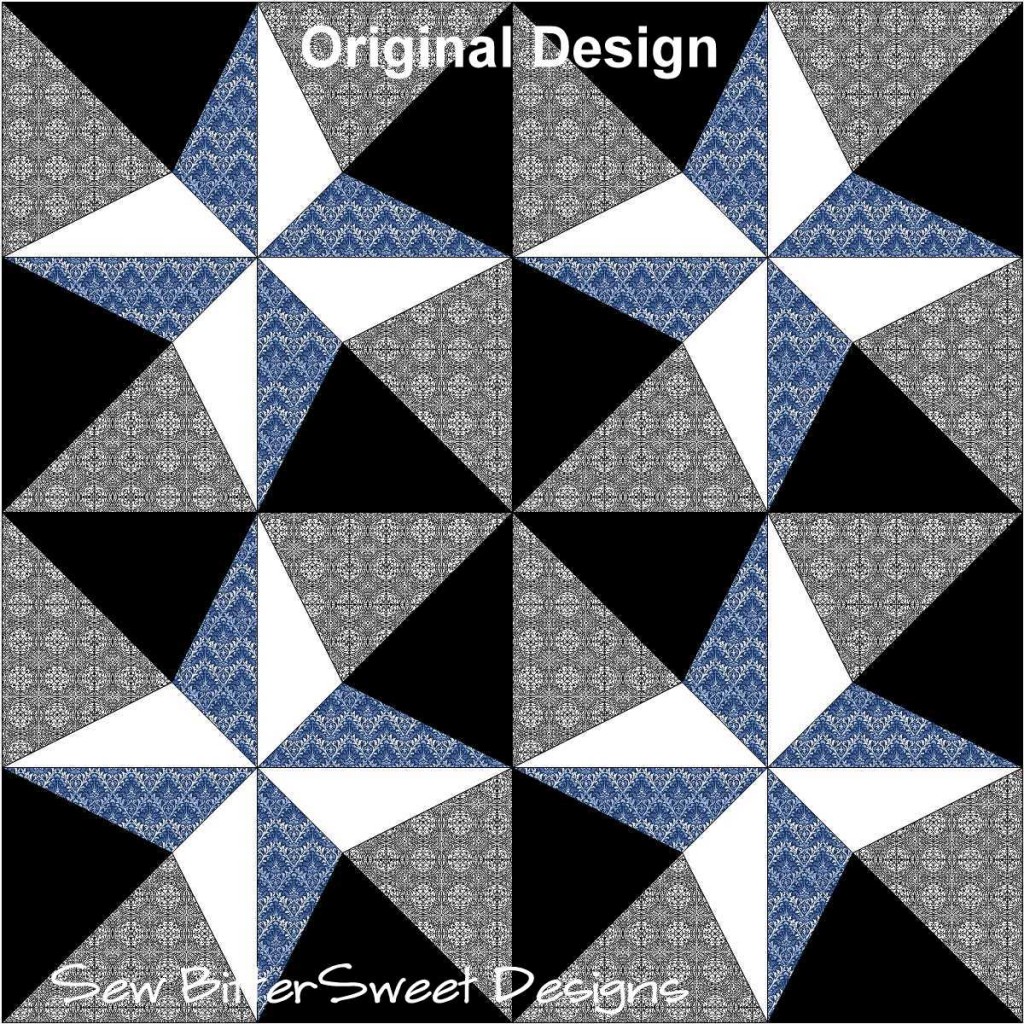
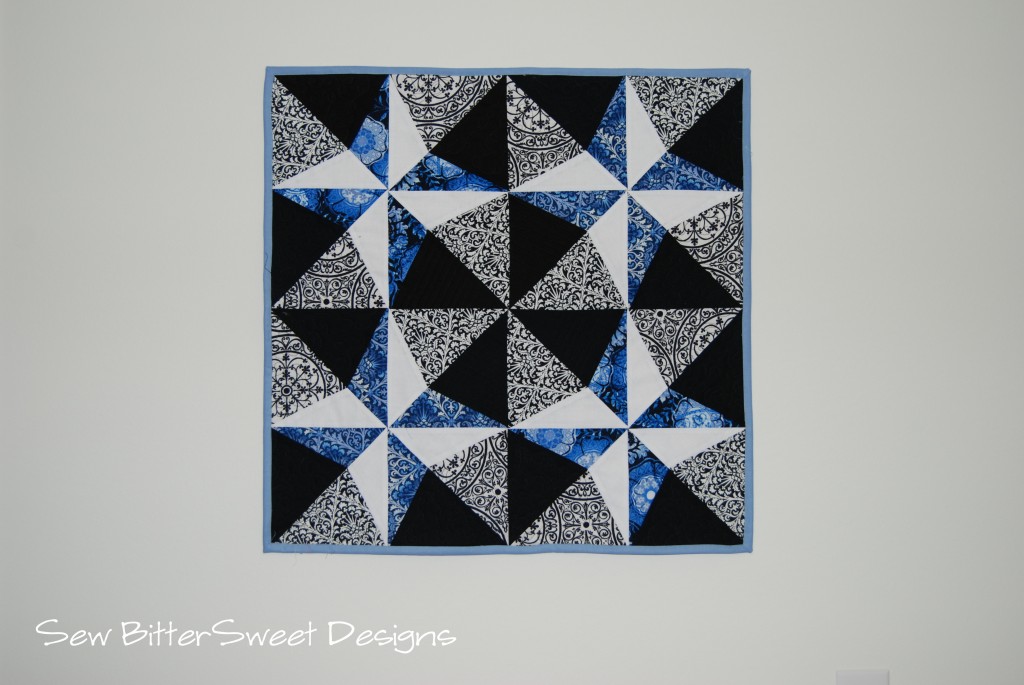
This is block is called Star & Dot and is attributed to “Comfort” from the year 1910.

You will want to download the cutting templates and the paper piecing templates.
(Please let me know if you have any trouble downloading these files – I would be happy to email them to you as well.)

You will need:

Helpful Supplies Include:

  • Fabric Glue Stick
  • Pins
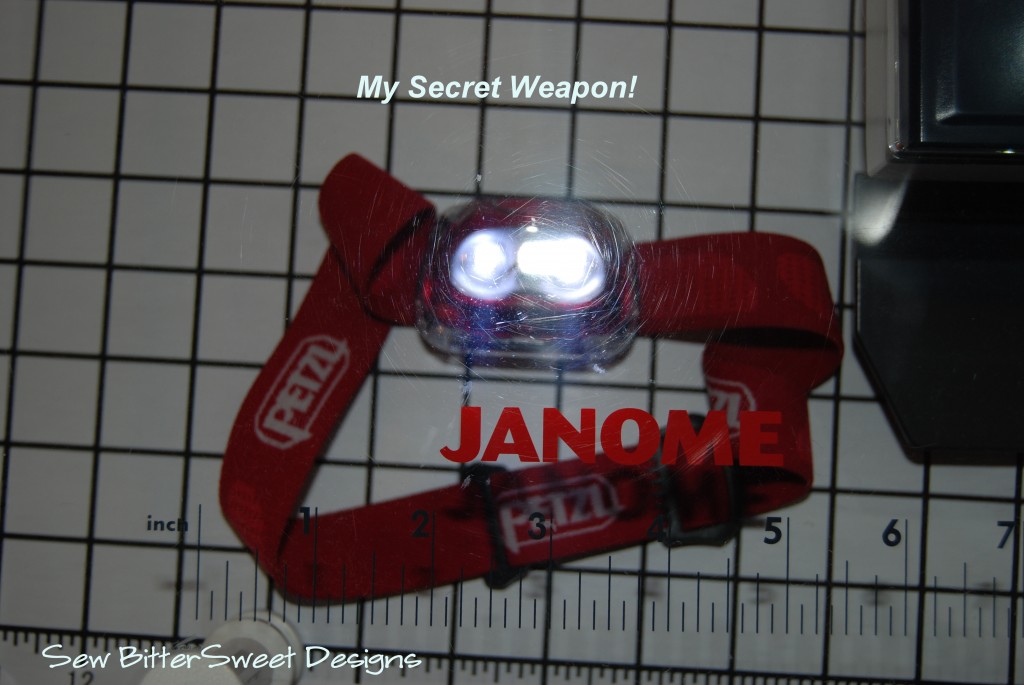
  • Light Box or hiking head lamp

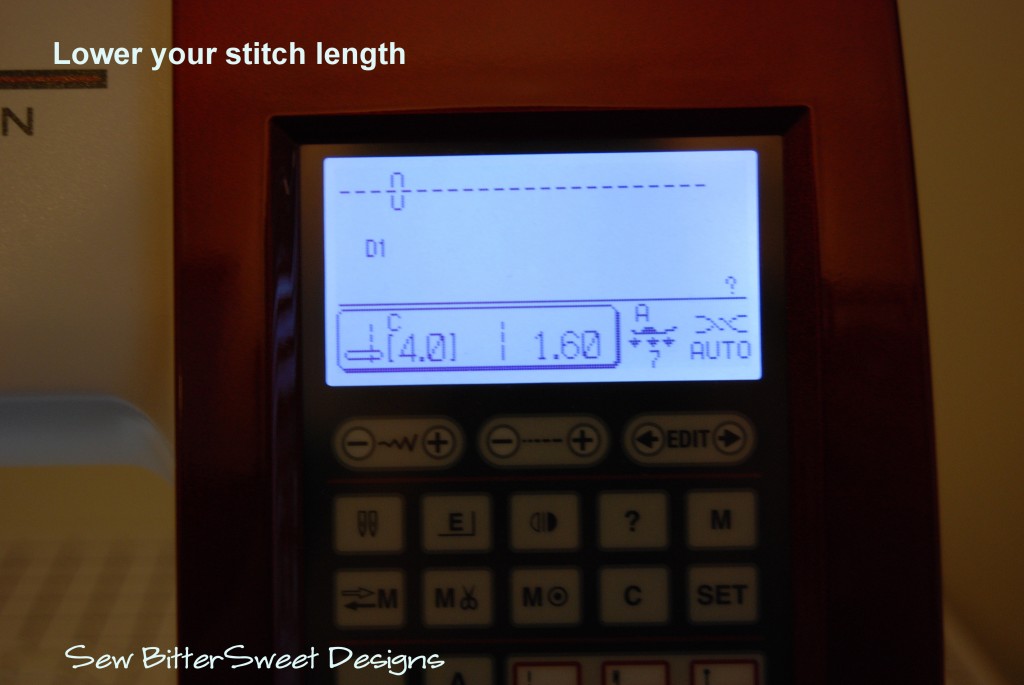
I like to start by lowering my stitch length; this makes it easier to tear off the paper when you are done with your piecing. I lower mine down to 1.6.

Using your cutting templates, with the fabric right side up, cut the following (I like to cut mine slightly larger (about 1/8”) than the templates – gives you a little wiggle room):

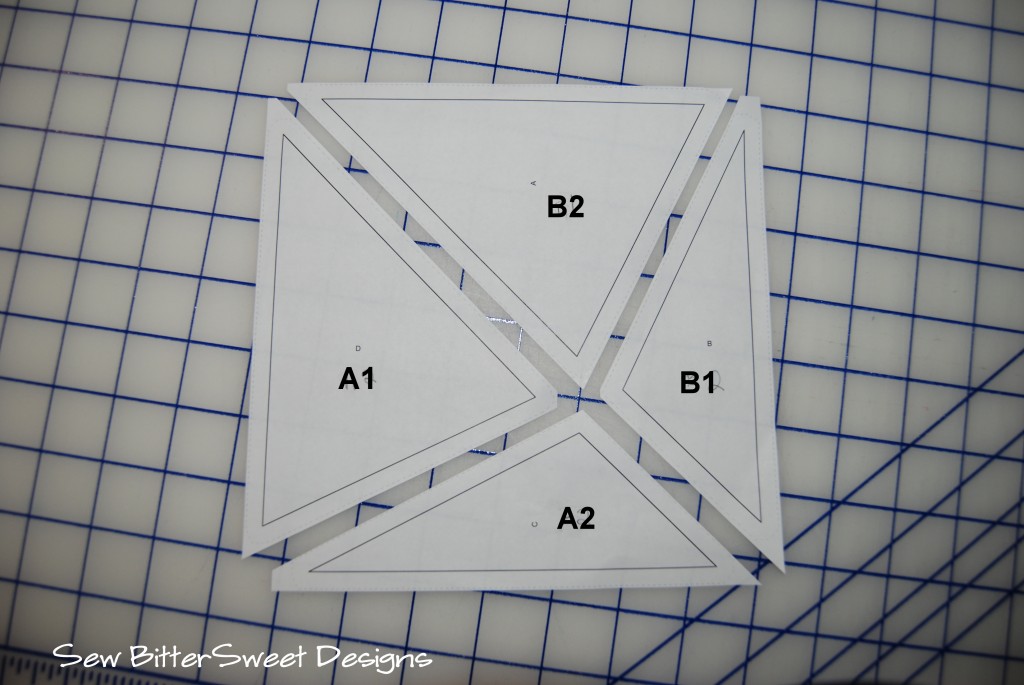
White – 16 pieces with A2
Black – 16 pieces with B2
Black Medium Diamond – 8 pieces with A1
Black Medallion – 8 pieces with A1
Blue Medium Diamond – 8 pieces with B1
Blue Floral Medium – 8 pieces with B1

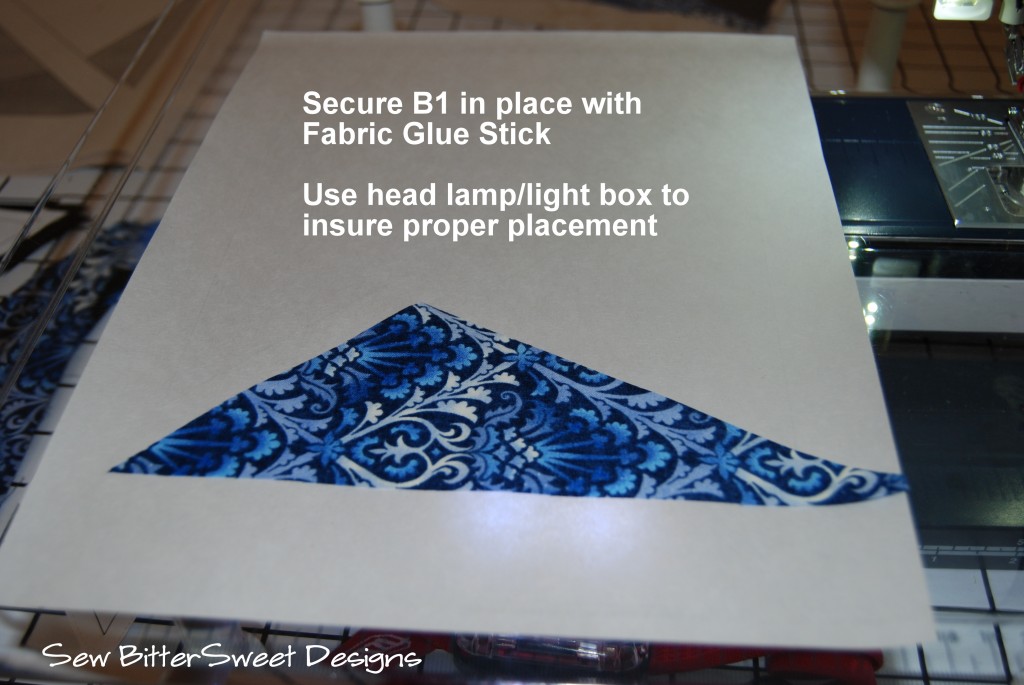
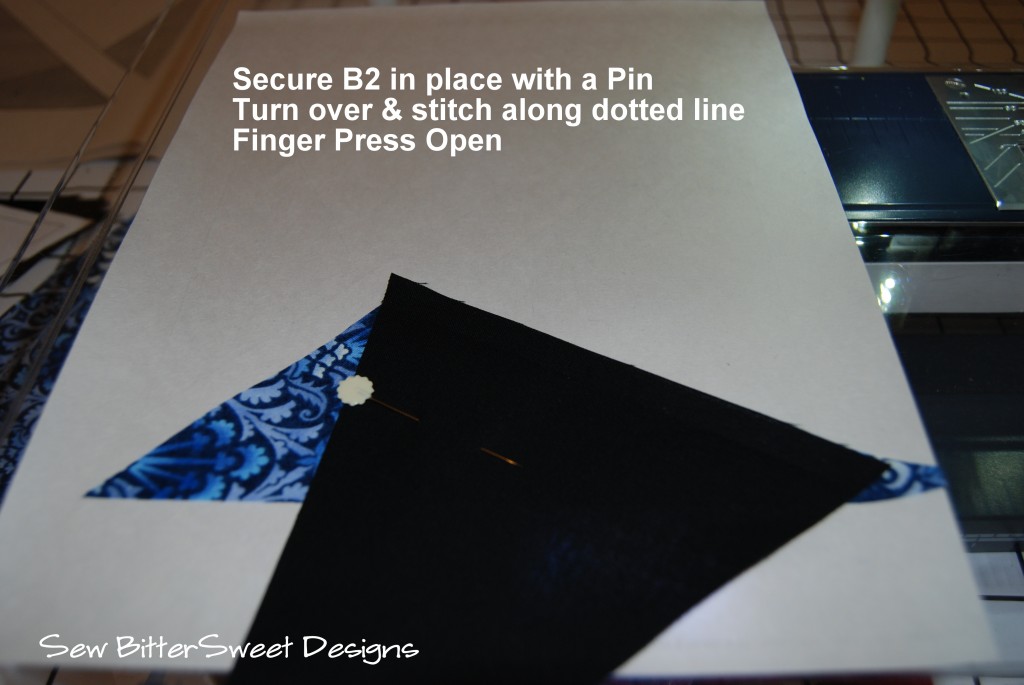
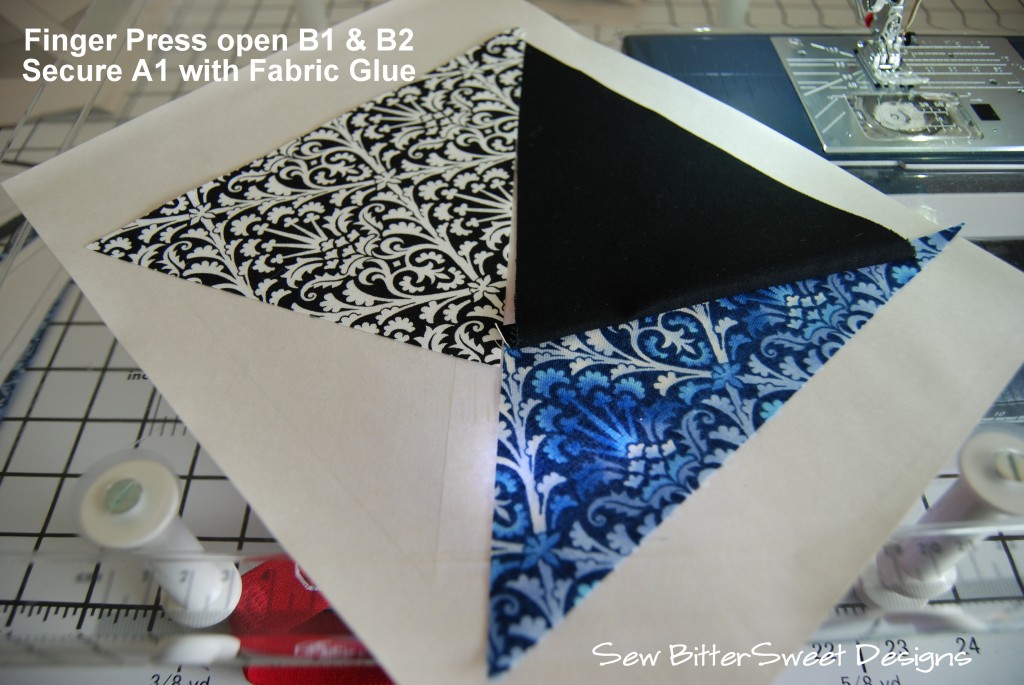
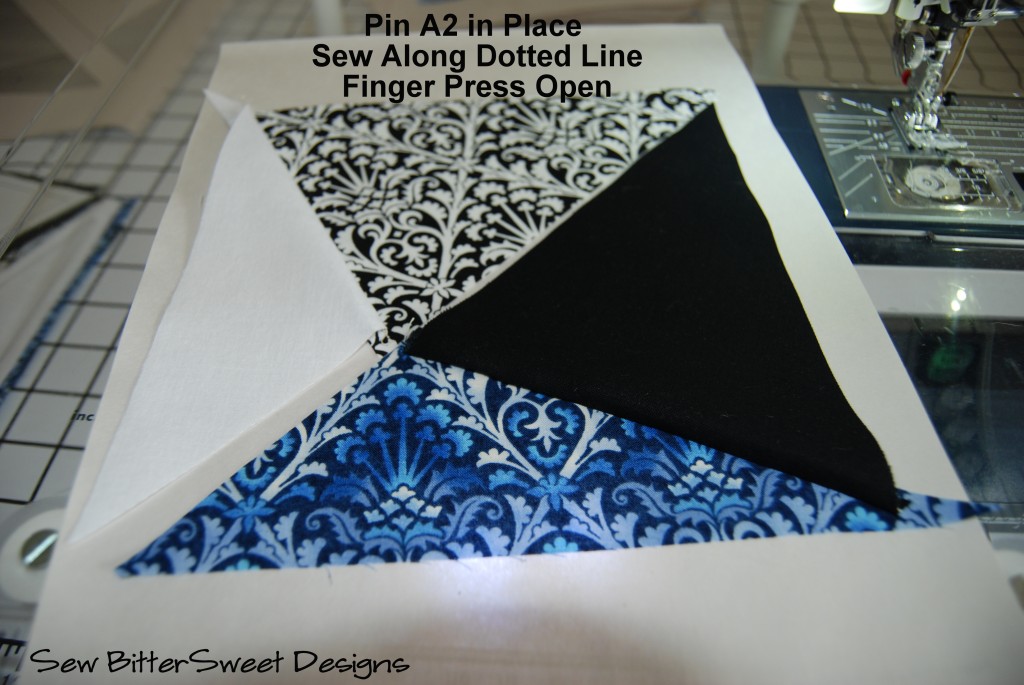
Starting with the B Sections follow the picture tutorial:

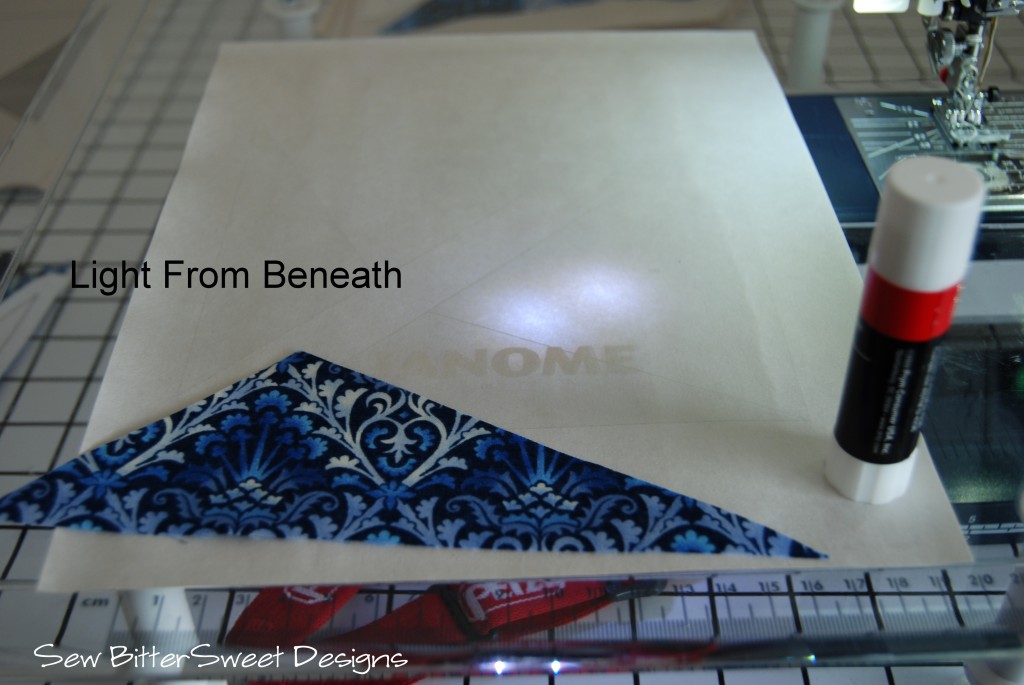
If you have a clear plastic sewing table – like the one that came standard with my machine, I recommend putting a light underneath it – this will help you arrange your pieces to be perfectly in line with your paper piecing template.

As you can see in the picture below, the bright light from underneath will help you align your pieces and it allows you to not only sew at night when you can’t look out your window for natural light, it also saves fabric – you can more precisely line things up and won’t have to use big pieces.

You are now ready to sew!

NOTE: It is important that you sew each piece in the order, I’ve listed – this will help you match up your seams when you piece your sections together!

Make all 16 of the paper pieces.  Then bust out your iron and press the sections down.

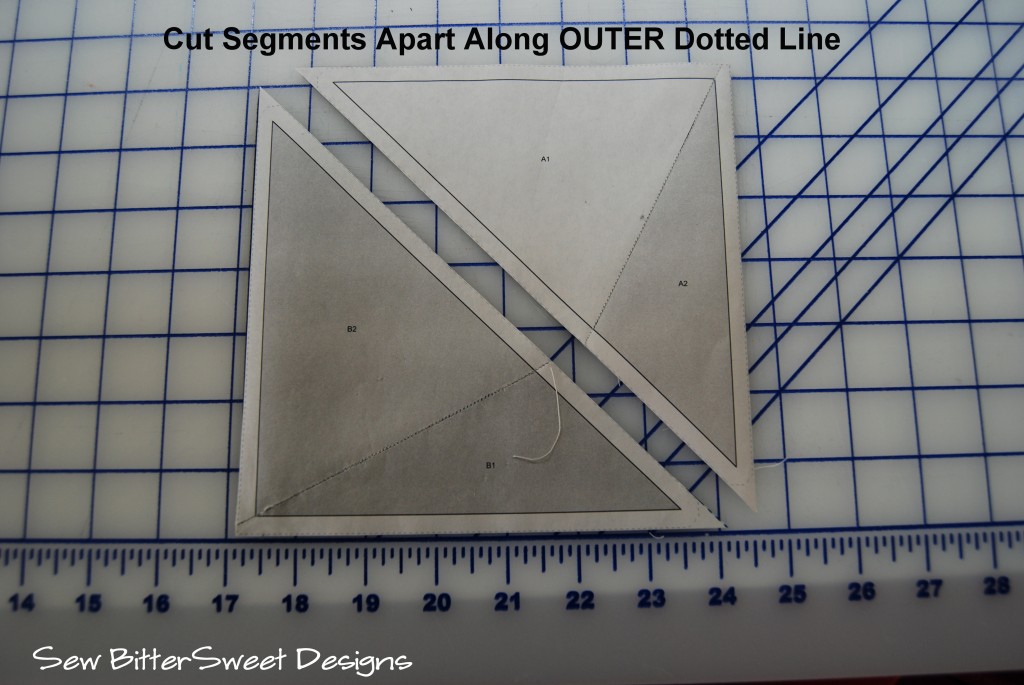
Cut your sections apart along the outer dotted lines.

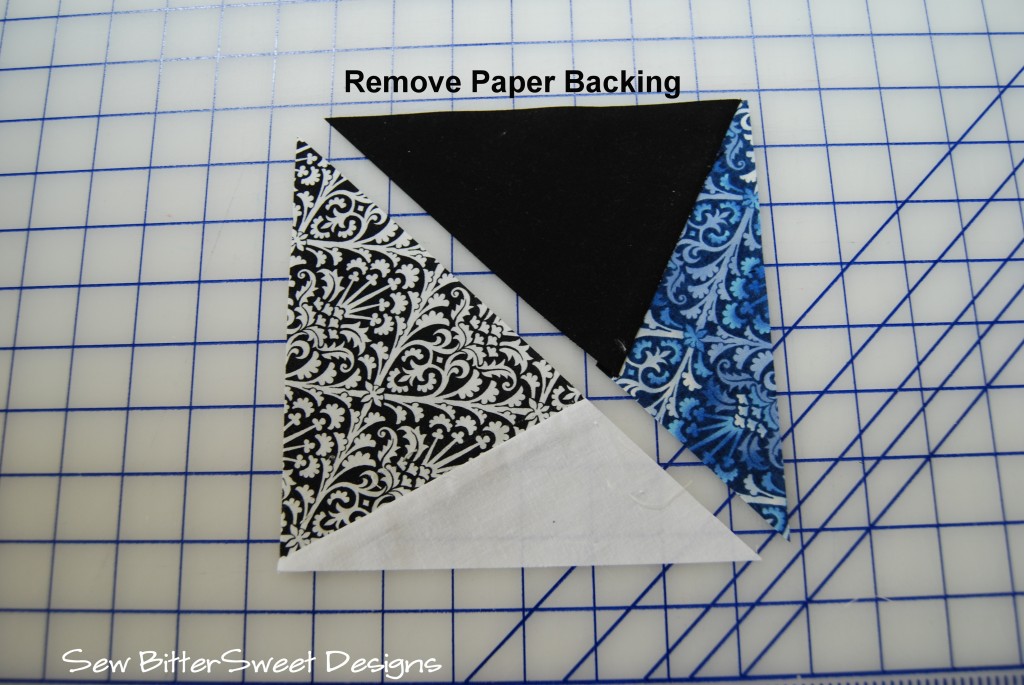
Remove your paper backing – if you are using the Carol Doak’s Foundation Papers, they will virtually fall off!  Don’t worry, with a small enough stitch length regular printer paper will come off fairly easily too.

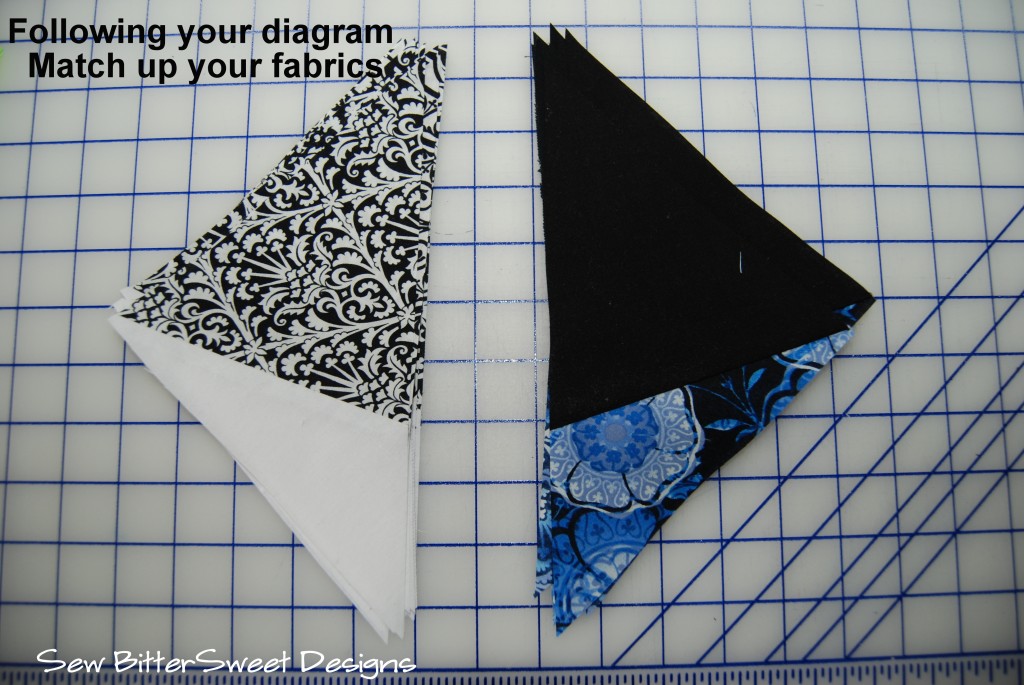
Next, pull out your diagram and match up your sections, place them in two piles – white pile and black pile.

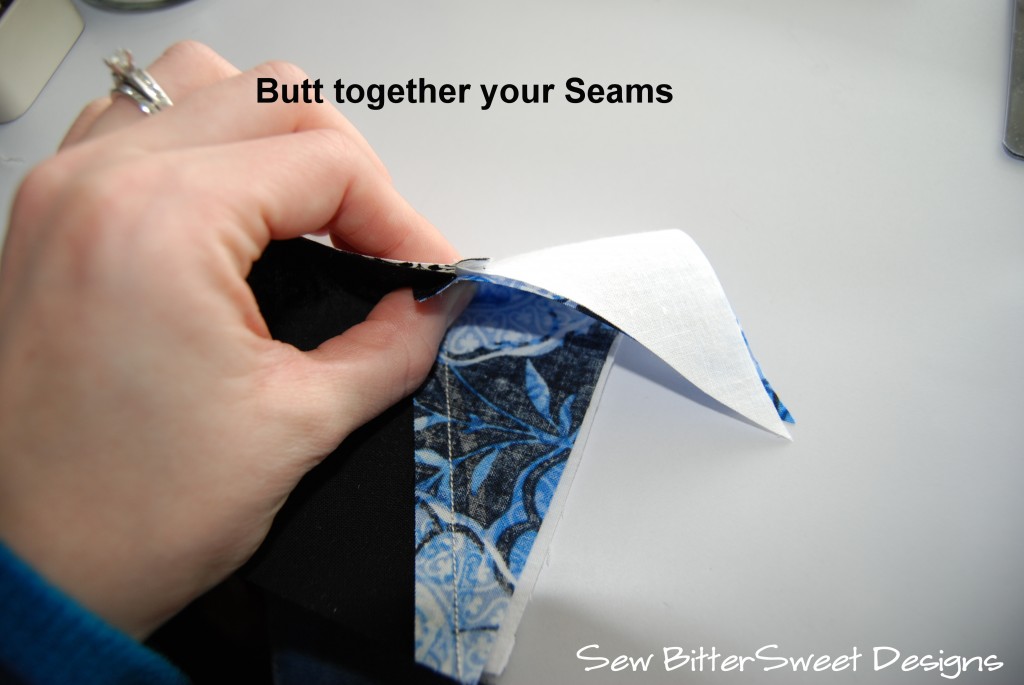
Remember how I had you sew your sections together in a VERY specific way…this is because it will make joining your sections super easy. Your seams will lock together.

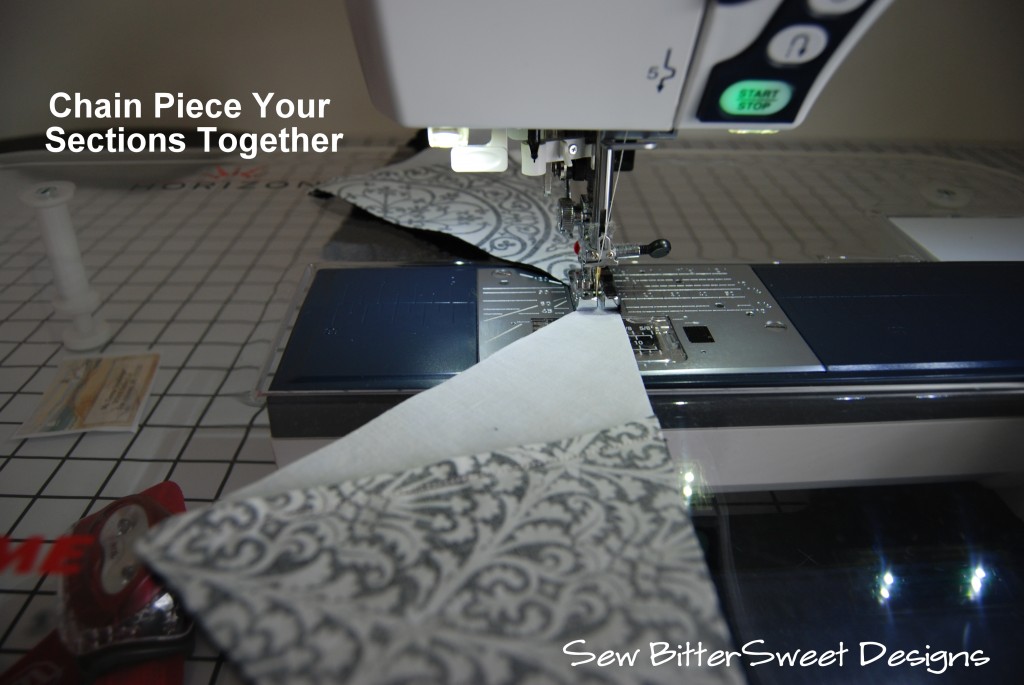
I love chain piecing, I think I have said that about 10 other times on this blog, and here again I am employing it. If you don’t already chain piece, I would highly recommend it! Saves lots of time!

You will have sixteen 6 inch blocks, I press mine open and trim the dog ears.

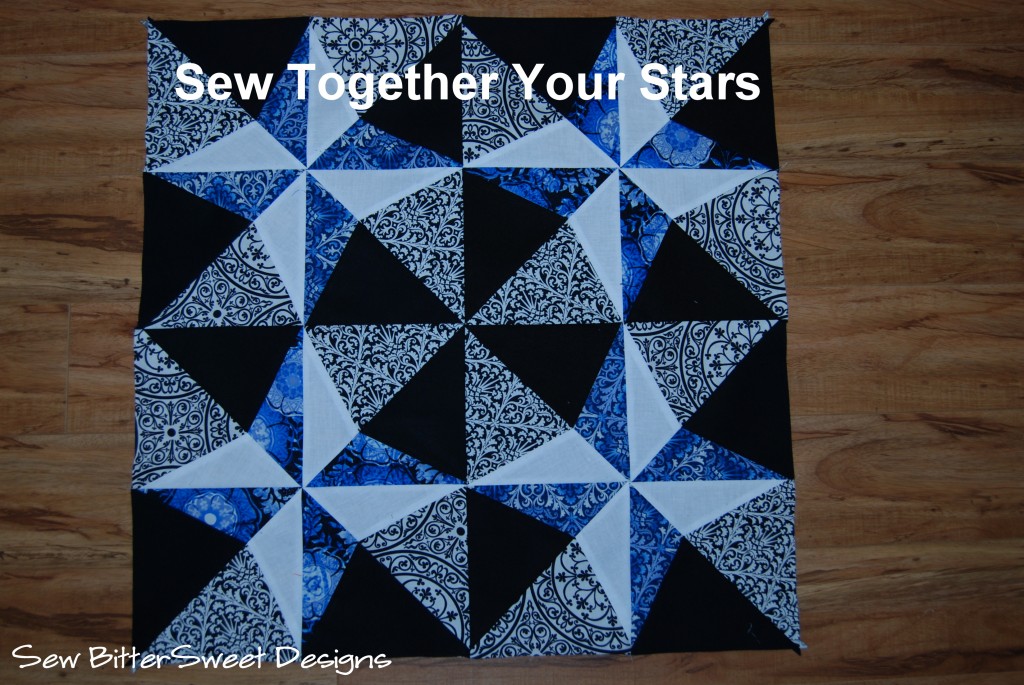
Next layout your blocks and sew your stars together.

NOTE: When sewing your squares into blocks – it is more important that seams match up rather than the squares fit perfectly together. The seams matching up (interlocking together) is what will give you the perfect star points!

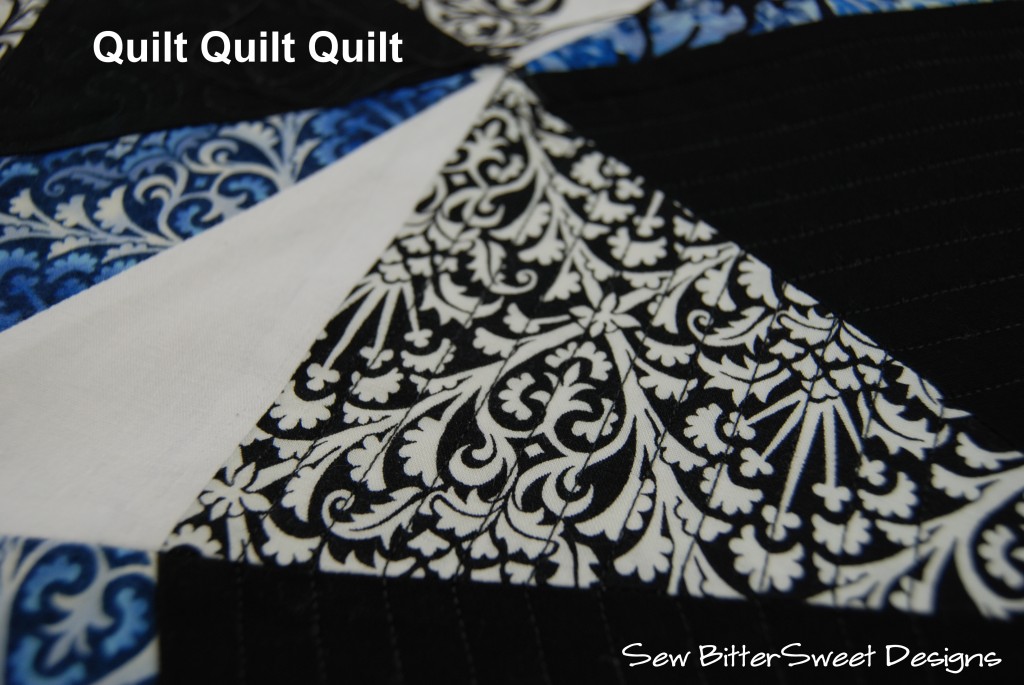
Time to quilt! I used black thread to quilt mine so it would blend in nicely. White would have stood out beautifully and made a great statement, but I wanted the quilting to blend.

You will need three strips for the binding in a solid blue. Feel free to follow my binding tutorial.

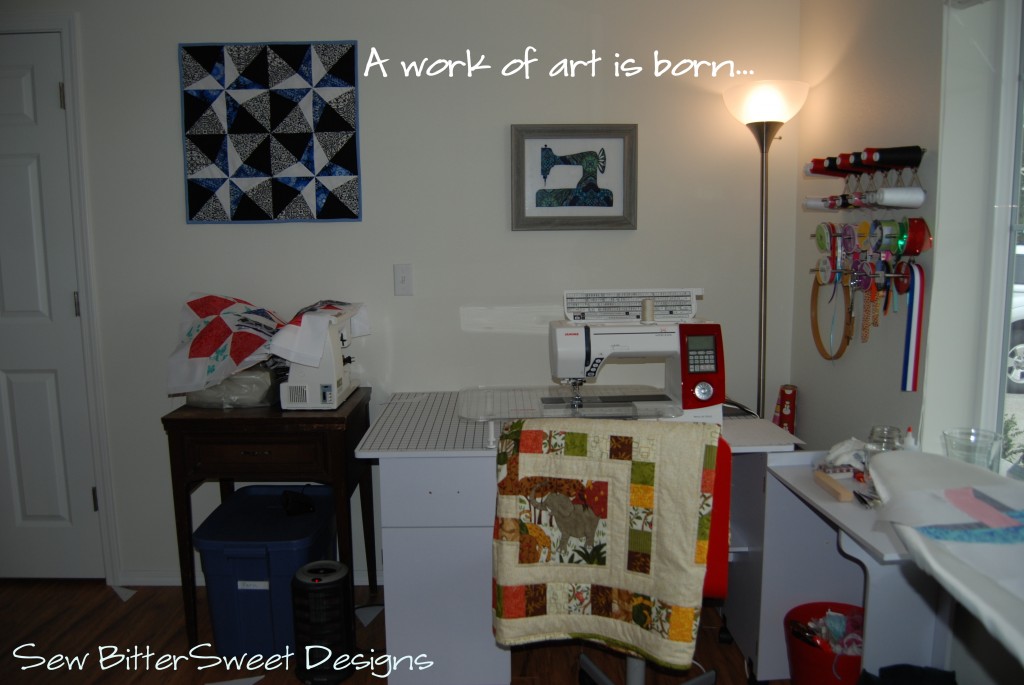
Bind and voila!

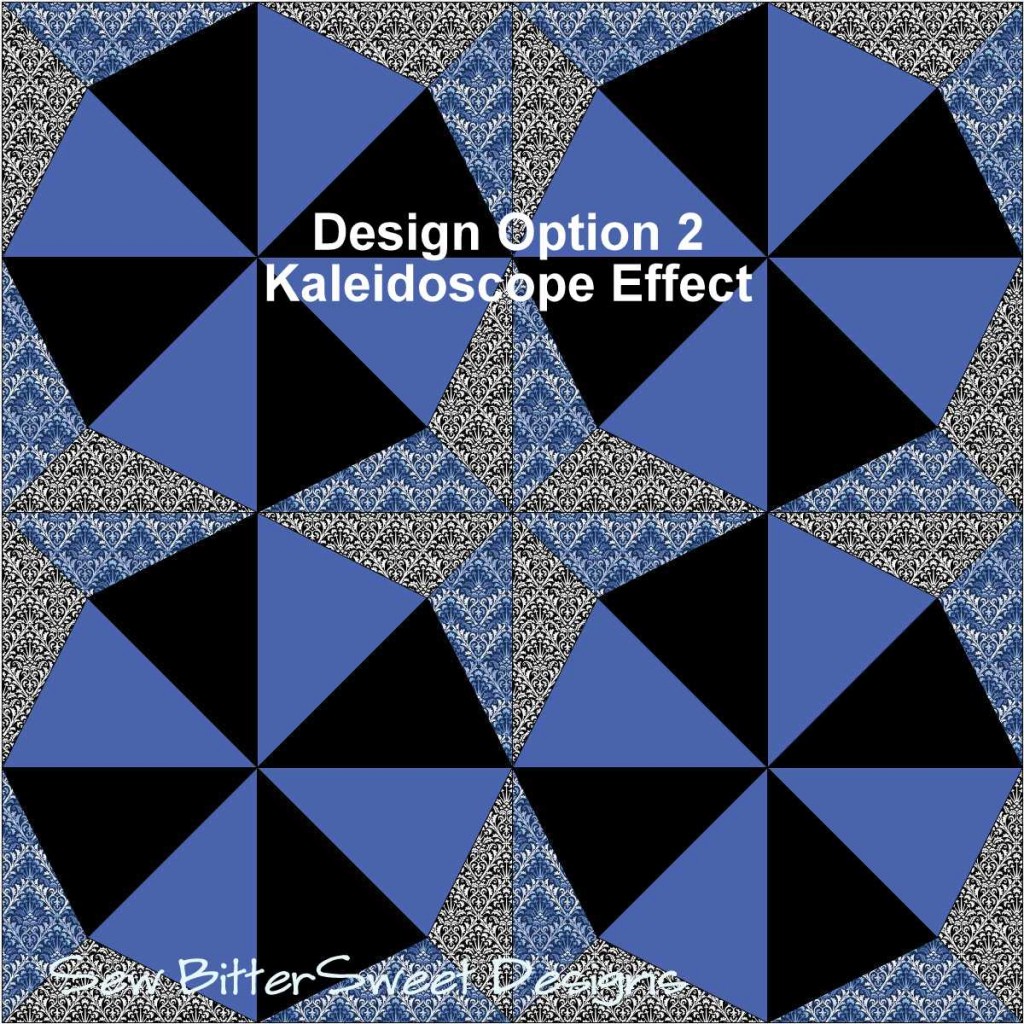
If you are not a fan of this particular design, here are a few other options, all made with the same paper pieced template and the same number of segments.


Enjoy! And if you end up making anything from one of my tutorials I would love to see it!

Make sure you enter to win the Fat Quarter Shop giveaway that I am hosting – you could win a Fat Quarter Bundle of Avalon AND a set of Carol Doak’s Foundation Papers.

Tri-Recs Tool Review & Mini-Tutorial

(Fat Quarter Shop provided me with this tool, the review is entirely my own)

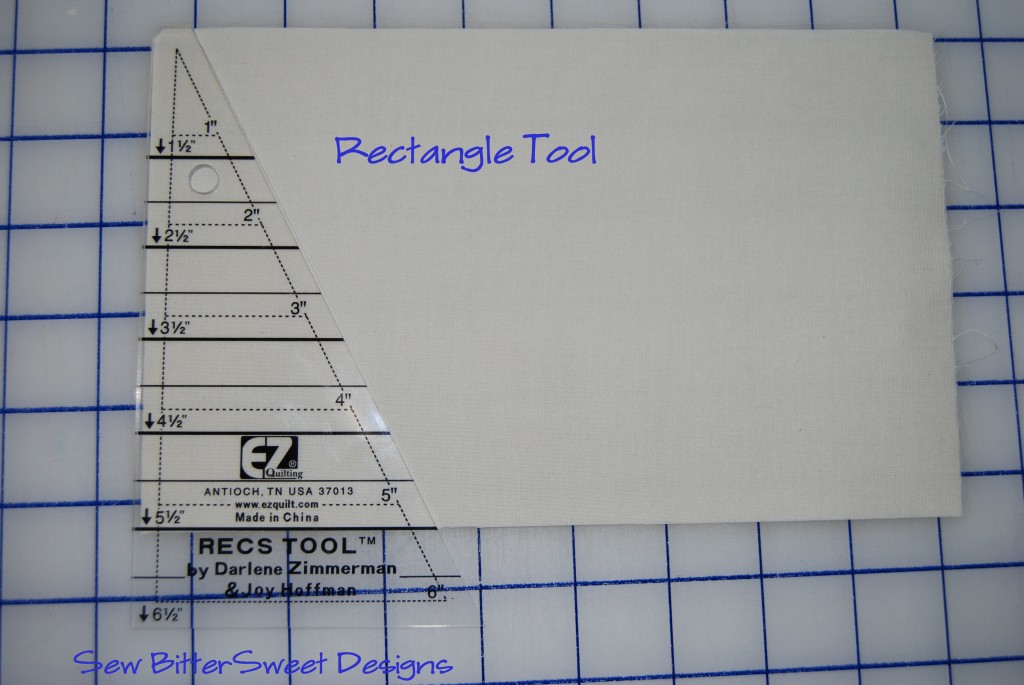
When using the Tri-Recs Tool you will work primarily with strips – 1.5” to 6.5” wide by width of fabric (WOF). As seen in yesterday tutorial of my Scrappy Trees block – you can easily use this tool with scraps as well.

The Tri-Recs Tool comes with 2 acrylic triangles and 2 pamphlets full of instructions and block diagrams. The thing I love best about the tool is that it has notches in multiple spots for easy alignment of your fabrics.

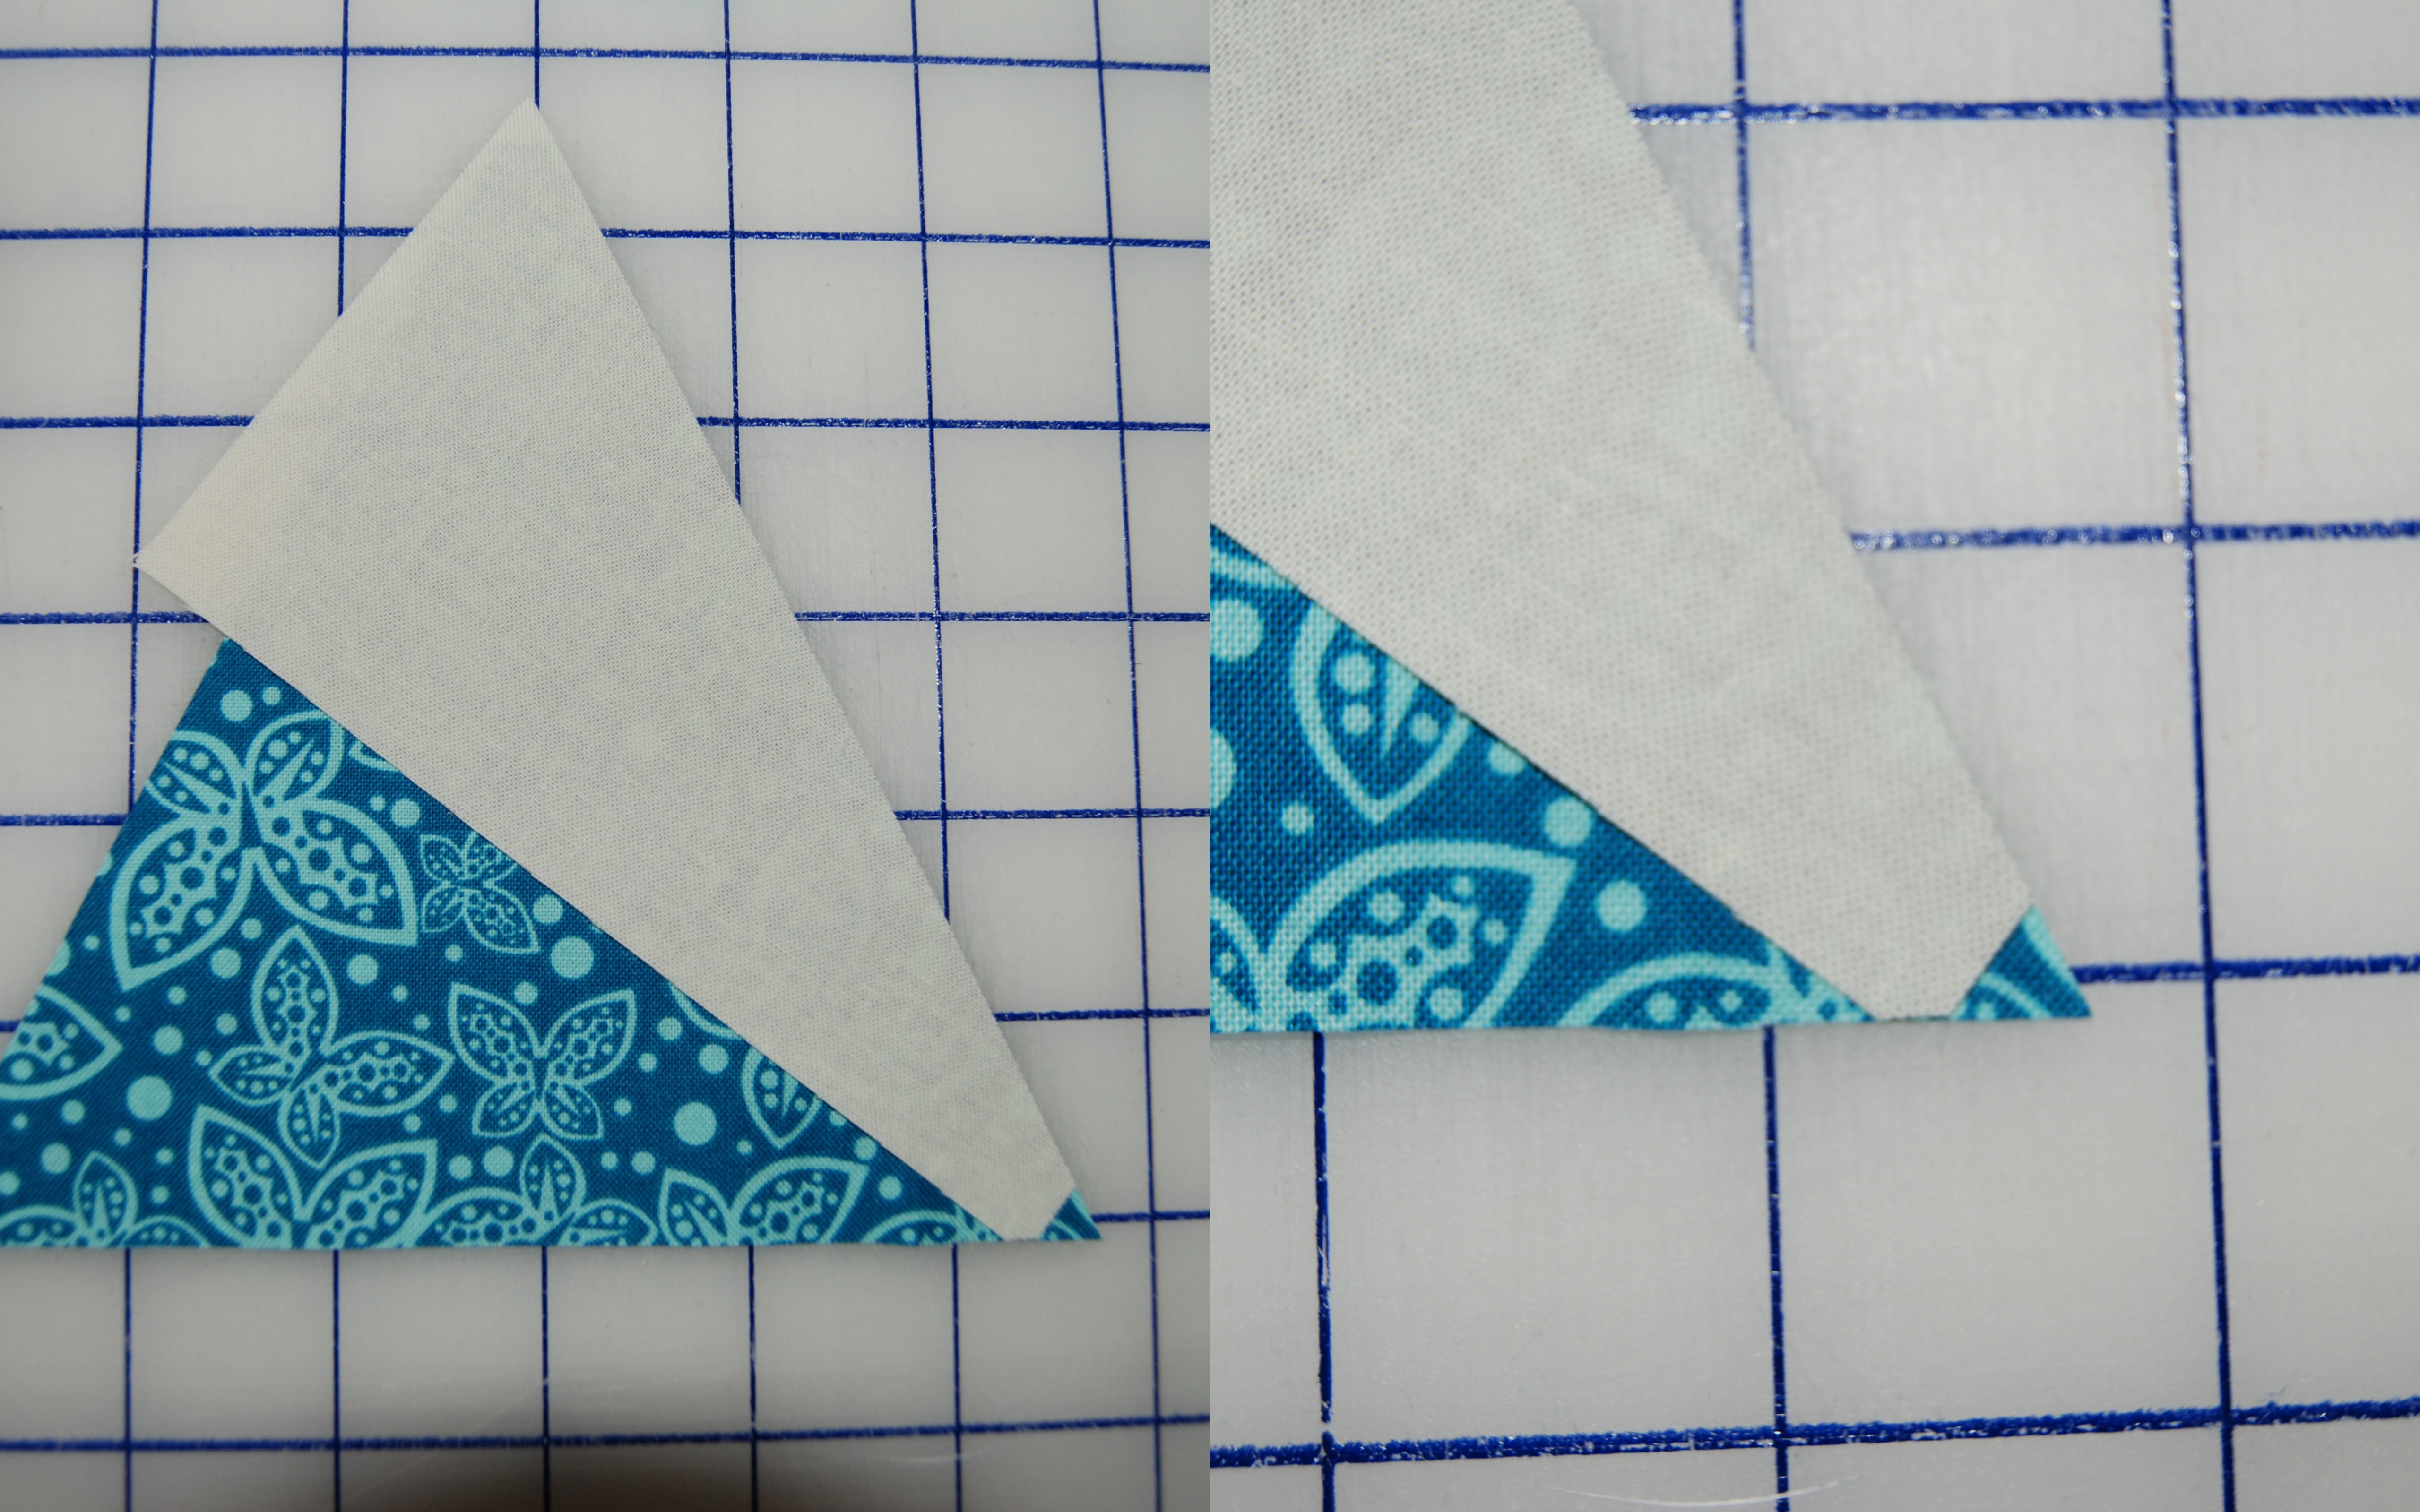
When used correctly you will have 2 separate notches in your “rectangle” pieces.

It is these notches that allow for perfect alignment every time – which in turn helps to avoid unnecessary and tiresome trimming of your blocks.

I started out with 2 strips of Imperial Pheasant measuring 3.5” by WOF and I started cutting and sewing, absolutely no plan in mind. I simply wanted to work with the ruler and see what it could do. I then proceeded to create a block that I had a hard time looking at without going cross-eyed (it would be better with different fabric placement choices!), but in creating it I realized that I didn’t trim a single piece and my block measure exactly 12.5”x12.5”! Now I ask you, how often does that ACTUALLY happen?!?

As you can see I incorporated both tools creating triangles in squares and rectangles in the block. The fact that I didn’t have to trim just astounds me.

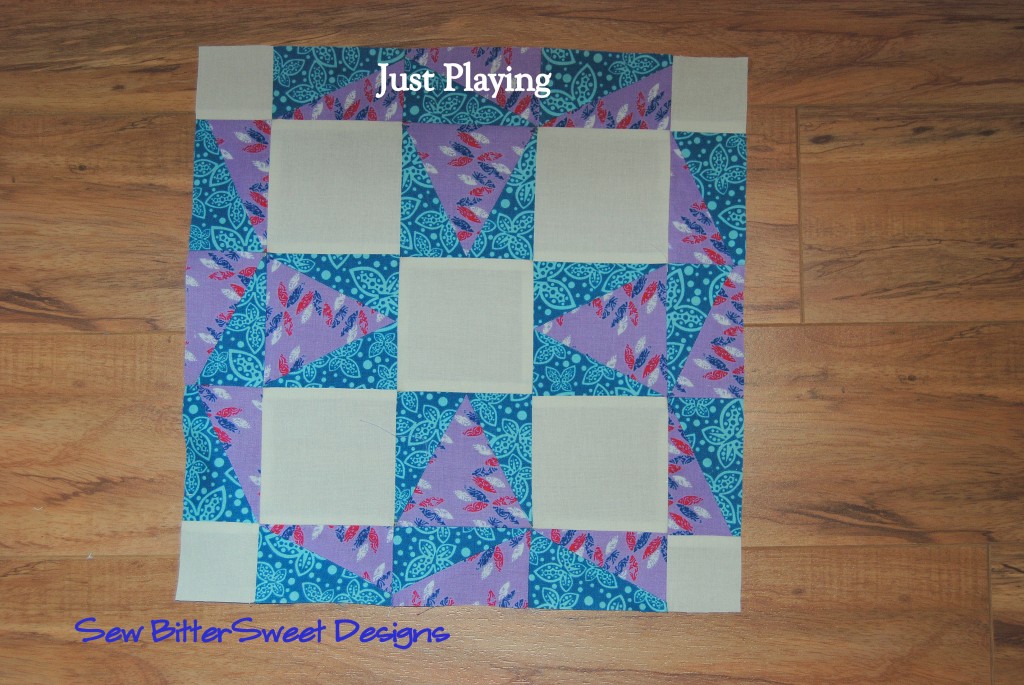
Next up, I wanted to create something that I dearly loved. Again, I had no real plan, but knew that whatever I made needed to be wall hanging size (Imperial Pheasant reminds me of my mom – especially these colors and Mother’s Day is coming…).

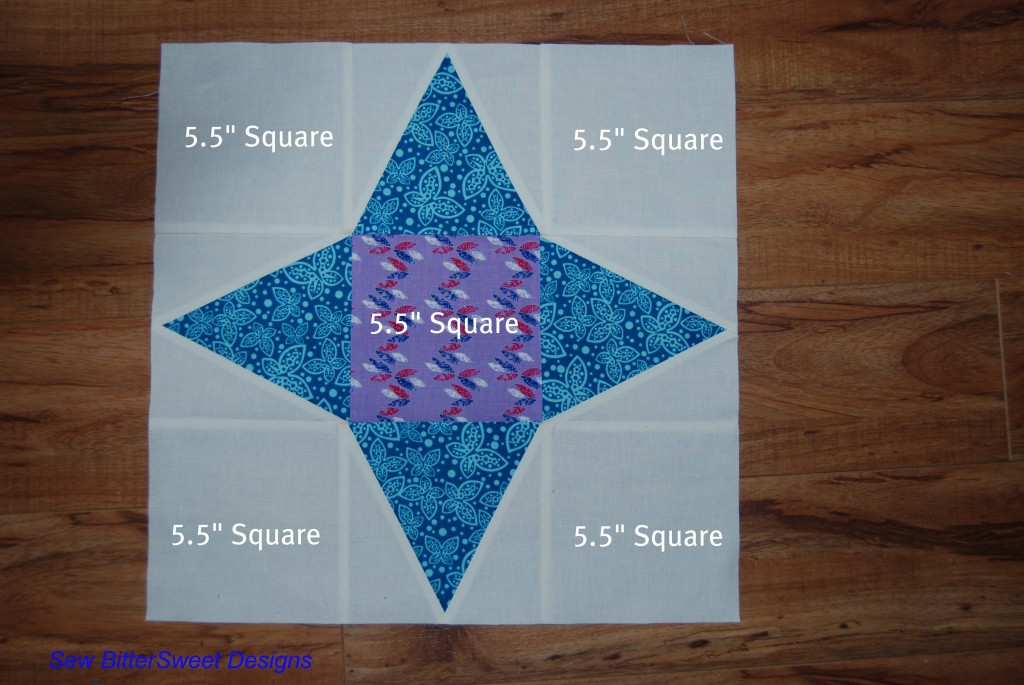
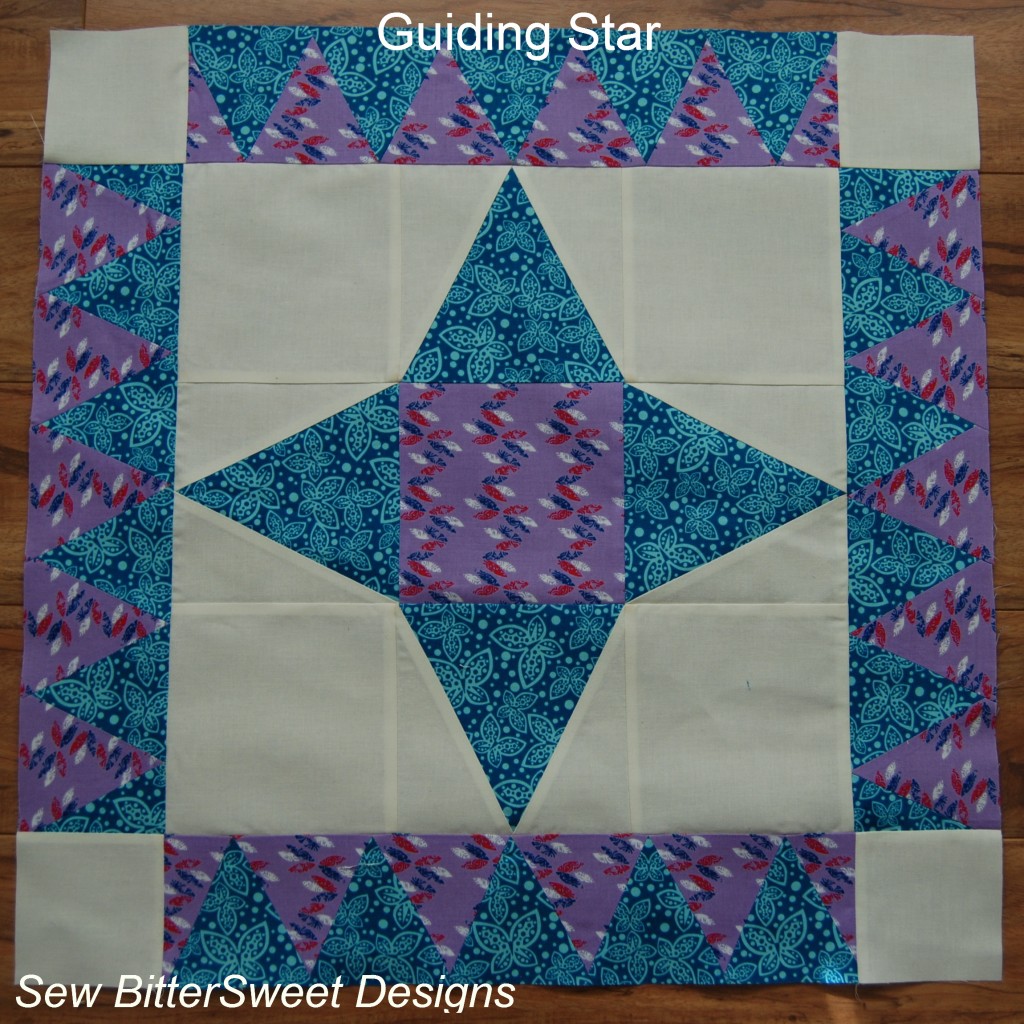
This time I cut 1 strip of the blue – 5.5” by WOF, 1 strip of cream 5.5” by WOF and I still had my 3.5” strips of blue and purple from the first block. I also cut 1 purple 5.5” square. I created this:

Using the 60⁰ Triangle Tool on the blue – I cut four 5.5” triangles. Using the Rectangle Tool and the cream, I cut 4 sets of 5.5” rectangle sections (8 total). I sewed those together and then pieced my block.

To make the borders I used the 60⁰ Triangle Tool only and cut alternating blue and purple 3.5” triangles. I pieced those together and added the borders. The border corners were 3.5” squares of the cream.
For more inspiration, my friend Michele from Quilting Gallery has made a gorgeous quilt using the Tri-Recs Tool. You can see her progress pictures here and you can see her finished quilt here. The versatility of the Tri-Recs Tool is beautifully demonstrated in Michele’s Quilt.

Things I like about the Tri-Recs Tool:

  • The notches make it exceptionally easy to sew your sections accurately – when sewing with a consistent ¼” seam, no trimming is required. There is ZERO guess work!
  • There is virtually no learning curve. The two pamphlets and the included diagrams are easy to use and follow – one quick perusal and I was off and creating.
  • You can create finished blocks measuring 6.5” square.  Guiding star before borders was 15.5” square – lots of flexibility with size.
  • This is a great ruler to make borders with – I have never done a triangle or rectangle border now (would never have considered it – too hard!) – now I think they will become a more regular design feature in my quilting projects.

Area’s For Improvement:

  • I really don’t have any…believe it or not.  For both projects I created, I didn’t have any plan, I just started cutting and sewing and the projects went together beautifully, seamlessly and QUICKLY.

Final Thoughts:

If you are ready to conquer triangles and create some wonderful border details then it is time to purchase the Tri-Recs Tool. I didn’t realize just how much I needed this ruler until I had it! I know I will be using it often in future projects.

Do you have the Tri-Recs Tool? You can purchase yours from Fat Quarter Shop and make sure you also enter their giveaway on Monday’s post too!

Scrappy Trees Tutorial

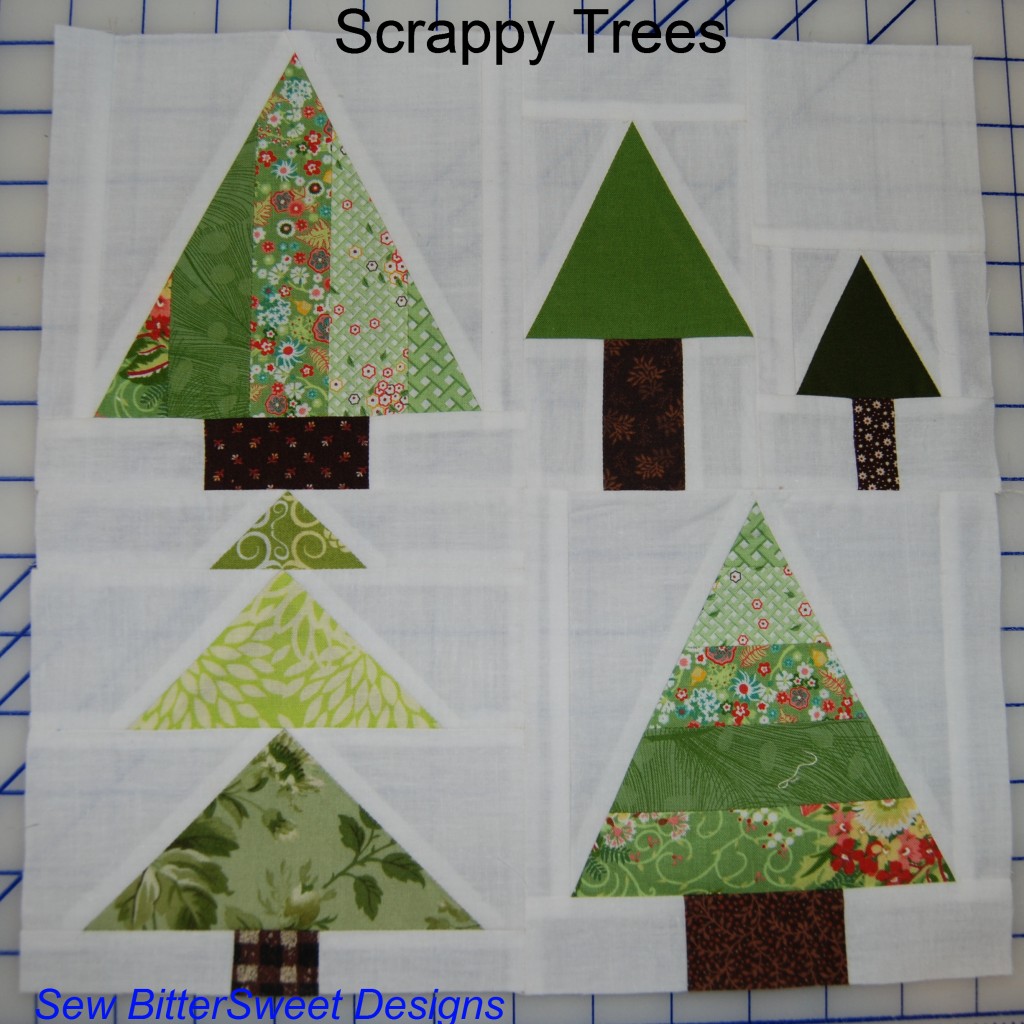
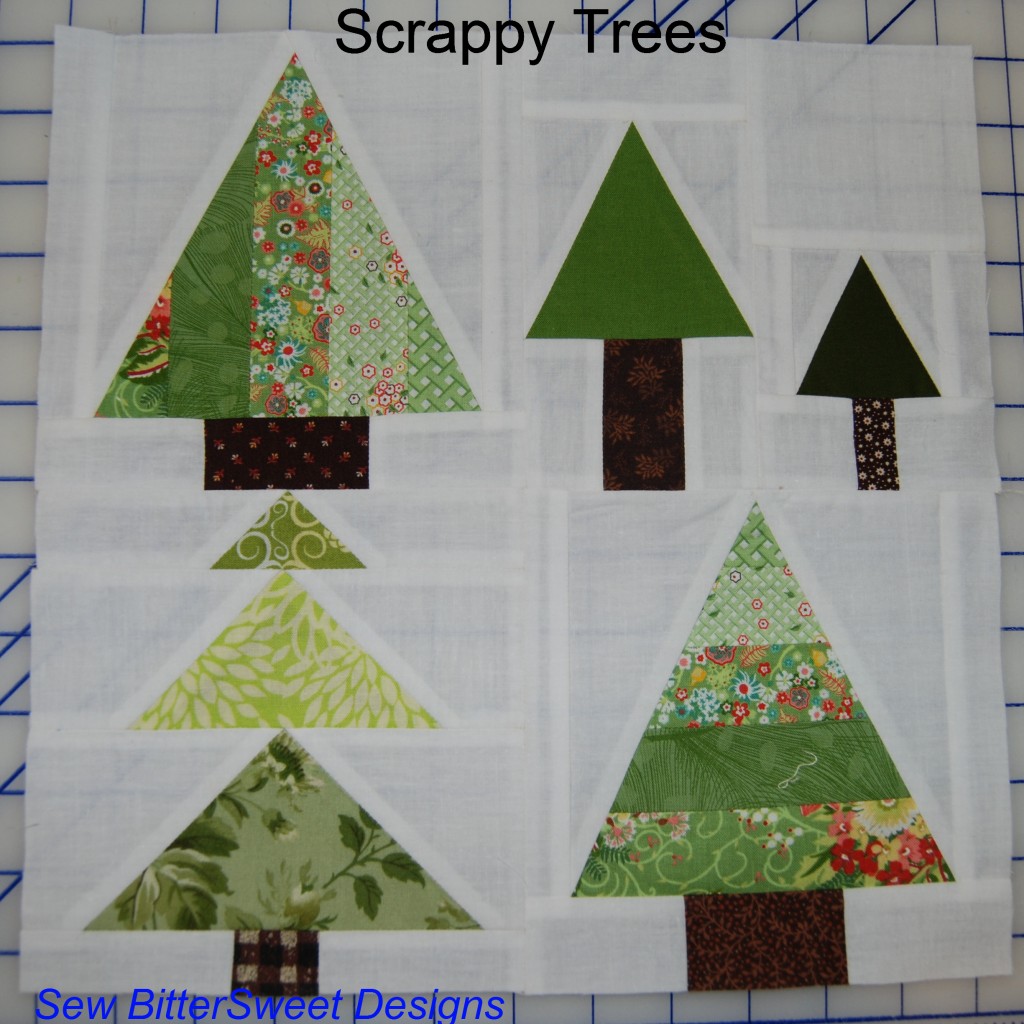
I was so excited when Kim from Kim’s Crafty Apple asked me if I would be interested in doing a tutorial for her Home Sweet Home QAL. I immediately jumped in with both feet and said YES! A couple weeks later PANIC set in – as it always does when I have a deadline and absolutely NO idea what I am going to make.  At first I tossed around the idea of a Tree House of some sort – after all Anne is obsessed with Berenstain Bears and as you probably know, they live in a killer tree house.  As I played and tooled around, I ended up designing a few blocks in EQ7 of scrappy little trees.

If this is your first time to my blog, WELCOME! Please take a few minutes to look around, I have a tutorials page with over 30 free tutorials for quilts, blocks & techniques and I am hosting a very generous giveaway right now from Fat Quarter Shop.

The nice thing is that each individual tree makes a 6.5” (6” finished) block – so if you would like to make 6” blocks from the individual trees you can.

Three of the trees were made using the Tri-Recs ruler – provided to me by Fat Quarter Shop (stop by tomorrow for another tutorial and for a review on it). I have provided PDF downloads of templates for those of you who do not own the Tri-Recs ruler and would like to make this block.

For the Double Tree Block – please go here to download the templates.

For the Pine Tree Blocks – please go here to download the templates.

Each of these blocks was made entirely out of scraps – including the Kona White background – I used 1 strip measuring 3.5” wide for the entire project. All seams are ¼” – you can press open or to the side (whatever is comfortable for you).

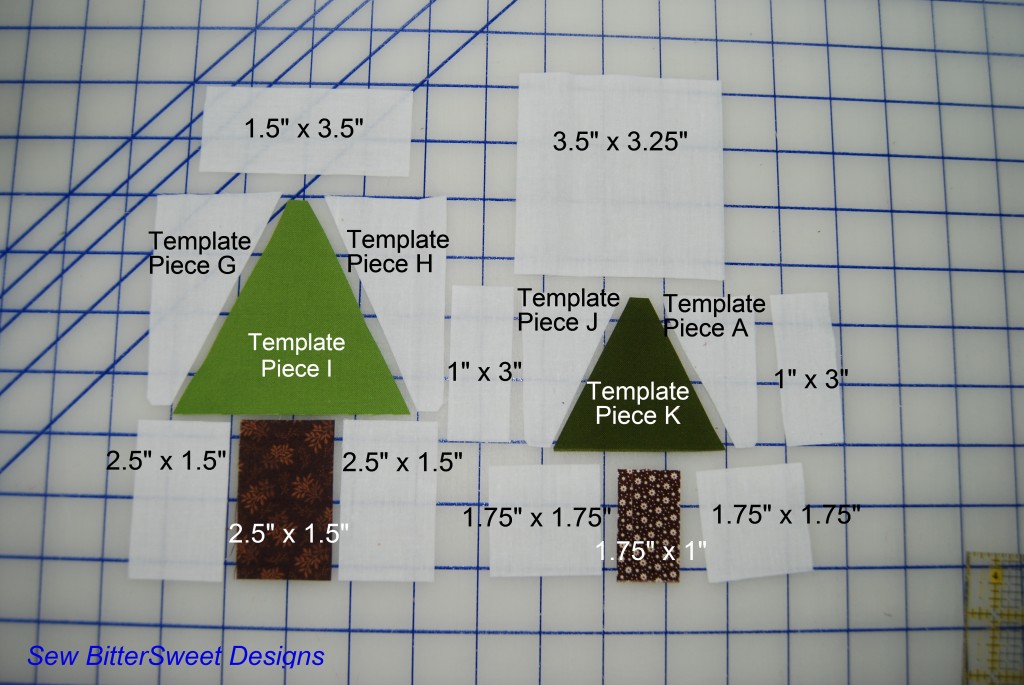
For the Double Pine Tree Block – cut scraps according to image:

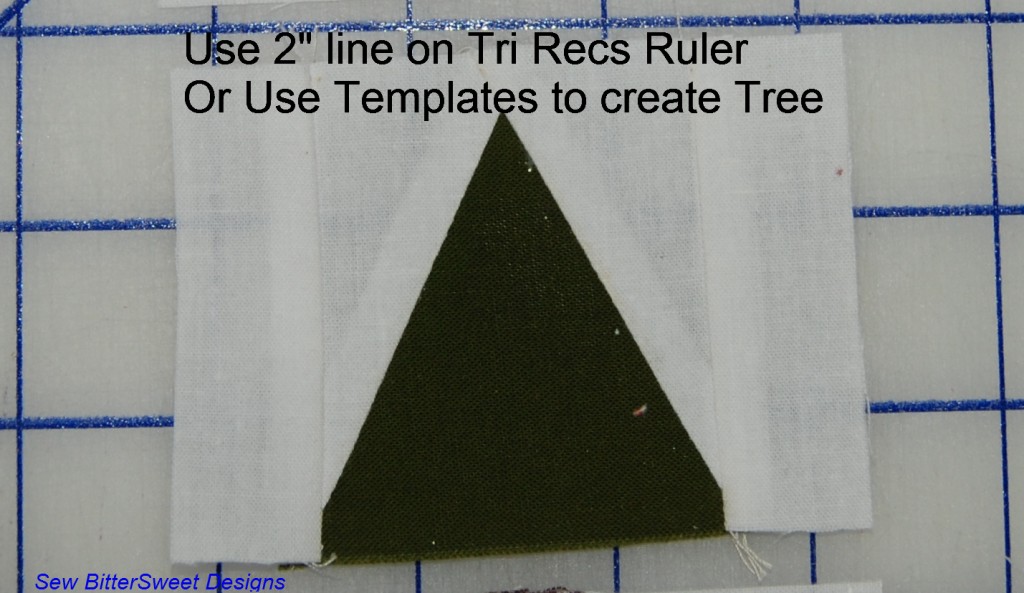
First you will want to create your “tree sections”

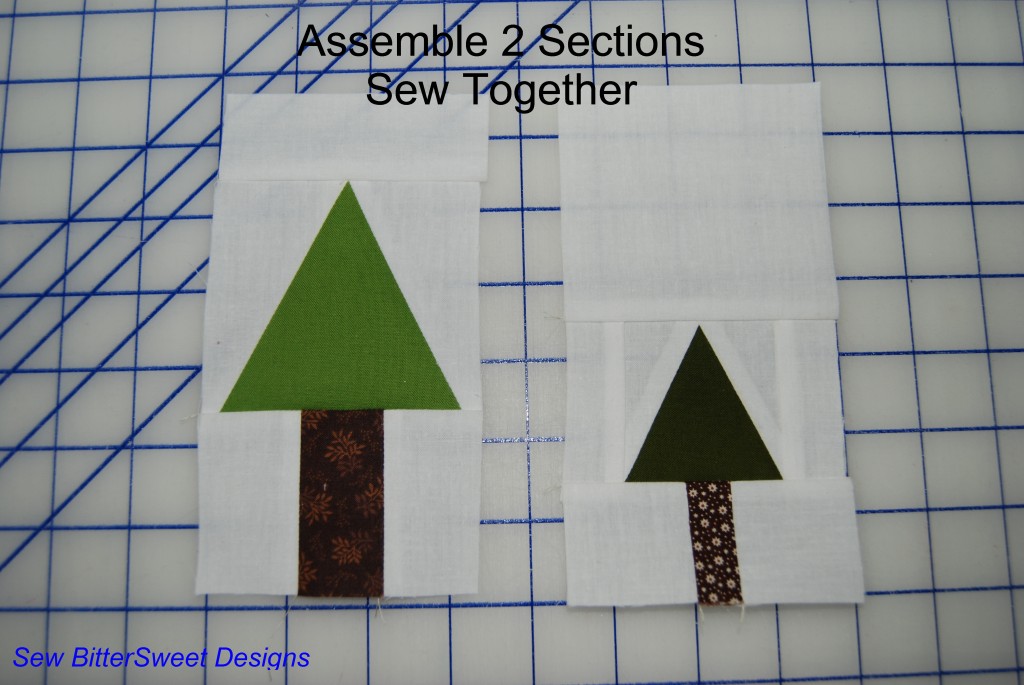
Next you will want to assemble the individual tree sections (effectively splitting the block in half):

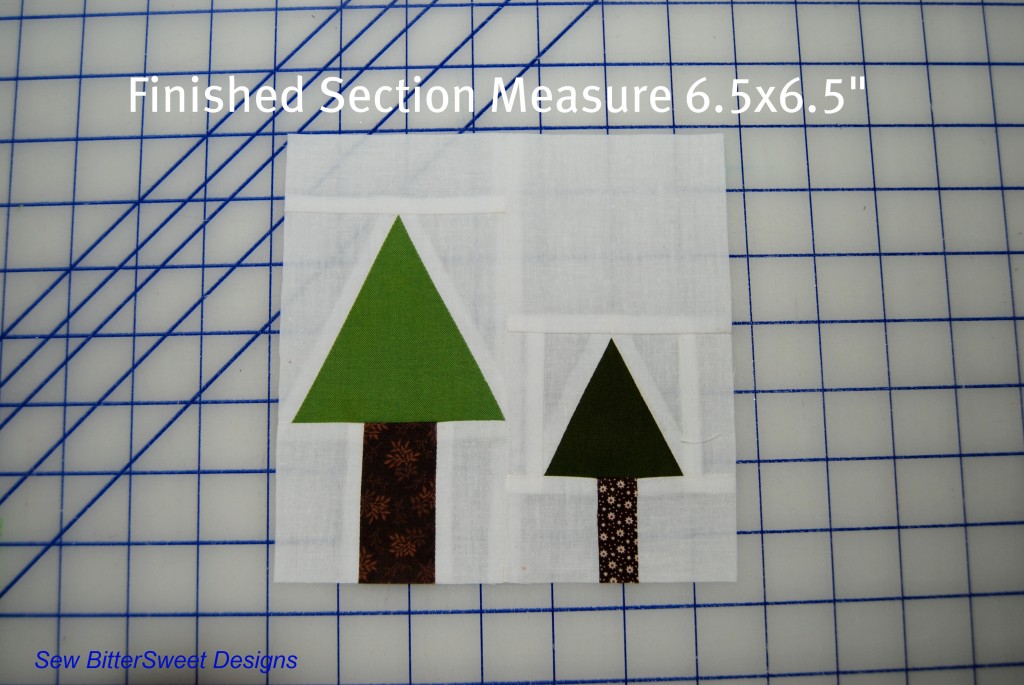
Finished block measures 6.5” Square

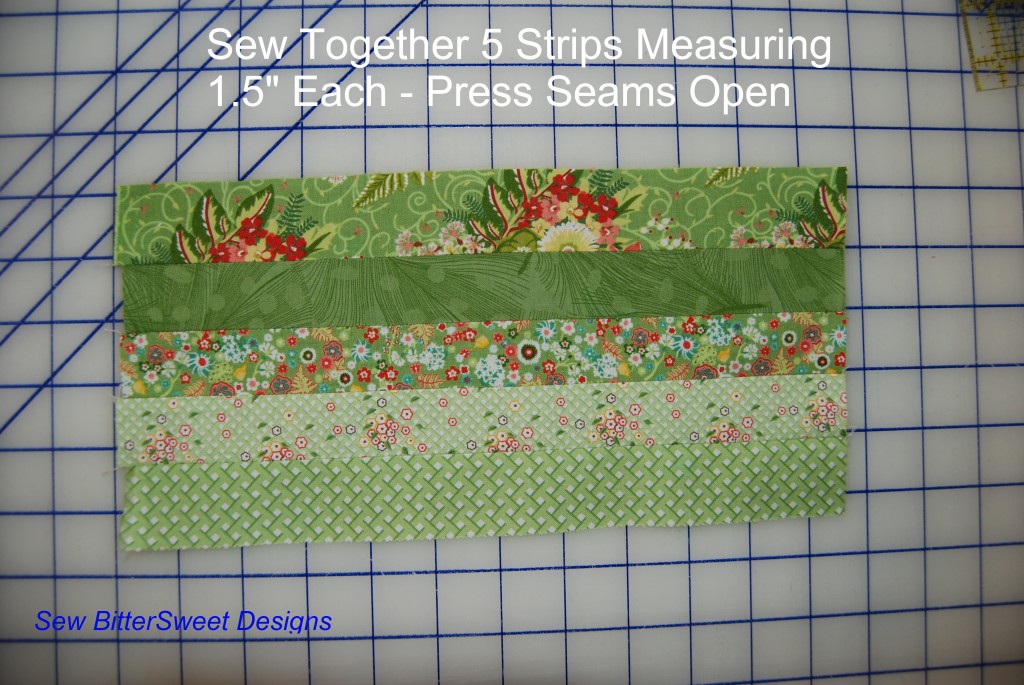
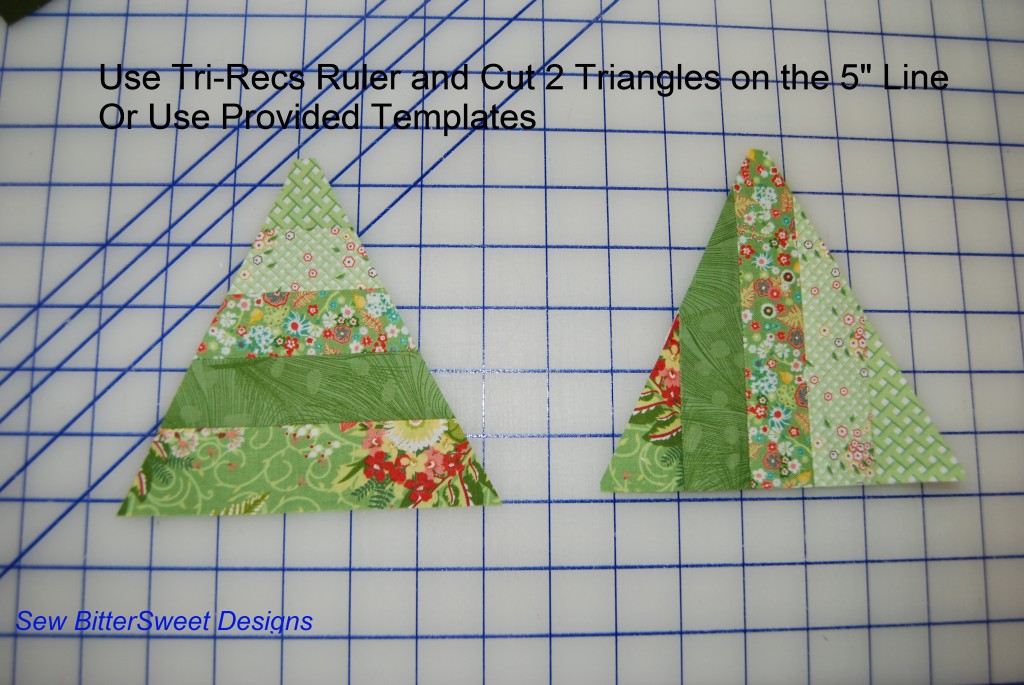
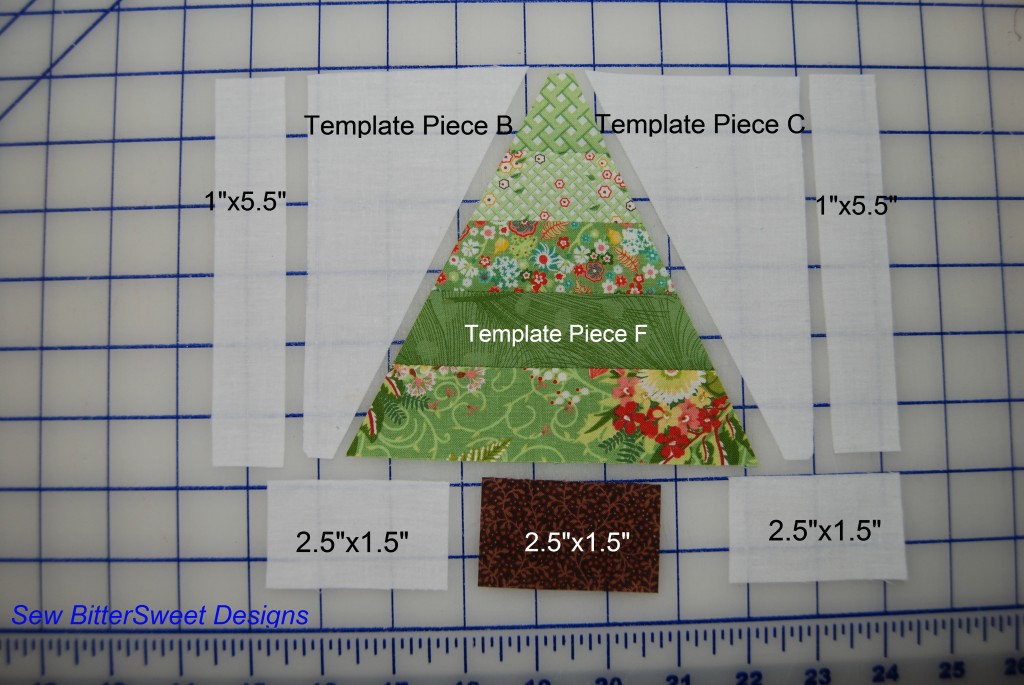
For the two Striped Pine Tree Blocks you will want to start by sewing together 5 strips of fabric measuring 1.5” x 12”

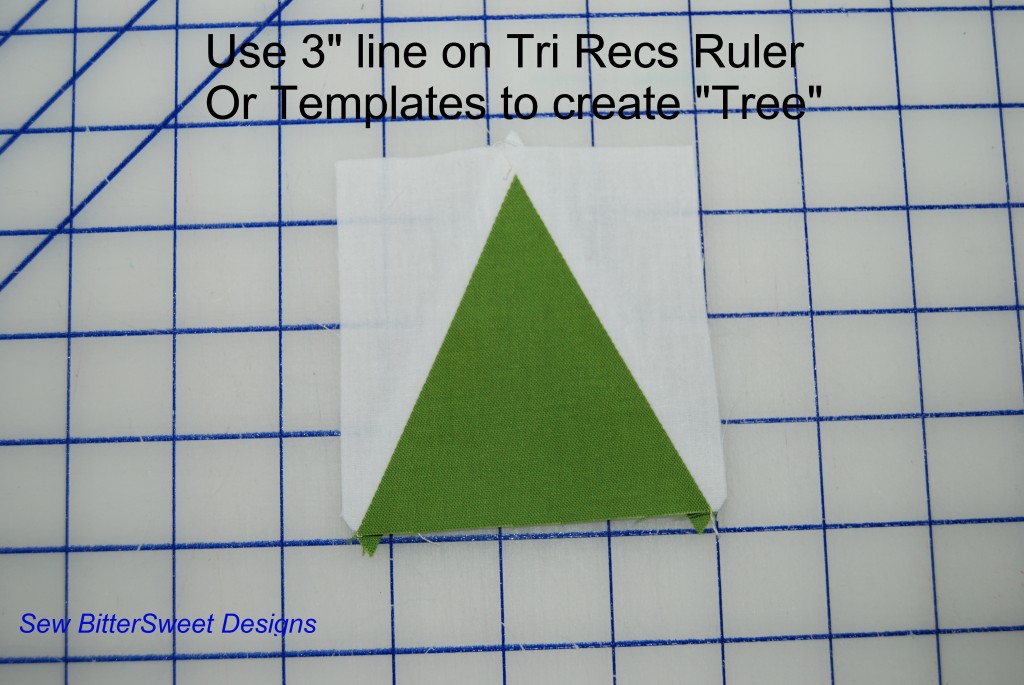
Then using the Tri-Recs ruler or the provided templates – you will want to cut out your tree sections. One will be horizontal stripes, the other will be vertical (simply turn the fabric before cutting):

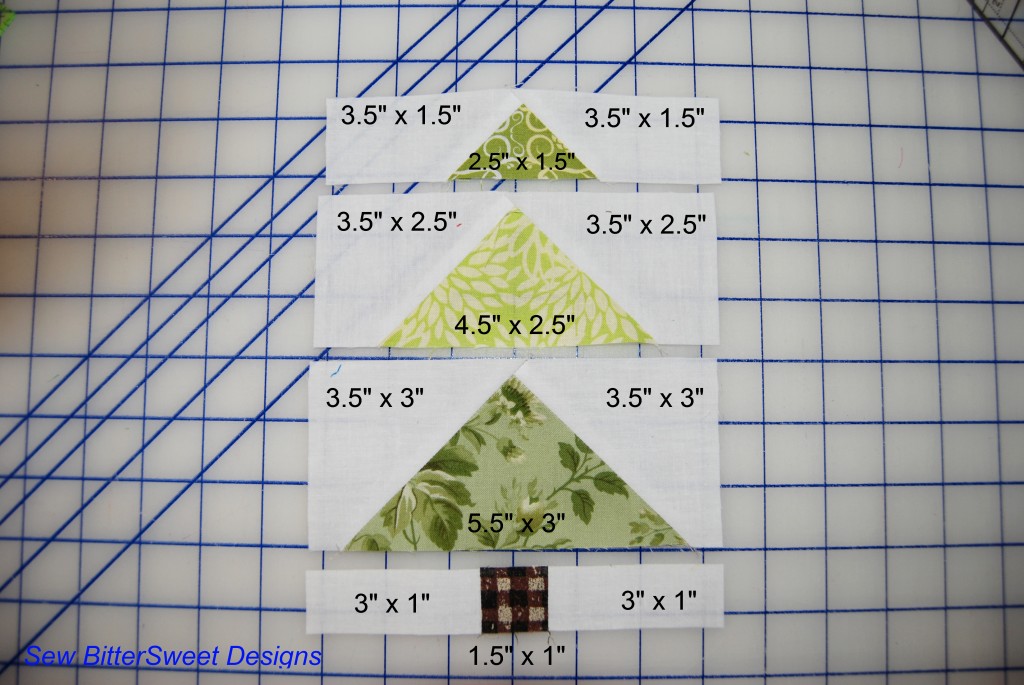
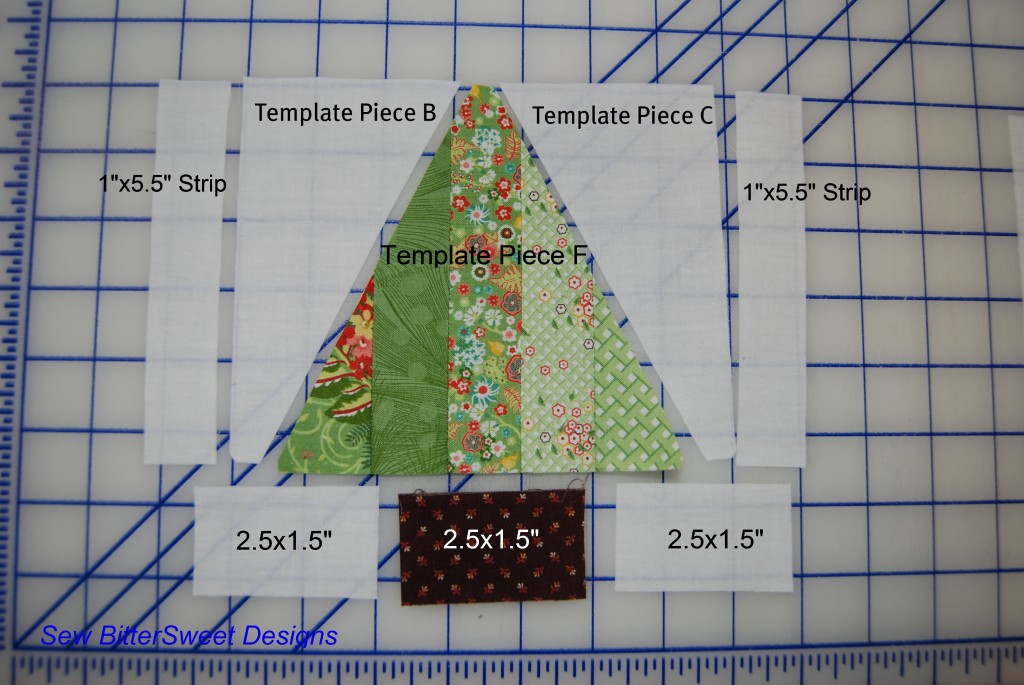
Following the cutting measurements on the next 2 images for the background and tree trunks:

Sew your sections together and voila! Two scrappy pine trees

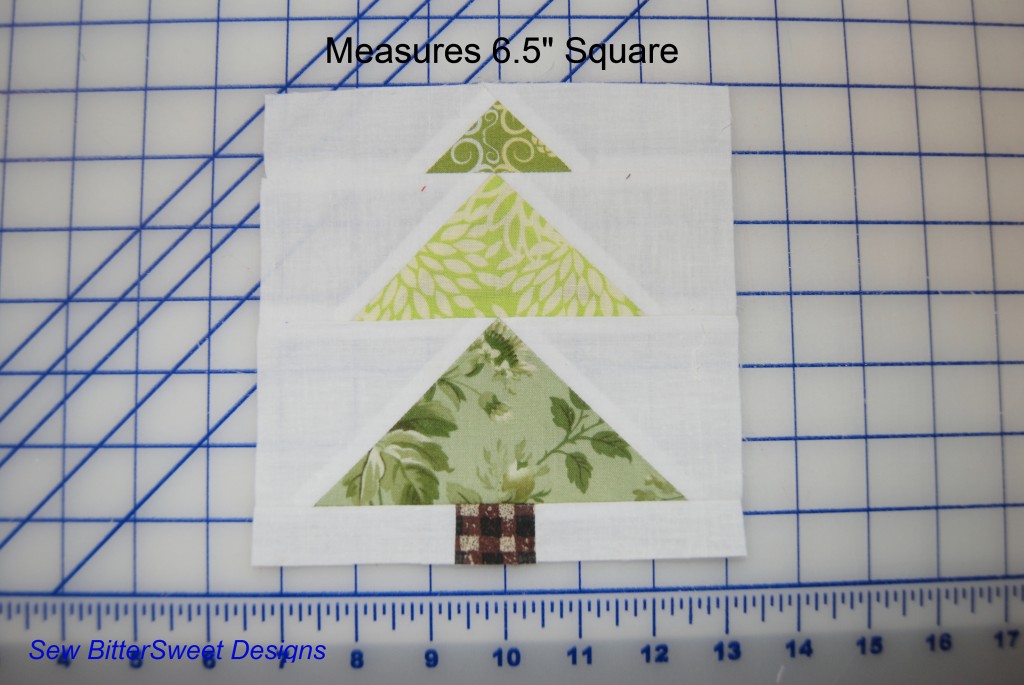
Sorry about this next block – it was easier to show you the cutting measurements on a partially assembled block:

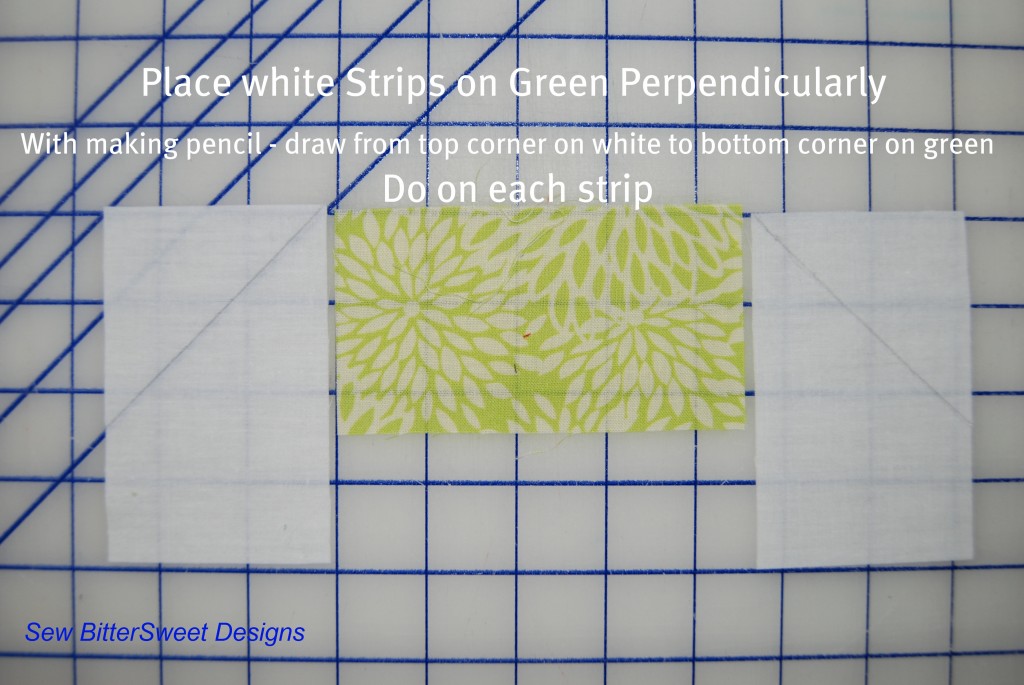
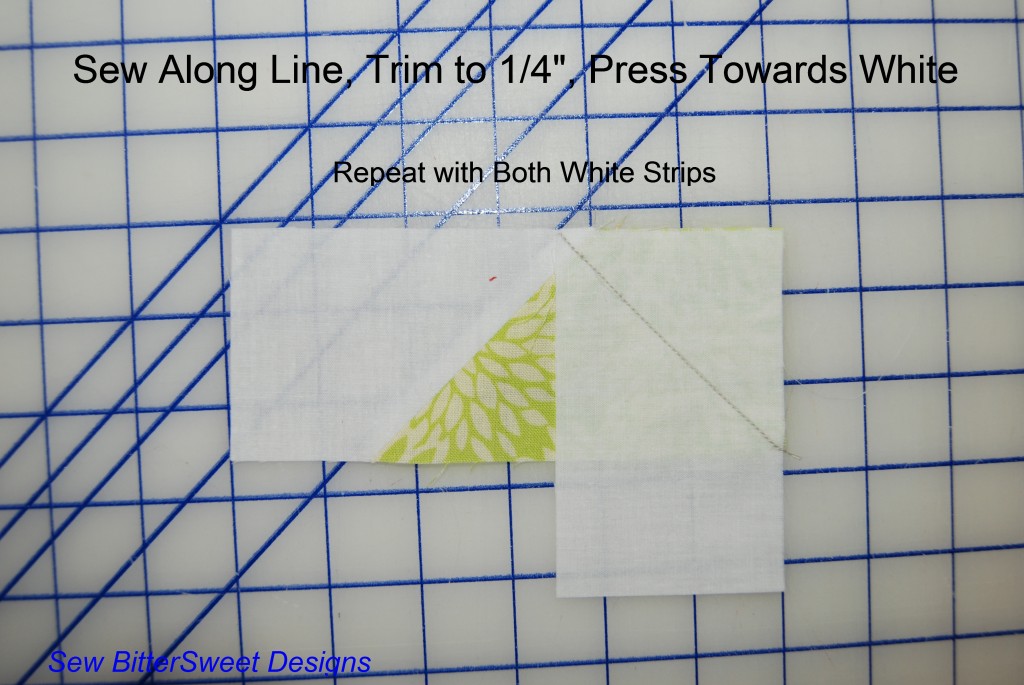
(The technique is the same for each section of the tree, I am demonstrating on the center section – the first section is small and it was hard to get good pictures)

With one white strip at a time, place it perpendicularly on your green strip and use your ruler to draw a line from the upper corner of your white fabric to the bottom corner of your green fabric. Do the same on both sides of the green fabric. Your lines should slant down on your white strips in opposite directions (picture flying geese, except these are rectangles not squares).

Next place your white strip on the green strip and sew along the line you drew. Trim to ¼” and press open, repeat with the other white strip. Once trimmed the entire strip should measure 6.5” long.


Sew on your bottom section with the tree trunk and you are done! Block should measure 6.5” square

Layout your 4 blocks in a way that makes you happy and sew them together!

Please let me know if you have any questions at all or if you need more pictures! And thank you Kim for hosting such a fun QAL and allowing me to be a part of it!

I’m linking up to Quilting By the River

Coming soon to a blog near you!

There is still time to vote for your favorite project in the Valentine’s Day Showcase – head on over and vote! You can vote for more than one project – so spread the love where you feel the need 🙂

I thought I would give you a sneak peak at some of the things I have been working on – each has a tutorial coming soon!

Have you heard of the Home Sweet Home QAL going on over at Kim’s Crafty Apple? Kim asked me via twitter back in January if I would like to be a designer for her QAL and I said “yes, of course!” About a week ago panic set in, I had NO IDEA what I was going to make for my block. I seriously considered doing a tree house block – but I just couldn’t settle on a design. What do you think? Do you like this block? I see 3 more similar blocks being made and a wall hanging being created!

This is going to be a wall hanging for my mom. I made this using the Tri-Recs ruler (review coming next week!) and I honestly just started cutting and sewing without any real plan in mind. I am calling this “Guiding Star” because for so long, my mom has been just that in my life. The only time I have gone more than a day without talking to her has been when she goes traveling overseas with my dad (and we usually end up web camming whenever she does!). What do you think? Will she like it?

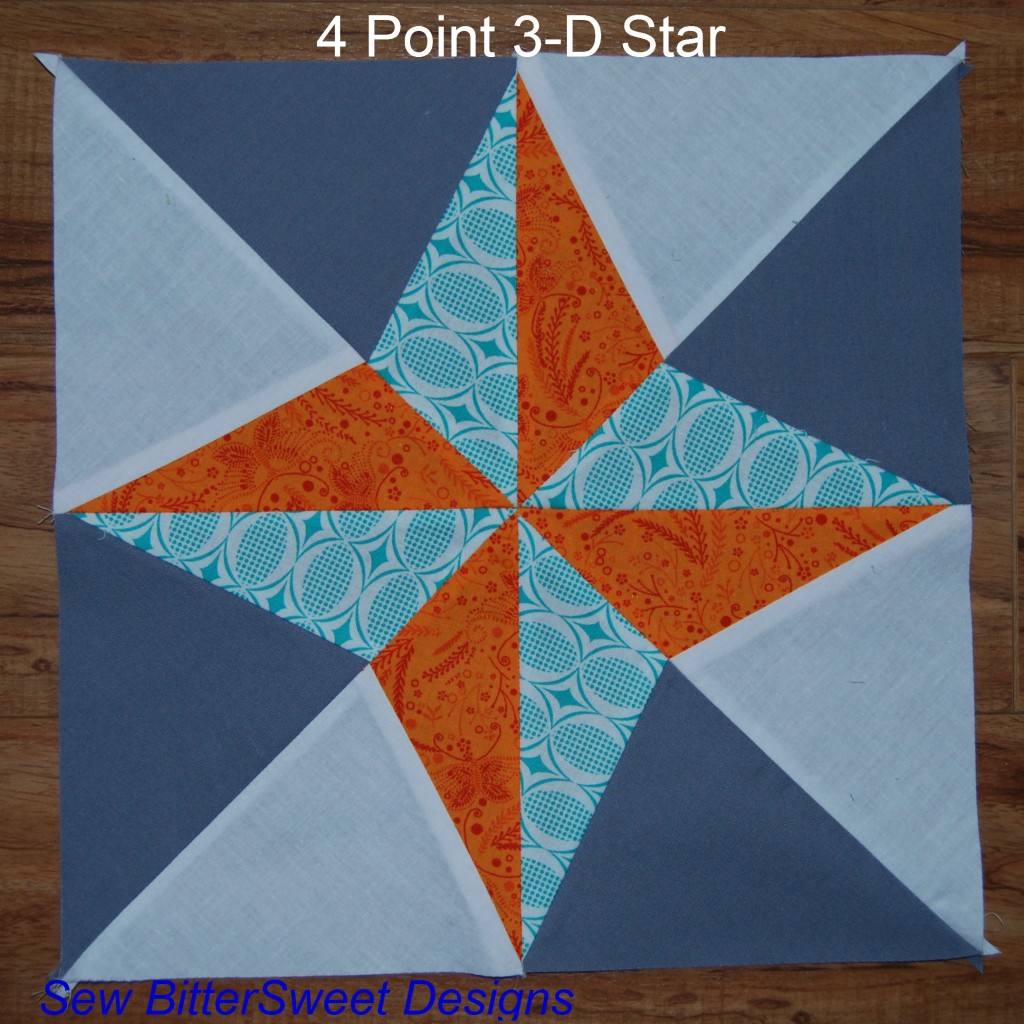
I joined the 3×6 Bee on Flickr this quarter and I said I would be open to any type of hive. I ended up in the paper piecing hive (hives immediately set in!!!). I have been wanting to improve my paper piecing (I’ve only done 4 blocks previously) and now I had no choice! I picked a block from the Encyclopedia of Pieced Quilt Blocks and drew it up in EQ7. I love how it turned out – it almost looks 3-dimensional.  I will have a tutorial up complete with cutting and sewing templates in the next couple of weeks.

What have you been up to? Did you get any sewing done over the long weekend?

Today I am off to the doctor to follow-up on some ongoing issues, so I won’t be around too much in the morning and later today the fridge repair company is coming back for the 4th time in an attempt to fix my ice maker! At this rate I hope to have ice by summer!


Valentine’s Day Showcase – Michele from Quilting Gallery

Welcome to Day 10 of the Valentine’s Day Showcase! We are wrapping things up with Michele from Quilting Gallery – she has a gorgeous wall hanging tutorial for all of us. I met Michele this summer when I submitted my Cobblestone Roads quilt to one of the weekly quilting contests that Michele hosts over on quilting gallery. Michele has been a wonderful friend the past few months and I’m so happy to feature her here!

What got you hooked on your craft of choice?

Initially, it was quilts in the local quilt store’s window that caught my eye and drew me into their store.  I was fascinated with the fabulous colours and the intricate designs. After a few years, I took a long hiatus from quilting to start my own business, but returned four years ago. Now, it is the fabulous blogs, tutorials, videos and most of all the friendships, that keep me hooked. Oh, and the lovely fabrics and colours that I get to play with every day.

What lights your crafting fire (ie. what keeps you crafting, why do you do it?)?

Ooops, I think I answered that above already.  I keep at it to challenge myself to be better, to learn new things, to experiment, to play and most of all to have FUN. Quilting feeds my soul and keeps me sane.

What is your favorite Valentine’s themed junk food?

Do jelly beans count?

Take it away Michele!


Hi everyone! Thanks so much to Melissa for organizing this super fun Valentine’s showcase party. I’m thrilled to be a part of it.

I’m Michele Foster and I own and manage the web site, Quilting Gallery. My site is dedicated to bringing quilters together from around the world and inspiring quilters’ creativity.

Quilting Gallery

It includes the quilting bloggers directory, quilt shop locator, quilter’s market and the quilt guilds directory. I host swaps, weekly quilt contests, challenges, guest bloggers and quilt-alongs too. I also have a brand new section that started this month called the Learning Center hosted by Pat Sloan. We are tackling Storage and Organization this month. I hope you’ll drop by for a visit.

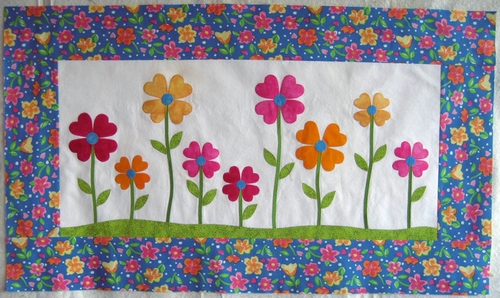
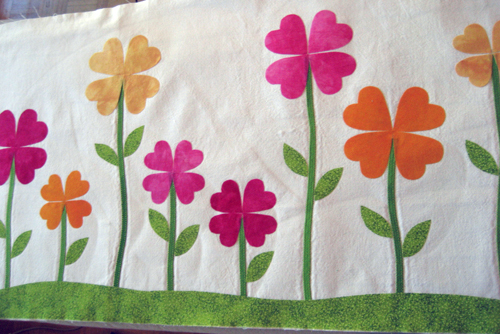
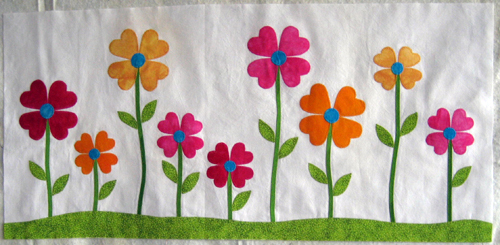
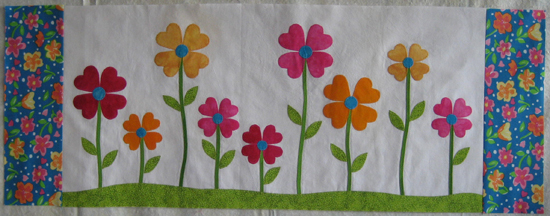
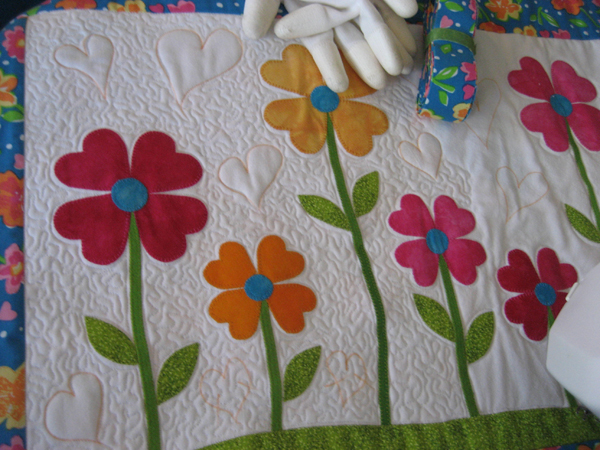
Here’s my Love-ly Garden wall hanging (or table runner) that I’ve created for you. It finishes at 22” x 38”.

love-ly-garden-border

As you can see, it’s not quilted or bound yet. My apologies, but a work crisis came up that I ended up having to deal with this weekend. Thankfully, I had the quilt top completed before.

Let’s get started…

Download a copy of this tutorial and the pattern templates.

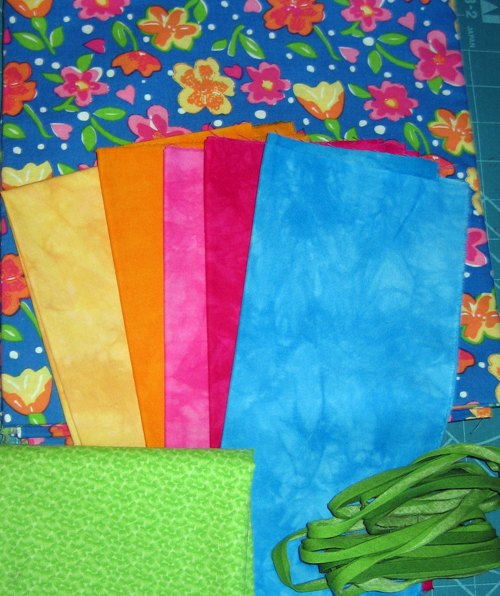
Love-ly Garden is a fusible appliqué quilt project. Choose a fabulous piece of fabric for your borders.. this will be your focus fabric. Pull coordinating colours from your focus fabric for your heart-shaped flower petals, centres, grass and leaves.

Requirements:

  • 14” x 30” solid for the background
  • 2 yards ¼”-wide green bias or ric-rac for stems
  • 2.5” x 30” green fabric for the grass
  • scraps of fabric that coordinate with your border for the flowers (heart petals & centres) and leaves
  • 25” x 40” focus fabric for the border and binding
  • 25” x 40”/42” piece backing fabric
  • 24” x 40” piece of batting
  • ½” yard fusible web
  • pattern templates (attached)
  • fabric glue stick (optional)

Note: Green fabric shown in the photo below was replaced with another piece.

Instructions:

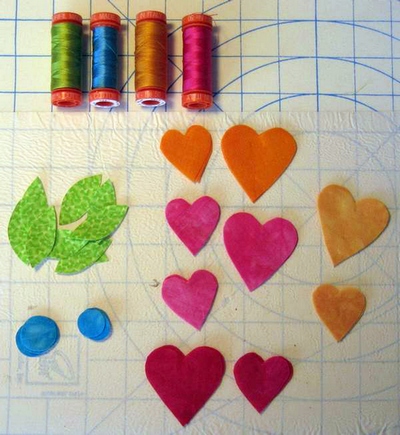
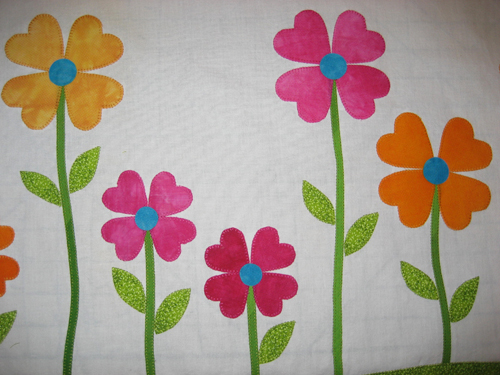
Using the templates in the download, trace the flower hearts, centres and leaves onto your fusible web.  Fuse to the back of your fabric scraps and cut out all of your shapes on the traced lines. I used 4 large and 5 small hearts and 15 leaves for my wall hanging.

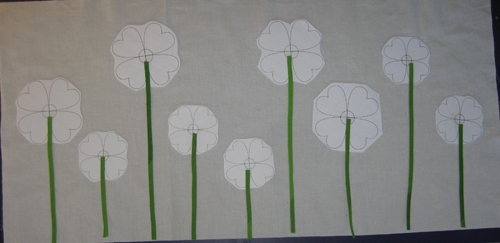
Using the last page in this file, print and roughly cut out the flower shapes. On your background fabric, place the paper flowers in a layout that is pleasing to you. Cut your bias stems (or ric rac) to the lengths needed.

Fuse, or apply with fabric glue, your bias strips to your background fabric. Add some gentle curves or waves when securing your strips for a more whimsical look. Attach the bias pieces to the background using a narrow blanket stitch.

For the grass, use  your rotary cutter to cut a gentle curve from your green fabric the length needed (~31”). You don’t need to have fusible web on this piece, but you can if you want.  I used a glue stick to attach the grass to my background fabric.

Add your flower petals and leaves to your background piece. Fuse in place.

Stitch around all petals and leaves and the along the top edge of the grass with a small blanket stitch. Fuse your flower centers and stitch with a small blanket stitch.

Stand back and admire your pretty garden.

From your border/binding fabric, cut 3 strips 4.5” wide and 4 strips 2.5” wide (or your preferred binding width).

If necessary, square up your background fabric so that it is even. It can become slightly distorted and frayed with all the handling while blanket stitching.

For the side borders, measure and cut two pieces from one of the 4.5” strips the height of your background fabric. Attach your side borders. Press toward the border pieces.
For the top and bottom borders, measure and trim to length the other two 4.5” strips.  Attach your top and bottom borders. Press toward the border pieces.

Layer your quilt top, batting and backing fabric. Baste using your favourite method. For the quilting, first I stitched in the ditch between the background and borders. Next, in free-motion mode, I outlined all of the applique shapes. Then I drew some random heart shapes in the white background. These shapes were stitched as I got to them while doing a close stipple in the background. I’m not sure yet what I’ll do for the border. Any ideas?

That’s a wrap!  I hope you have FUN making this love-ly wall hanging.  It’s been very cold here in Ottawa lately, so it was a pleasure to work on this springtime project and dream of the flowers that will soon return to us.

If you make the Love-ly wall hanging, please share the photo in my Flickr group or on Facebook. I’d love to see it.

Each week I host a themed quilting contest on Quilting Gallery. This week, we’re celebrating Today!, with the theme “Be My Valentine”. For this week, you can enter not just quilts, but anything made with fabric. The Fat Quarter Shop have donated a lovely jelly roll to this week’s winner.  Enter here!

weekly-themed-quilt-contests

Happy quilting!
Michele
Quilting Gallery

——————————————————————————————————-

Thank you so much Michele, and thank you to all of the wonderful ladies who contributed tutorials for the Valentine’s Day Showcase. Tomorrow the linky party will open for everyone to enter their wonderful Valentine’s Day projects. Remember, these do not necessarily have to be from one of the tutorials presented (although that would be fabulous!) and you don’t need to have a tutorial to go with them. I can’t wait to see what everyone else has made!

Happy Valentine’s Day!

NOTE: Don’t forget, I am one of the bloggers who is going to lose Google Friend Connect in March 2012, please take a moment and follow me via Bloglovin’, Facebook, RSS or networked blogs.  You are important to me and I want to be able to stay in contact with you!  Check my side bar for all the best ways to stay in touch after GFC goes bye bye!

Scroll to Top